Apache Hadoop can be installed on Ubuntu for local learning, HDFS testing, and running MapReduce examples in a single-node setup. Hadoop is written in Java, so the first requirement is a working Java installation. After that, Hadoop must be downloaded, extracted, configured through environment variables, and verified from the terminal.
This tutorial explains how to install Apache Hadoop on Ubuntu, what each installation step does, and how to avoid the common path and Java configuration issues that usually stop a first Hadoop setup.
Install Apache Hadoop on Ubuntu
Following is a step by step guide to Install Apache Hadoop on Ubuntu
Install Java on Ubuntu for Hadoop
Hadoop is an open-source framework written in Java. So, for Hadoop to run on your computer, you should install Java in prior.
Open a terminal and run the following command :
$ sudo apt-get install default-jdkTo verify the installation of Java, run the following command in the terminal :
$ java -versionThe output for the command would be as shown below.
hadoopuser@tutorialkart:~# java -version
openjdk version "1.8.0_131"
OpenJDK Runtime Environment (build 1.8.0_131-8u131-b11-0ubuntu1.16.04.2-b11)
OpenJDK 64-Bit Server VM (build 25.131-b11, mixed mode)
The exact Java version shown on your system may be different. That is normal. What matters is that the java -version command runs successfully and the Java version is supported by the Hadoop release you are installing.
On newer Ubuntu systems, you may also install a specific OpenJDK version when your Hadoop release requires it. For example:
sudo apt update
sudo apt install openjdk-11-jdk
To find the Java installation path used by Ubuntu, run:
readlink -f $(which java)The result usually ends with /bin/java. Use the directory before /bin/java as the base when setting JAVA_HOME. For example, if the command returns /usr/lib/jvm/java-11-openjdk-amd64/bin/java, then JAVA_HOME should be /usr/lib/jvm/java-11-openjdk-amd64.
Download Apache Hadoop Binary Package for Ubuntu
Download latest Hadoop binary package from http://hadoop.apache.org/releases.html.
Look for latest stable release (not in alpha channel) and click on binary link provided for the release.
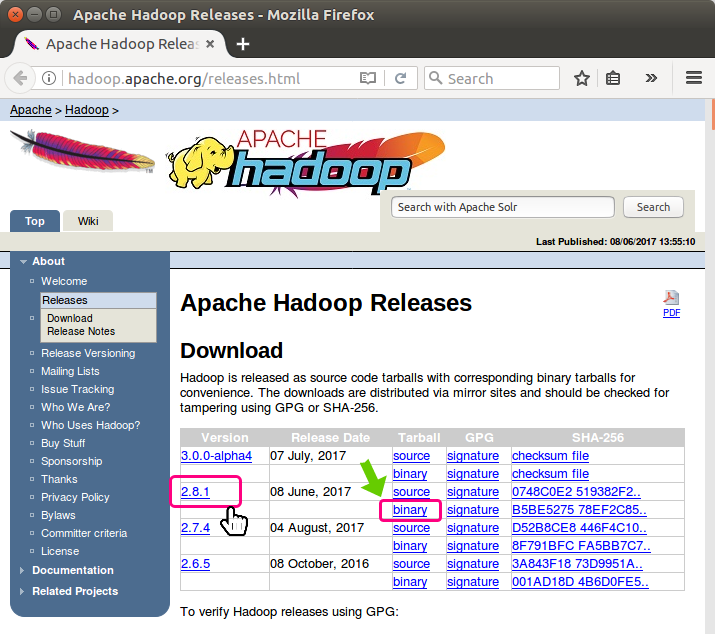
Click on the first mirror link
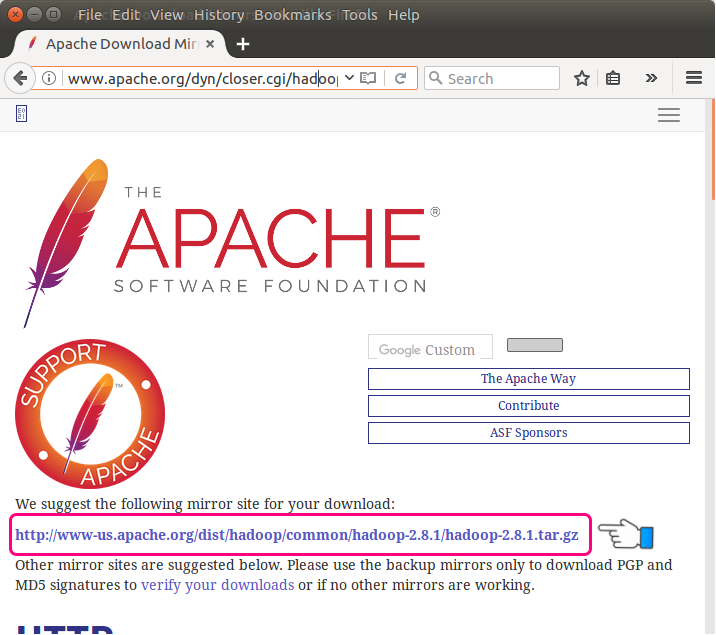
Copy the downloaded tar file to /usr/lib/ and untar.
$ sudo cp hadoop-2.8.1.tar.gz /usr/lib/
$ sudo tar zxf hadoop-2.8.1.tar.gz
$ sudo rm hadoop-2.8.1.tar.gz
Provide the password if asked.
The commands above use hadoop-2.8.1 because that was the release used when this tutorial was first written. If you download another Hadoop release, replace hadoop-2.8.1 with your actual extracted folder name in every path. For example, if your folder is hadoop-3.x.x, use that folder name consistently.
A common modern layout is to keep Hadoop under /usr/local/hadoop. The following commands show the same idea with a generic downloaded archive name. Replace the file name with the Hadoop archive you downloaded.
cd ~/Downloads
sudo tar -xzf hadoop-*.tar.gz -C /usr/local
sudo mv /usr/local/hadoop-* /usr/local/hadoop
sudo chown -R $USER:$USER /usr/local/hadoop
After extraction, check whether Hadoop files are available:
ls /usr/local/hadoopbin etc include lib libexec LICENSE.txt NOTICE.txt README.txt sbin shareSet Java and Hadoop Path on Ubuntu
Make sure you have the PATHs set up for Java and Hadoop in bashrc file.
Open a Terminal and run the following command to edit bashrc file.
$ sudo nano ~/.bashrcPaste the following entries at the end of .bashrc file.
#HADOOP VARIABLES START
export JAVA_HOME=/usr/lib/jvm/default-java/jre
export HADOOP_INSTALL=/usr/lib/hadoop-2.8.1
export PATH=$PATH:$HADOOP_INSTALL/bin
export PATH=$PATH:$HADOOP_INSTALL/sbin
export HADOOP_MAPRED_HOME=$HADOOP_INSTALL
export HADOOP_COMMON_HOME=$HADOOP_INSTALL
export HADOOP_HDFS_HOME=$HADOOP_INSTALL
export YARN_HOME=$HADOOP_INSTALL
export HADOOP_COMMON_LIB_NATIVE_DIR=$HADOOP_INSTALL/lib/native
export HADOOP_OPTS="-Djava.library.path=$HADOOP_INSTALL/lib"
#HADOOP VARIABLES END
If you installed Hadoop under /usr/local/hadoop, use the matching path in ~/.bashrc. Also set JAVA_HOME to the Java directory on your system, not blindly to a copied value from another machine.
# Hadoop environment variables
export JAVA_HOME=/usr/lib/jvm/java-11-openjdk-amd64
export HADOOP_HOME=/usr/local/hadoop
export HADOOP_INSTALL=$HADOOP_HOME
export HADOOP_MAPRED_HOME=$HADOOP_HOME
export HADOOP_COMMON_HOME=$HADOOP_HOME
export HADOOP_HDFS_HOME=$HADOOP_HOME
export YARN_HOME=$HADOOP_HOME
export HADOOP_COMMON_LIB_NATIVE_DIR=$HADOOP_HOME/lib/native
export PATH=$PATH:$HADOOP_HOME/bin:$HADOOP_HOME/sbin
Save the file and reload the shell configuration:
source ~/.bashrcThen verify the configured paths:
echo $JAVA_HOME
echo $HADOOP_HOME
which hadoop
Configure JAVA_HOME in hadoop-env.sh
Setting JAVA_HOME in ~/.bashrc makes Java available in your terminal session. Hadoop scripts also read Java settings from hadoop-env.sh. To avoid startup errors, set the same Java path there.
nano $HADOOP_HOME/etc/hadoop/hadoop-env.shAdd or update the following line with your actual Java path:
export JAVA_HOME=/usr/lib/jvm/java-11-openjdk-amd64If your Java path is different, replace the value after JAVA_HOME=. You can confirm the path by using readlink -f $(which java) as shown earlier.
Run Hadoop Command on Ubuntu
After setting up the path for Hadoop and Java, you may run the hadoop command, from anywhere, using the terminal.
$ hadoopThe output would be as shown below :
Usage: hadoop [--config confdir] [COMMAND | CLASSNAME]
  CLASSNAME            run the class named CLASSNAME
or
  where COMMAND is one of:
  fs                   run a generic filesystem user client
  version              print the version
  jar             run a jar file
                       note: please use "yarn jar" to launch
                             YARN applications, not this command.
  checknative [-a|-h] check native hadoop and compression libraries availability
  distcp   copy file or directories recursively
  archive -archiveName NAME -p  * create a hadoop archive
  classpath            prints the class path needed to get the
                       Hadoop jar and the required libraries
  credential           interact with credential providers
  daemonlog            get/set the log level for each daemon
  trace                view and modify Hadoop tracing settings

Most commands print help when invoked w/o parameters.
You can also verify the installed Hadoop version directly:
hadoop versionIf the version command prints Hadoop version details, your basic Hadoop installation and shell path are working.
Configure Hadoop on Ubuntu for Single-Node Pseudo-Distributed Mode
The installation steps above make the Hadoop command available. To run HDFS and MapReduce services locally, configure Hadoop in pseudo-distributed mode. In this mode, all Hadoop daemons run on the same Ubuntu machine, which is useful for learning and local testing.
Configure core-site.xml for Local HDFS NameNode
Open core-site.xml:
nano $HADOOP_HOME/etc/hadoop/core-site.xmlUse the following configuration inside the <configuration> element:
<configuration>
    <property>
        <name>fs.defaultFS</name>
        <value>hdfs://localhost:9000</value>
    </property>
</configuration>
This tells Hadoop clients to use the local HDFS NameNode running on localhost:9000.
Configure hdfs-site.xml for NameNode and DataNode Storage
Create local directories for HDFS metadata and data:
mkdir -p ~/hadoopdata/hdfs/namenode
mkdir -p ~/hadoopdata/hdfs/datanode
Open hdfs-site.xml:
nano $HADOOP_HOME/etc/hadoop/hdfs-site.xmlAdd the following configuration:
<configuration>
    <property>
        <name>dfs.replication</name>
        <value>1</value>
    </property>
    <property>
        <name>dfs.namenode.name.dir</name>
        <value>file:///home/USER/hadoopdata/hdfs/namenode</value>
    </property>
    <property>
        <name>dfs.datanode.data.dir</name>
        <value>file:///home/USER/hadoopdata/hdfs/datanode</value>
    </property>
</configuration>
Replace USER with your Ubuntu username. For example, if your home directory is /home/hadoopuser, use /home/hadoopuser/hadoopdata/hdfs/namenode and /home/hadoopuser/hadoopdata/hdfs/datanode.
Configure mapred-site.xml for YARN MapReduce
For Hadoop releases that include YARN, configure MapReduce to run on YARN. If the template file exists, copy it first:
cp $HADOOP_HOME/etc/hadoop/mapred-site.xml.template $HADOOP_HOME/etc/hadoop/mapred-site.xml 2>/dev/null || true
nano $HADOOP_HOME/etc/hadoop/mapred-site.xml
Add the following property:
<configuration>
    <property>
        <name>mapreduce.framework.name</name>
        <value>yarn</value>
    </property>
</configuration>
Configure yarn-site.xml for ResourceManager and NodeManager
Open yarn-site.xml:
nano $HADOOP_HOME/etc/hadoop/yarn-site.xmlAdd the following configuration:
<configuration>
    <property>
        <name>yarn.nodemanager.aux-services</name>
        <value>mapreduce_shuffle</value>
    </property>
</configuration>
Set Up SSH for Hadoop Single-Node Startup Scripts
Hadoop startup scripts use SSH to start local daemons. On a single-node Ubuntu setup, passwordless SSH to localhost is usually required.
sudo apt install openssh-server
ssh-keygen -t rsa -P "" -f ~/.ssh/id_rsa
cat ~/.ssh/id_rsa.pub >> ~/.ssh/authorized_keys
chmod 0600 ~/.ssh/authorized_keys
Test SSH to localhost:
ssh localhostIf it logs in without asking for your account password, type exit to return to your original shell.
Format HDFS and Start Hadoop Services on Ubuntu
Format the HDFS NameNode only when creating a fresh Hadoop setup. Do not repeatedly format an existing NameNode unless you intentionally want to erase the local HDFS metadata.
hdfs namenode -formatStart HDFS services:
start-dfs.shStart YARN services:
start-yarn.shCheck the running Java daemons:
jpsOn a working single-node Hadoop setup, you should see processes such as NameNode, DataNode, SecondaryNameNode, ResourceManager, and NodeManager. The exact list depends on your Hadoop version and configuration.
NameNode
DataNode
SecondaryNameNode
ResourceManager
NodeManager
Jps
Verify Hadoop Installation with HDFS Commands
After the Hadoop services are running, create a directory in HDFS and list it:
hdfs dfs -mkdir -p /user/$USER
hdfs dfs -ls /user
Create a local test file and upload it to HDFS:
echo "Apache Hadoop on Ubuntu" > sample.txt
hdfs dfs -put sample.txt /user/$USER/
hdfs dfs -cat /user/$USER/sample.txt
Apache Hadoop on UbuntuIf this command prints the file content from HDFS, the local Hadoop filesystem is working.
Common Hadoop Installation Errors on Ubuntu
| Problem | Likely cause | What to check |
|---|---|---|
hadoop: command not found | Hadoop bin directory is not in PATH | Check ~/.bashrc, run source ~/.bashrc, and verify which hadoop. |
JAVA_HOME is not set | Java path is missing or wrong | Set JAVA_HOME in both ~/.bashrc and hadoop-env.sh. |
Password prompt during start-dfs.sh | Passwordless SSH to localhost is not configured | Generate SSH keys and add the public key to ~/.ssh/authorized_keys. |
NameNode not shown in jps | NameNode format or HDFS configuration failed | Check core-site.xml, hdfs-site.xml, and Hadoop logs. |
| Output directory already exists in a MapReduce job | Hadoop does not overwrite job output directories by default | Delete or change the HDFS output path before rerunning the job. |
Stop Hadoop Services on Ubuntu
When you are done testing, stop YARN and HDFS services:
stop-yarn.sh
stop-dfs.sh
Run jps again to confirm that Hadoop daemons have stopped.
Apache Hadoop on Ubuntu FAQ
How do I install Apache Hadoop on Ubuntu?
Install Java, download the Hadoop binary package from the Apache Hadoop releases page, extract it to a directory such as /usr/local/hadoop, set JAVA_HOME and HADOOP_HOME, update PATH, configure Hadoop XML files, format HDFS, and start the Hadoop services.
Which Java version should I use for Hadoop on Ubuntu?
Use a Java version supported by the Hadoop release you are installing. Older Hadoop tutorials often use Java 8, while newer Hadoop releases may support newer OpenJDK versions. Always check the Hadoop release documentation and set JAVA_HOME to the actual Java path on your Ubuntu system.
Can I install Hadoop on Ubuntu without a cluster?
Yes. For learning and local testing, you can install Hadoop in pseudo-distributed mode on a single Ubuntu machine. In this setup, NameNode, DataNode, ResourceManager, and NodeManager run on the same computer.
Why does Hadoop ask for an SSH password on localhost?
Hadoop startup scripts use SSH to start daemons. If passwordless SSH is not configured for localhost, Ubuntu asks for a password. Generate an SSH key and add the public key to ~/.ssh/authorized_keys to fix this for a local setup.
How can I verify that Hadoop is installed correctly on Ubuntu?
Run hadoop version to verify the command path, start HDFS and YARN, run jps to check Hadoop daemons, and use hdfs dfs commands to create, upload, list, and read a test file from HDFS.
Editorial QA Checklist for This Hadoop Ubuntu Installation Guide
- Confirm that Java installation and
JAVA_HOMEsetup are explained before Hadoop commands are used. - Verify that the Hadoop archive name and installation directory are consistent in the commands used by the reader.
- Check that existing
hadoop-2.8.1examples are treated as historical examples and not presented as the only valid release. - Make sure pseudo-distributed mode steps include
core-site.xml,hdfs-site.xml,mapred-site.xml, andyarn-site.xml. - Confirm that verification steps include
hadoop version,jps, and basichdfs dfscommands.
Conclusion: Hadoop Installation on Ubuntu
In this Apache Hadoop Tutorial, we have successfully installed Hadoop on Ubuntu. In subsequent tutorials, we shall look into HDFS and MapReduce and start with Word Count Example in Hadoop.
You also learned how to set Hadoop environment variables, configure Java for Hadoop scripts, prepare a single-node HDFS setup, start Hadoop services, and verify the installation with practical HDFS commands. These steps give you a working local Hadoop environment for learning HDFS, YARN, and MapReduce examples on Ubuntu.