In this OpenCV tutorial, we learn how to install OpenCV with Anaconda using conda-forge or pip, create a separate Anaconda environment, verify the cv2 installation, and run a simple Python program to read and display an image.
Install OpenCV Python with Anaconda
Anaconda is useful for managing Python packages and separate project environments. If you have anaconda installed, working with OpenCV becomes easier. You may follow: Install Anaconda tutorial if Anaconda is not installed yet.
OpenCV can be installed in an Anaconda environment in two common ways: using conda from the conda-forge channel, or using pip with the opencv-python package. The package name is usually opencv or opencv-python, but the Python import name is cv2.
Recommended Anaconda environment for OpenCV Python
It is better to install OpenCV in a separate Anaconda environment instead of installing it directly into the base environment. This keeps OpenCV, NumPy, Jupyter, and other dependencies isolated for one project.
conda create -n opencv-env python=3.11
conda activate opencv-env
After activating the environment, install OpenCV using either the conda method or the pip method. Avoid mixing both methods in the same environment unless you know why you need to do it.
Install OpenCV in Anaconda using conda-forge
The conda-forge channel is a practical choice when you want OpenCV and its compiled dependencies handled by conda. This method is commonly used for Anaconda and Miniconda environments.
conda install -c conda-forge opencvYou can also use the fully qualified conda-forge package name.
conda install conda-forge::opencvOnce installation completes, verify that Python can import cv2 from the active environment.
python -c "import cv2; print(cv2.__version__)"Install OpenCV in Anaconda using pip
To install OpenCV Python with Anaconda, use following pip command.
$ pip install opencv-pythonWhen using pip inside Anaconda, run pip through the same Python interpreter that belongs to the active conda environment. This reduces the chance of installing OpenCV into the wrong Python environment.
conda activate opencv-env
python -m pip install --upgrade pip
python -m pip install opencv-python
If you are working on a server, Docker container, or notebook environment where GUI windows are not needed, use the headless package instead.
python -m pip install opencv-python-headlessUse only one OpenCV Python package in one environment. For example, avoid installing both opencv-python and opencv-python-headless together unless you are intentionally resolving a specific dependency issue.
Older pip installation output for OpenCV Python in Anaconda
Console Output
$ pip install opencv-python
Collecting opencv-python
  Downloading opencv_python-3.4.0.12-cp36-cp36m-manylinux1_x86_64.whl (24.9MB)
    100% |????????????????????????????????| 24.9MB 35kB/s
Requirement already satisfied: numpy>=1.11.3 in /usr/lib/anaconda3/lib/python3.6/site-packages (from opencv-python)
Installing collected packages: opencv-python
Successfully installed opencv-python-3.4.0.12
OpenCV package for Python is successfully installed.
Check whether OpenCV is installed in the active Anaconda environment
Before running a full image example, confirm that the active environment and OpenCV package are the ones you expect. This is helpful when you have multiple Python installations, multiple conda environments, or Jupyter kernels.
conda info --envs
which python
python -c "import cv2; print(cv2.__file__); print(cv2.__version__)"
On Windows, use the following command to check the Python path in the active Anaconda Prompt.
where pythonIf the path points to the environment where you installed OpenCV, the setup is consistent.
Verify OpenCV Anaconda installation by displaying an image
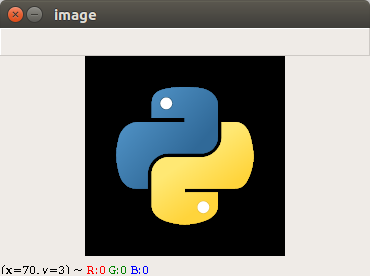
Following is a simple program to verify the OpenCV Python package. We shall use methods of cv2 to read and display an image.
Python Program
import cv2

img = cv2.imread('/home/img/python.png')

cv2.imshow('image',img)
cv2.waitKey(0)
cv2.destroyAllWindows()
When you run the above example, the following image would be displayed in a separate window.
If the image window does not appear, check whether you are running the program on a desktop environment. The function cv2.imshow() needs GUI support. In Jupyter Notebook, JupyterLab, remote servers, and headless systems, use Matplotlib or save the image to a file instead.
Test OpenCV in Anaconda without a GUI window
The following example is useful for notebooks and servers because it reads an image, checks whether the file was loaded, and saves a grayscale output image without opening a separate display window.
import cv2

img = cv2.imread("python.png")

if img is None:
    raise FileNotFoundError("Image file was not found or could not be read.")

gray = cv2.cvtColor(img, cv2.COLOR_BGR2GRAY)
cv2.imwrite("python-gray.png", gray)

print("OpenCV test completed successfully.")
This program also shows an important habit: always check whether cv2.imread() returned a valid image before processing it. If the path is wrong, OpenCV may return None instead of raising an immediate file error.
Use OpenCV inside Jupyter Notebook from Anaconda
If you want to use OpenCV from Jupyter Notebook, install Jupyter into the same conda environment or register the environment as a kernel. This helps Jupyter use the same Python environment where cv2 is installed.
conda activate opencv-env
conda install -c conda-forge notebook ipykernel
python -m ipykernel install --user --name opencv-env --display-name "Python (opencv-env)"
After launching Jupyter, select the Python (opencv-env) kernel for notebooks that use OpenCV.
Fix common OpenCV Anaconda installation issues
ModuleNotFoundError: No module named cv2 in Anaconda
This usually means OpenCV was installed in a different environment from the one running your code. Activate the correct environment and verify the Python path.
conda activate opencv-env
python -c "import sys; print(sys.executable)"
python -c "import cv2; print(cv2.__version__)"
pip install cv2 does not work in Anaconda
The package name is not cv2. Use opencv-python with pip, or use opencv from conda-forge. In Python code, you still import the module as cv2.
python -m pip install opencv-pythoncv2.imshow does not display an image in Jupyter Notebook
cv2.imshow() is meant for desktop GUI windows and is not the best display method inside notebooks. In a notebook, either save the processed image with cv2.imwrite() or convert BGR to RGB and display it with Matplotlib.
import cv2
import matplotlib.pyplot as plt

img = cv2.imread("python.png")
rgb = cv2.cvtColor(img, cv2.COLOR_BGR2RGB)

plt.imshow(rgb)
plt.axis("off")
plt.show()
FAQs on installing OpenCV with Anaconda
How do I install OpenCV in Anaconda Python?
Create and activate a conda environment, then run conda install -c conda-forge opencv. You can also install with pip using python -m pip install opencv-python from the active Anaconda environment.
Should I use conda install opencv or pip install opencv-python?
Use conda install -c conda-forge opencv when you want conda to manage compiled dependencies inside an Anaconda environment. Use pip install opencv-python when your project mainly uses pip packages or a virtual environment managed through pip.
Why do I import cv2 after installing opencv-python?
opencv-python is the distribution package name used by pip. The actual Python module provided by OpenCV is named cv2, so OpenCV programs start with import cv2.
How do I check the OpenCV version in Anaconda?
Activate the Anaconda environment and run python -c "import cv2; print(cv2.__version__)". This prints the OpenCV version available to that environment’s Python interpreter.
Can I use OpenCV in Jupyter Notebook installed with Anaconda?
Yes. Install OpenCV and Jupyter in the same conda environment, or register that environment as a Jupyter kernel with ipykernel. Then select that kernel before importing cv2 in the notebook.
Conclusion on OpenCV Anaconda setup
In this Python OpenCV Tutorial, we learned how to install OpenCV with Anaconda using conda-forge and pip, verify the cv2 module, display an image, and handle common environment-related installation issues.
Editorial QA checklist for OpenCV Anaconda installation tutorial
- Confirm that the tutorial explains both
conda install -c conda-forge opencvandpython -m pip install opencv-pythonwithout mixing them carelessly. - Check that every new command-line example uses the
language-bashPrismJS class. - Keep the existing OpenCV display image and its original link unchanged.
- Verify that the page clearly explains the difference between the package name
opencv-pythonand the import namecv2. - Make sure the Jupyter Notebook guidance mentions selecting the correct Anaconda environment kernel.