In this OpenCV Python tutorial, you will learn how to read an image from disk with cv2.imread() and display it in a window with cv2.imshow().
OpenCV Python Read and Display Image
Reading and displaying images is one of the first steps in many OpenCV Python programs. Before you process an image, detect objects, crop a region, resize it, or apply filters, you usually need to load the image into memory and verify that it has been read correctly.
OpenCV provides two commonly used functions for this task:
cv2.imread()reads an image file and returns it as a NumPy array.cv2.imshow()displays that image array in a separate window.
A basic OpenCV image display program also needs cv2.waitKey(), because the image window closes immediately if the script ends without waiting for a key press.
Install OpenCV Python Before Reading Images
If OpenCV is not installed in your Python environment, install it using pip. In most desktop Python environments, the following package is enough for reading and displaying images.
pip install opencv-pythonAfter installation, import OpenCV in Python using the module name cv2.
import cv2Syntax of cv2.imread()
The syntax of imread() function is
cv2.imread(/complete/path/to/image,flag)First argument is complete path to the image along with the extension.
Second argument is an optional flag which could be any one of the following.
- cv2.IMREAD_COLOR : Loads a color image. Any transparency of image will be neglected. It is the default flag.
- cv2.IMREAD_GRAYSCALE : Loads image in grayscale mode
- cv2.IMREAD_UNCHANGED : Loads image as such including alpha channel
Returns numpy array, containing the pixel values. For colored images, each pixel is represented as an array containing Red, Green and Blue channels.
Note that the default flag is cv2.IMREAD_COLOR. Hence even if read a png image with transparency, the transparency channel is neglected.
In OpenCV, a color image is read in BGR channel order, not RGB channel order. This is important when you later display the same image with libraries such as Matplotlib, because Matplotlib expects RGB order.
Check Whether cv2.imread() Read the Image Successfully
If the image path is wrong, the file does not exist, or the image format cannot be decoded, cv2.imread() returns None. It is good practice to check this before calling cv2.imshow().
import cv2

image_path = '/home/img/python.png'
img = cv2.imread(image_path)

if img is None:
    print('Could not read image:', image_path)
else:
    print('Image shape:', img.shape)
For a color image, img.shape usually returns height, width, and number of channels. For a grayscale image, it usually returns only height and width.
Image shape: (512, 512, 3)Syntax of cv2.imshow()
cv2.imshow(window_name, image)First argument is name of the window that is displayed when image is shown in.
Second argument is the image to be shown in the window.
cv2.imshow() is intended for desktop environments where OpenCV can create a GUI window. In headless environments such as many servers, containers, or some online notebooks, the window may not open. In such cases, save the image using cv2.imwrite() or display it with notebook-friendly plotting tools.
OpenCV Python Example to Read and Display an Image
In the following Python program, we read an image at the location '/home/img/python.png', and then display the image in a separate window.
Python Program
import cv2

img = cv2.imread('/home/img/python.png')

cv2.imshow('sample image',img)

cv2.waitKey(0) # waits until a key is pressed
cv2.destroyAllWindows() # destroys the window showing image
When above program is run, an image is shown in another window named ‘sample image’, as specified in the arguments of imshow().
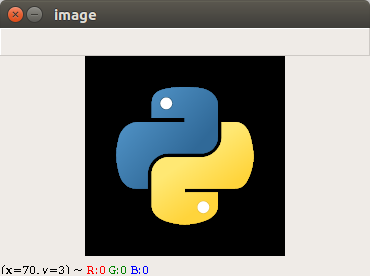
Right click on image in the window shows options for various operations out of which some are zoom-in, zoom-out etc.

Read an OpenCV Image in Grayscale Mode
To read an image directly as grayscale, pass cv2.IMREAD_GRAYSCALE as the second argument to cv2.imread(). This is useful when your processing step does not require color information.
import cv2

img = cv2.imread('/home/img/python.png', cv2.IMREAD_GRAYSCALE)

if img is None:
    print('Image not found or could not be read')
else:
    cv2.imshow('grayscale image', img)
    cv2.waitKey(0)
    cv2.destroyAllWindows()
A grayscale image has only one channel, so its NumPy array shape is different from a color image.
Read a PNG Image with Transparency in OpenCV Python
If you want to preserve the alpha channel of a PNG image, use cv2.IMREAD_UNCHANGED. Without this flag, OpenCV reads the image as a normal color image and ignores transparency.
import cv2

img = cv2.imread('/home/img/logo.png', cv2.IMREAD_UNCHANGED)

if img is None:
    print('Image not found or could not be read')
else:
    print('Image shape:', img.shape)
For a PNG image with transparency, the shape may show four channels. In OpenCV, these channels are usually Blue, Green, Red, and Alpha.
Use a Relative Image Path in OpenCV Python
You do not always need to pass an absolute path. If the image is in the same folder as your Python script, you can use a relative path. This keeps examples easier to move between systems.
import cv2

img = cv2.imread('python.png')

if img is None:
    print('Check the image filename and current working directory')
else:
    cv2.imshow('relative path image', img)
    cv2.waitKey(0)
    cv2.destroyAllWindows()
If a relative path does not work, print the current working directory and confirm that the image file is present there.
import os

print(os.getcwd())
Common cv2.imshow() and cv2.imread() Errors
The following issues are common when reading and displaying images in OpenCV Python.
| Problem | Likely cause | Fix |
|---|---|---|
img is None | Wrong path, wrong filename, missing extension, or unreadable file | Check the full path and use an if img is None condition |
| Image window opens and closes immediately | The script finishes without waiting | Call cv2.waitKey(0) after cv2.imshow() |
| Colors look different in Matplotlib | OpenCV uses BGR, while Matplotlib expects RGB | Convert with cv2.cvtColor(img, cv2.COLOR_BGR2RGB) |
| Transparency is missing | Image was read with the default color flag | Use cv2.IMREAD_UNCHANGED for images with alpha channel |
| Display window does not appear | The code is running in a headless or notebook environment | Use a desktop Python environment or display the image with notebook tools |
OpenCV Python Read and Display Image Program with Error Handling
The following version is safer for regular use because it checks whether the image was loaded before trying to display it.
import cv2

image_path = '/home/img/python.png'
img = cv2.imread(image_path)

if img is None:
    print(f'Unable to read image: {image_path}')
else:
    cv2.imshow('sample image', img)
    cv2.waitKey(0)
    cv2.destroyAllWindows()
This structure prevents errors that happen when cv2.imshow() receives an empty image. It also makes path-related problems easier to debug.
QA Checklist for OpenCV Python Image Display Tutorial
- Confirm that the image path in every
cv2.imread()example includes the correct file name and extension. - Check that every
cv2.imshow()example includescv2.waitKey()beforecv2.destroyAllWindows(). - Verify that the tutorial explains what happens when
cv2.imread()returnsNone. - Confirm that BGR channel order is mentioned for OpenCV color images.
- Check that grayscale and transparent PNG examples use the correct
imreadflags.
FAQs on Reading and Displaying Images in OpenCV Python
Why does cv2.imread() return None in Python?
cv2.imread() usually returns None when the image path is wrong, the file name is misspelled, the extension is missing, or the file cannot be decoded as an image. Check the path first, then add an if img is None condition before using the image.
Why is cv2.waitKey(0) used after cv2.imshow()?
cv2.waitKey(0) keeps the OpenCV image window open until a key is pressed. Without it, the script may finish immediately and the display window may close before you can view the image.
Does OpenCV read images in RGB format?
No. OpenCV reads color images in BGR format by default. If you need RGB format, convert the image using cv2.cvtColor(img, cv2.COLOR_BGR2RGB).
How do I display a grayscale image using OpenCV Python?
Read the image using cv2.imread(image_path, cv2.IMREAD_GRAYSCALE), then pass the returned image array to cv2.imshow(). The displayed image will have one channel instead of three color channels.
Can cv2.imshow() be used in Jupyter Notebook?
cv2.imshow() is designed for GUI windows and may not work well in many notebook or headless environments. In notebooks, it is usually better to display images with notebook-compatible plotting methods after converting BGR images to RGB when required.
Conclusion
In this OpenCV Python Tutorial, we have learnt how to read and display an image using OpenCV library. Use cv2.imread() to load the image, check that the returned value is not None, show it with cv2.imshow(), keep the window open with cv2.waitKey(), and close the window using cv2.destroyAllWindows().