How to create a new Lead in Microsoft Dynamics 365 Sales
In this Dynamics 365 Training tutorial, you will learn how to create a new lead in Microsoft Dynamics 365 for Sales. A lead is usually the first sales record created when a person or company shows interest in your products or services, but is not yet qualified as a real sales opportunity.
Before creating a lead in Dynamics 365 Sales, it is useful to understand what a lead represents, which fields should be completed, and what happens after the lead is saved or qualified. The exact form layout can vary based on your organization configuration, but the basic lead creation process is the same in the Sales Hub app.
What is a lead in Microsoft Dynamics CRM?
A lead in Microsoft Dynamics 365 Sales is an unqualified prospect. It can represent a person, a company, or both. Leads are not customers yet. They are records used by the sales team to capture early interest, track follow-up activity, and decide whether the prospect should become an opportunity, contact, or account.
Leads are converted to customers when they become qualified. If a lead is not suitable for further sales activity, it can be disqualified and kept as an inactive lead record for reporting and history.
Although you can create accounts and contacts directly in Microsoft Dynamics 365, entering leads first helps your sales team manage the early sales process more clearly.
- Track which new prospects are interested in your products or services.
- Record how salespeople are contacting and developing new prospects.
- Apply qualification criteria before creating opportunities, accounts, or contacts.
- Measure lead sources such as website forms, campaigns, referrals, events, and imports.
When should you create a lead instead of an account or contact?
Create a lead when the person or company has shown interest, but your team has not yet confirmed budget, need, authority, timeline, or sales fit. Create an account or contact directly only when you already know the organization or person is a real customer, partner, supplier, or qualified business relationship.
| Record type | Use it when |
|---|---|
| Lead | The prospect is new, unqualified, or still being evaluated. |
| Contact | The person is already known and should be stored as an individual business contact. |
| Account | The company or organization is already confirmed as a business relationship. |
| Opportunity | There is a qualified sales deal with estimated revenue, close date, and sales stage. |
How to create a Lead in Microsoft Dynamics 365 for Sales
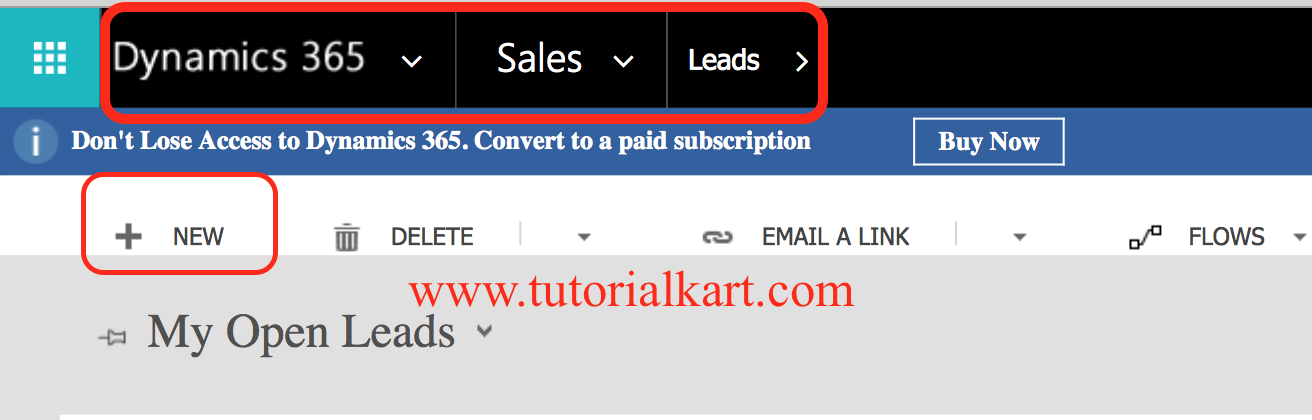
To create a new lead in Microsoft Dynamics 365 Sales, sign in with your username and password. Open the Sales Hub or Sales app, then go to Sales | Leads. In some older environments, the navigation may appear as Dynamics 365 | Sales | Leads.
- Click the New button on the command bar to create a new lead.
Lead form sections in Dynamics 365 Sales
When creating leads in Microsoft Dynamics 365 for Sales, the lead form commonly contains sections such as Summary and Details. Your administrator may add, remove, rename, or require fields based on your business process.
- Summary Section contains details such as contact information, company name, topic, job title, email, phone, and website.
- Details section contains details such as lead description, industry, preferred contact method, source campaign, rating, and marketing information.
In the Summary section, Topic and Name are commonly required fields. If your organization has customized the lead table, additional fields may also be required before you can save the record.
- Topic: Describe what the lead is about, such as the product, service, requirement, or inquiry.
- Name: Enter the first name and last name of the person associated with the lead.
- Company: Enter the company name when the lead is related to a business organization.
- Email and Phone: Add at least one reliable contact method so the salesperson can follow up.

Recommended lead details to enter before saving
A lead with only a name and topic may technically save, but it is not very useful for sales follow-up. Add enough information for the owner to understand the prospect, contact them, and decide the next action.
- Enter a clear lead description, including the product or service requested.
- Select the industry if it helps with segmentation or routing.
- Choose the preferred contact method, such as email, phone, or appointment.
- Record the lead source, such as website form, phone inquiry, event, referral, advertisement, or campaign.
- Assign the lead owner if the record should be worked by a specific salesperson or team.
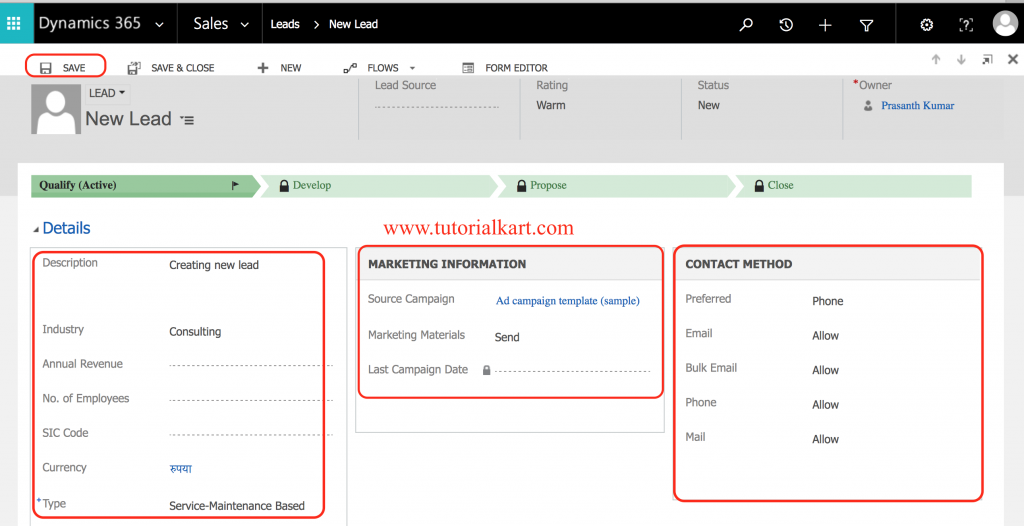
Save the new lead record in Dynamics 365 Sales
After entering the required lead information, click Save. You can also use Save & Close if you want to return to the lead list after saving. If any required field is missing, Dynamics 365 Sales displays a validation message and highlights the field that must be completed.
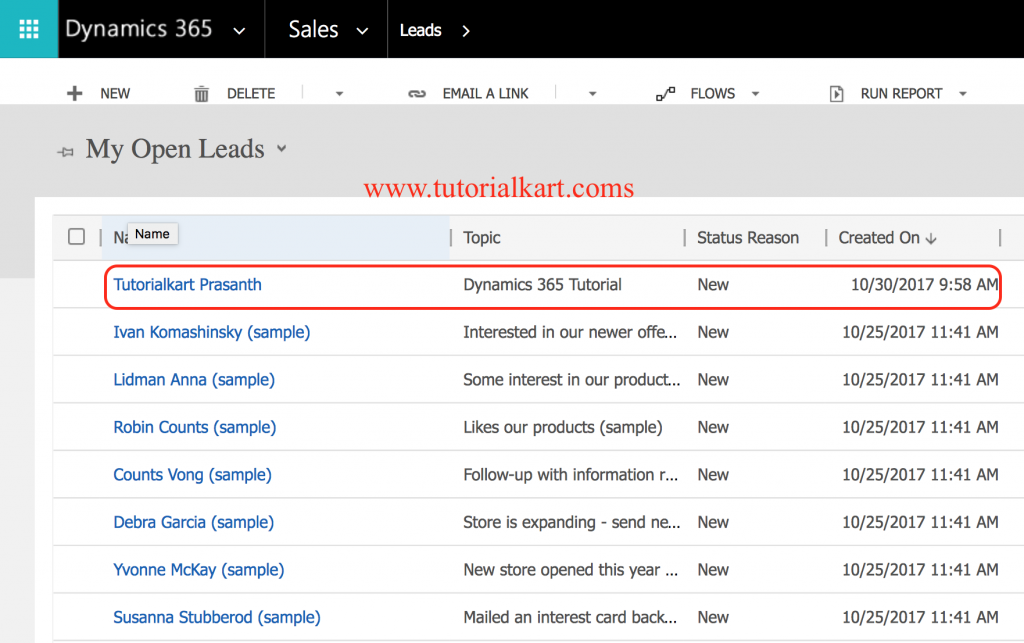
Now the lead is successfully created. Navigate back to Leads to view all lead records in your organization. You can open the lead later to add activities, update qualification information, assign the record, or move it through the sales process.
What happens after a lead is created?
After a lead is created, the sales user normally contacts the prospect, adds notes or activities, and decides whether the lead should be qualified or disqualified. When a lead is qualified, Dynamics 365 Sales can create or link related records such as an opportunity, account, and contact, depending on your organization configuration and lead qualification settings.
- Qualify the lead when the prospect is a valid sales opportunity.
- Disqualify the lead when the prospect is not a fit, is not interested, is a duplicate, or cannot be contacted.
- Reactivate an inactive lead only if your business process allows the prospect to be worked again.
For current product behavior, Microsoft provides official guidance on creating and editing leads in Dynamics 365 Sales and on the lead qualification experience.
Common mistakes while creating leads in Dynamics 365 Sales
- Using vague topics: A topic such as “New inquiry” is less useful than “Website inquiry for field service software”.
- Missing contact details: Leads without email, phone, or company information are harder to follow up.
- Skipping lead source: Without source data, reports cannot show which campaigns or channels are producing useful leads.
- Creating duplicate leads: Search for an existing lead, contact, or account before creating a new record if duplicate detection is not enforced.
- Qualifying too early: Qualify only after the sales team confirms that the prospect should become a real opportunity.
FAQ about creating leads in Microsoft Dynamics 365 Sales
What is a lead in Microsoft Dynamics 365 Sales?
A lead is an unqualified prospect who has shown interest in your products or services. It is used to capture early sales information before deciding whether to create an opportunity, account, or contact.
How do I create a new lead in Dynamics 365 Sales?
Open the Sales Hub app, go to Sales | Leads, select New, enter the required lead fields such as Topic and Name, add useful contact and company details, and then click Save.
Which fields are required when creating a lead?
Topic and Name are commonly required on the standard lead form. Your organization may require more fields, such as company, lead source, owner, email, or phone, based on custom business rules.
What happens when a lead is qualified in Dynamics 365?
When a lead is qualified, Dynamics 365 Sales can create or associate related sales records such as an opportunity, account, and contact. The exact result depends on your lead qualification configuration.
Can leads be created from website forms or imports?
Yes. Leads can be created manually, imported from files, generated from campaigns, or created through integrations such as website forms and automation tools, depending on how your Dynamics 365 environment is configured.
QA checklist for this Dynamics 365 lead creation tutorial
- Confirm that the tutorial uses the current app name, Dynamics 365 Sales, while still helping users on older navigation screens.
- Verify that the lead creation path points users to Sales | Leads | New.
- Check that Topic, Name, contact details, company information, and lead source are explained clearly.
- Ensure the tutorial distinguishes leads from accounts, contacts, and opportunities.
- Review the qualification explanation so it does not assume the same configuration for every Dynamics 365 organization.