What is Site map Designer in Dynamics 365?
Site map Designer in Dynamics 365 is a visual editor used to configure the navigation of a Dynamics 365 or model-driven app. A site map controls what users see in the app navigation, such as areas, groups, and subareas. Instead of editing XML manually, administrators and app makers can use the tile-based designer to add, arrange, configure, preview, save, and publish navigation components.
In Dynamics 365, the site map is not just a menu. It decides how users move between entities, dashboards, web resources, external URLs, and other app components. A well-planned site map keeps related records together and helps users open the correct part of the application quickly.
Using site map designer in Dynamics 365, we can also define the area, subarea, or group titles in the languages supported by Microsoft Dynamics 365.
Dynamics 365 site map structure: Area, Group, and Subarea
A Dynamics 365 site map is built using three main navigation levels. Understanding these levels makes it easier to design the app menu correctly before editing it.
- Area: The top-level navigation section. Examples include Sales, Service, Settings, or a custom business area.
- Group: A container inside an area. Groups organize related subareas together, such as Customers, Transactions, Configuration, or Custom Entities.
- Subarea: The actual navigation item users click. A subarea can point to an entity, dashboard, web resource, URL, or another supported component.
For example, an app can have an area named TutorialKart, a group named Custom Entities, and a subarea that opens a custom entity named Dynamics 365.
- By default, a site map for the Dynamics 365 – custom app is already available.
- You can edit this site map or configure site maps for new apps by using the site map designer.
What can you do with Site map Designer in Dynamics 365?
Using Site map designer we perform the following actions in Dynamics 365
- Can create a Site map for a custom application.
- Can edit the default site map.
- We can add and delete area, group and subarea to a group in the site map.
- Can organize area, groups and subareas.
- We can clone a component.
- Can configure navigation labels, entity selection, icons, and display options.
- Can validate the site map before publishing changes.
- Can preview the navigation structure before users see it in the app.
Administrators usually use the site map designer when a new custom entity must appear in the app menu, when an unused navigation item should be removed, or when the app needs a cleaner structure for a specific business process.
Before editing a Dynamics 365 site map
Before you edit a site map in Dynamics 365, check the following points.
- Use a solution for customizations so that changes can be moved between environments.
- Make sure the custom entity, dashboard, or component already exists before adding it as a subarea.
- Confirm that users have the required security roles to access the entity or component. Adding an item to the site map does not automatically give access to the underlying data.
- Plan the area and group names before publishing, especially if the app is used by many users.
- Test the navigation with a non-administrator user role after publishing.
The screenshots in this tutorial show the classic Dynamics 365 customization experience. In newer model-driven apps, the same idea applies through the app designer or Power Apps maker experience, where the app navigation or site map can be edited for a specific model-driven app.
How to edit a site map designer in Dynamics 365?
- To edit a site map in Dynamics 365, navigate to Settings | Customizations| Solutions.
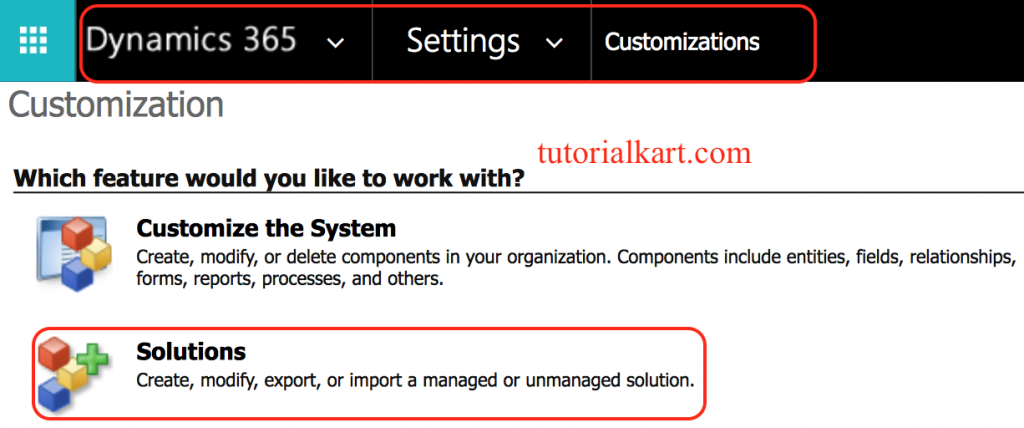
Open the solution where your customizations are stored. Using a solution is recommended because it keeps the site map change together with related components such as custom entities, forms, views, and dashboards.
- Click on tutorialkart Solution |Client extensions | Add existing | Site map.
- Select Client extensions from the list of Components on the left
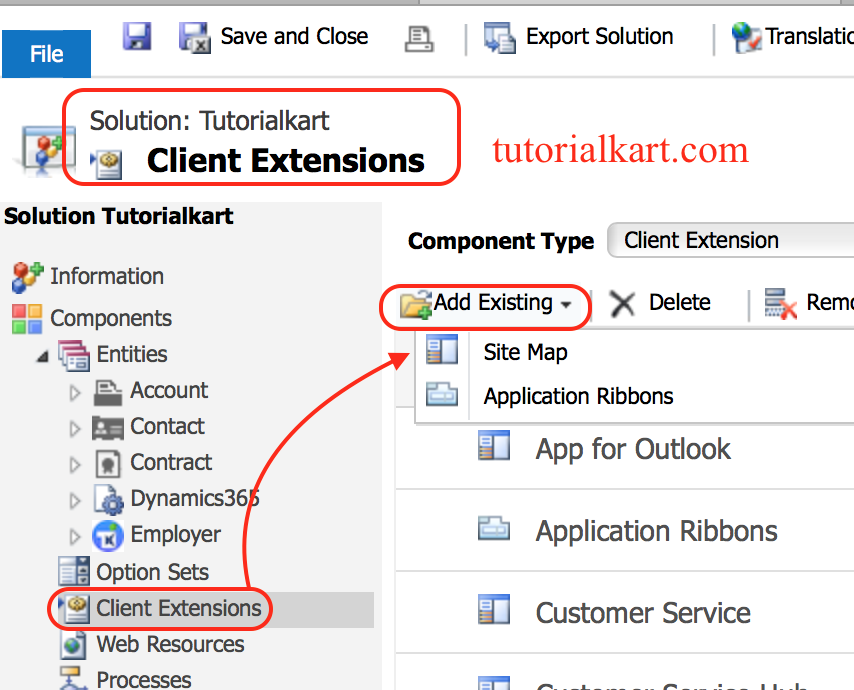
- Now a popup window will be displayed where we have to add solution components.
In Dynamics 365, a site map will be present for every application in our Dynamics 365 organization and a default site map. Select default site map as shown.
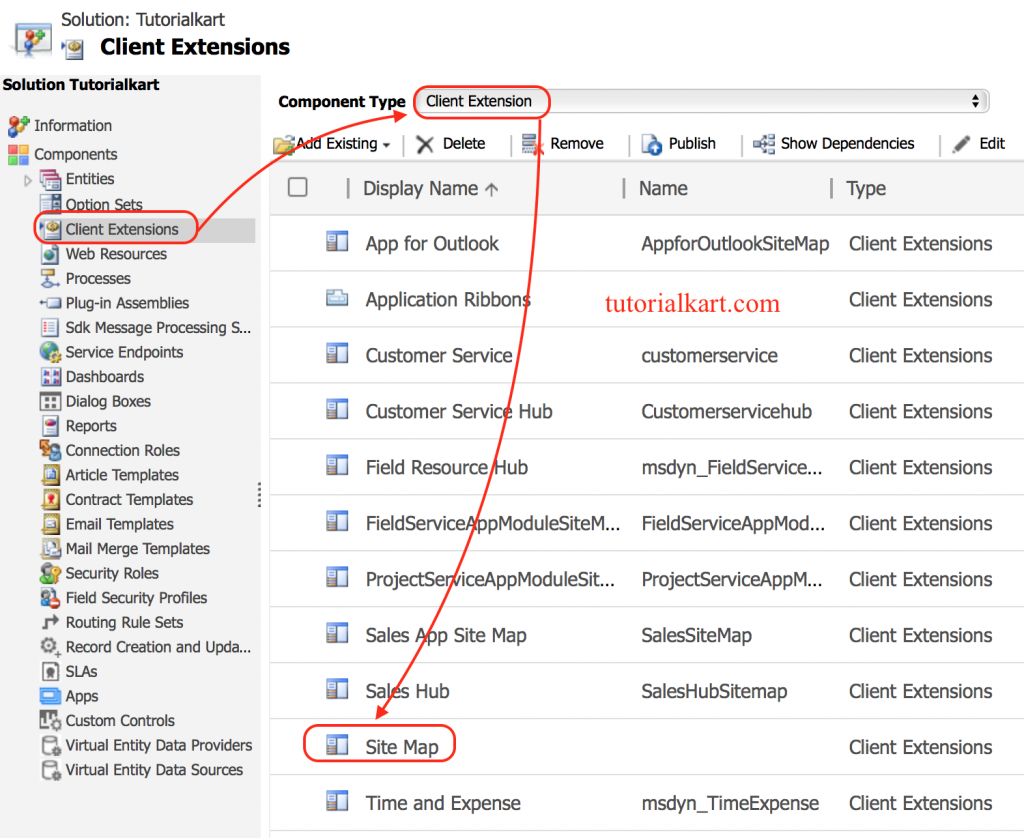
After the site map is added to the solution, open it in the site map designer. The designer displays the existing navigation as editable tiles. You can select a tile to view its properties or drag new components from the component panel.
In this example, we are going to add custom entity called “Dynamics 365” that created in tutorialkart Solutions.
Adding New Area in Site map designer
To add new area in Site map Designer, navigate to Components | Click on Area and drag a new area as shown below.
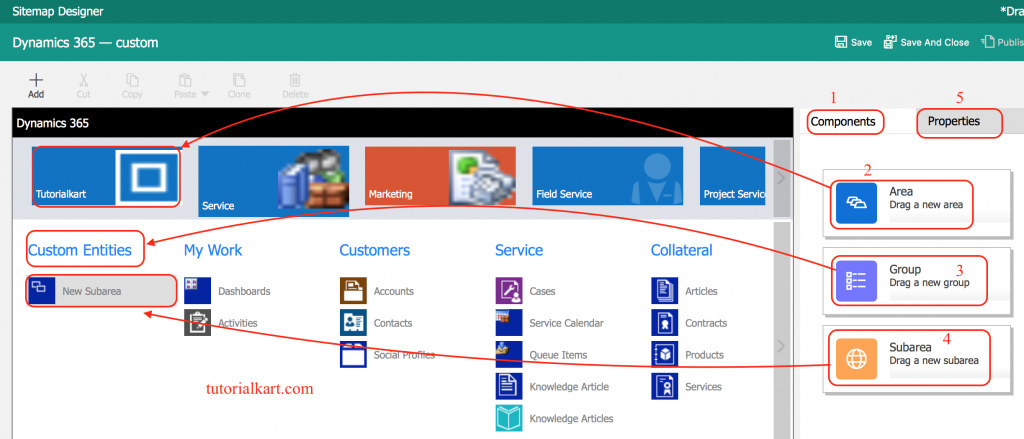
As shown above we have added Area and names it as tutorialkart, Group and named it as Custom entities and Subarea.
When adding a new area, choose a name that clearly describes the business function. Avoid creating too many areas for a small app because it can make the navigation harder to use. In most cases, related items should be placed inside groups under an existing area.
- Now click on Properties to change title, to select entity from the drop down, to select Icon.
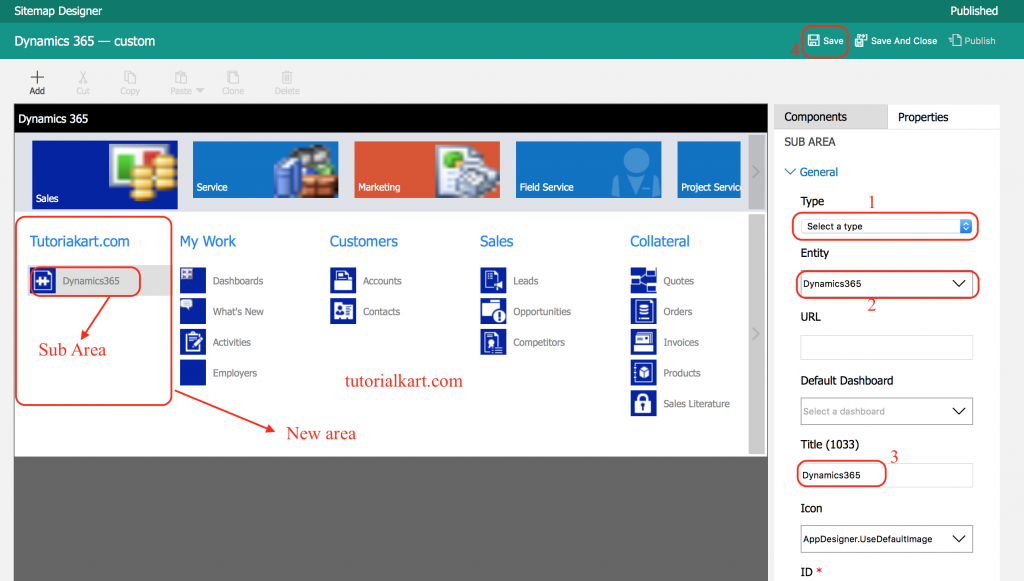
Configuring a Dynamics 365 subarea for a custom entity
A subarea is the navigation item that opens the target component. For a custom entity, select the entity from the properties panel. After selecting the entity, review the title and icon. If the title is left blank, the app may use the entity display name, but it is better to enter a clear label when the navigation needs a business-friendly name.
- Title: The label shown in the app navigation.
- Type: The type of item, such as entity, dashboard, web resource, or URL.
- Entity: The table or entity opened when the user clicks the subarea.
- Icon: The image or icon used for the navigation item, where supported.
- Privileges: The security-based visibility rules, where applicable.
If a user cannot see the custom entity after the site map is published, check both the app navigation and the user’s security role. The site map can show an item only when the user has permission to access the target component.
- Now, click on ‘Save’ button and then, click on ‘Publish’ button.
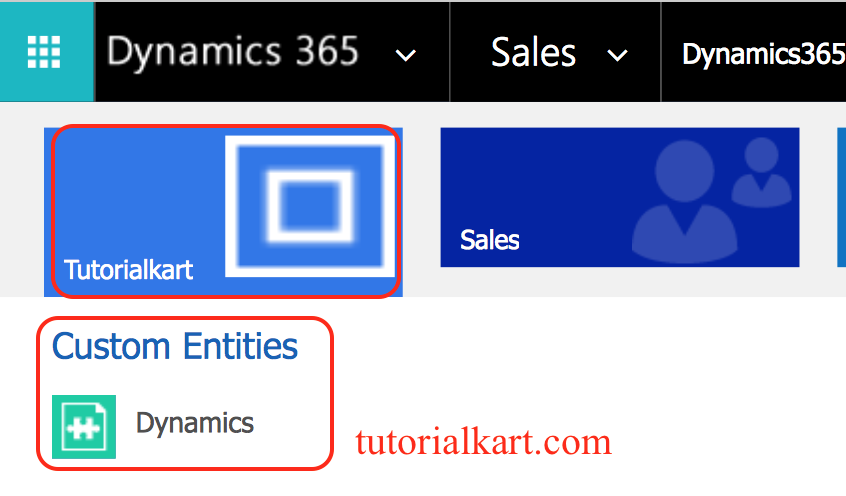
We have successfully edit site map and added our custom entities on Microsoft CRM menu in dynamics 365.
Saving and publishing a Dynamics 365 site map correctly
Saving and publishing are two different actions. Saving keeps the changes in the designer, while publishing makes the navigation changes available to users. After publishing, refresh the app and confirm that the new area, group, or subarea appears in the expected place.
- Use Save before closing the designer.
- Use Validate, if available, to check for missing required properties.
- Use Publish to apply the site map changes.
- Open the app as a normal user to verify navigation and permissions.
Common issues after editing a Dynamics 365 site map
If the site map change is not visible after publishing, use the following checks.
- The subarea is missing: Confirm that the site map was published and the app was refreshed.
- The custom entity is not shown: Check whether the entity is included in the app and whether the user has security role access.
- The label is incorrect: Open the component properties and update the title or localized label.
- The icon is not displayed: Check the selected icon resource and whether the app type supports it.
- The navigation looks cluttered: Move related subareas into fewer groups and remove unused items.
Best practices for designing a Dynamics 365 site map
A site map should be designed for the way users work in the app. Keep the structure simple and place the most-used records where users can find them without extra clicks.
- Group related entities together, such as accounts, contacts, leads, and opportunities.
- Use short and clear labels for areas, groups, and subareas.
- Avoid adding entities that users do not need in the app navigation.
- Keep administrator-only configuration items away from normal user work areas.
- Use security roles and app access properly instead of relying only on hiding navigation items.
- Test the site map in a sandbox or non-production environment before moving changes to production.
Dynamics 365 Site map Designer FAQ
What is a site map in Dynamics 365?
A site map in Dynamics 365 defines the app navigation. It controls the areas, groups, and subareas that users see when they open the app.
How do I edit a site map in Dynamics 365?
In the classic Dynamics 365 experience, open Settings, go to Customizations, open Solutions, add the site map under Client Extensions, and edit it using the site map designer. In newer model-driven apps, open the app in the maker or app designer experience and edit the app navigation.
What is the difference between an area, group, and subarea in a Dynamics 365 site map?
An area is the top-level navigation section, a group organizes related items inside an area, and a subarea is the clickable navigation item that opens an entity, dashboard, web resource, URL, or another supported component.
Why is my custom entity not visible after adding it to the Dynamics 365 site map?
The most common reasons are that the site map was not published, the app was not refreshed, the entity was not included in the app, or the user does not have the required security role privileges for that entity.
Do site map changes give users access to Dynamics 365 records?
No. The site map controls navigation visibility, but record and entity access is controlled by security roles, privileges, teams, business units, and other security settings.
Editorial QA checklist for this Dynamics 365 site map tutorial
- Confirms that Site map Designer is a visual editor for Dynamics 365 app navigation.
- Explains area, group, and subarea using Dynamics 365-specific terms.
- Shows how to add the site map to a solution through Client Extensions.
- Explains how to add a custom entity as a site map subarea.
- Mentions save, validate, publish, refresh, and security role checks.
- Keeps the classic screenshots and notes that newer model-driven apps may use the app designer or maker experience.