Microsoft Dynamics 365 Navigation and Interface helps users move between Dynamics 365 apps, areas, records, dashboards, settings, and recently opened items. The interface has changed from older Microsoft Dynamics CRM versions, so this tutorial explains the main navigation options step by step and shows how to open apps, use the navigation bar, access personal settings, create records, and work with record commands.
The screenshots in this tutorial show a classic Dynamics 365 web interface. In newer model-driven apps, some labels and positions may look slightly different, but the navigation ideas are the same: choose an app, use the site map or navigation pane, open records, use search, and work with command buttons based on your security role.
Microsoft Dynamics 365 navigation path from Microsoft 365 sign-in
To start using Microsoft Dynamics 365, sign in with the Microsoft work or school account assigned to your organization. Your administrator must give you access to the required Dynamics 365 app and security role before you can see business data.
- Login to Dynamics 365 at http://login.microsoftonline.com.
- Enter your username and password.
- Click on Submit button.
After successfully signing in, Microsoft displays the available Microsoft 365 and Dynamics 365 products for your account. The exact tiles depend on the licenses and apps assigned to your user.
- Select Dynamics.com to login to home.dynamics.com.
Choose a Dynamics 365 app from the home page
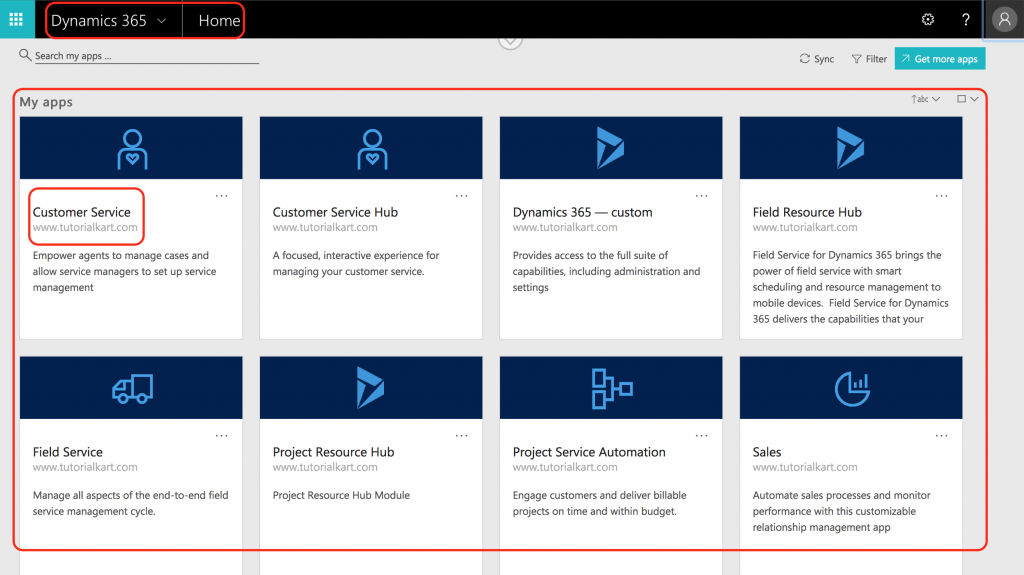
Now we are at Dynamics 365 Home, when we dropdown menu as shown below list of all application present in Microsoft Dynamics 365 will be displayed. In Dynamics 365 we have different options like My apps, Home, Dynamics 365 – Custom, Sales Hub, Sales, Customer Service, Project resource Hub, Project service automation, field service, Field resource Hub.
Each app opens a focused workspace. For example, a Sales app contains sales-related navigation such as leads, opportunities, accounts, contacts, dashboards, and activities. A Customer Service app contains service-related navigation such as cases, queues, knowledge articles, and service dashboards. This app-based layout keeps users from seeing every module at once.
- Select Dynamics 365 – Custom as shown below.

Microsoft Dynamics 365 interface lets users navigate from left to right, and the intuitive design includes large buttons for each of the various sections. If we select modules like Sales or Service, a “sticky” menu will with expanded menu items as shown below.
Understand the Dynamics 365 navigation bar and app areas
The navigation bar in Microsoft Dynamics 365 is located on the top of the screen and it contains Sales, Service, marketing, Field service, Project Service, Resource scheduling, Settings and training.
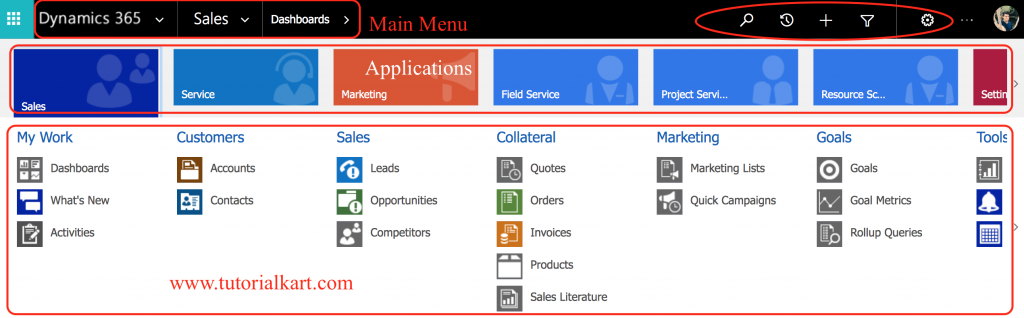
The navigation bar gives quick access to the areas and tools that are available in the selected app. In a newer model-driven app, the same idea is often shown through a left navigation pane or site map. The app maker decides which groups, tables, dashboards, and pages appear in that navigation.
- To open recently opened pages click on clock symbol present on the top menu.
- A + icon is used for quickly adding information.
- A magnifying glass icon for systemwide quick searches and the Advanced Find button.
- If you click the + icon, the ribbon bar expands to show you what can be created.
Common Dynamics 365 navigation icons and what they do
| Navigation option | What it is used for | Typical user action |
|---|---|---|
| App selector or app list | Opens another Dynamics 365 app assigned to the user. | Switch from Sales Hub to Customer Service Hub or another available app. |
| Area menu or site map | Groups related pages and tables inside the current app. | Move from Sales to Accounts, Contacts, Leads, Opportunities, or Dashboards. |
| Recent items | Shows recently opened records and views. | Return quickly to a contact, account, dashboard, case, or activity. |
| Search | Searches records that the user has permission to view. | Find a customer, opportunity, case, or other record. |
| New or quick create | Creates a new record without navigating through several menus. | Create a contact, account, task, phone call, lead, or case. |
| Settings gear | Opens personal options and app settings. | Change time zone, language, email settings, or other personal options. |
Settings Personal Information in Dynamics 365
To setup Personal Information in Dynamics 365, navigate to Gear symbol present on the top right in the main menu. Here we can view Apps that are available for Dynamics 365, can view privacy statement
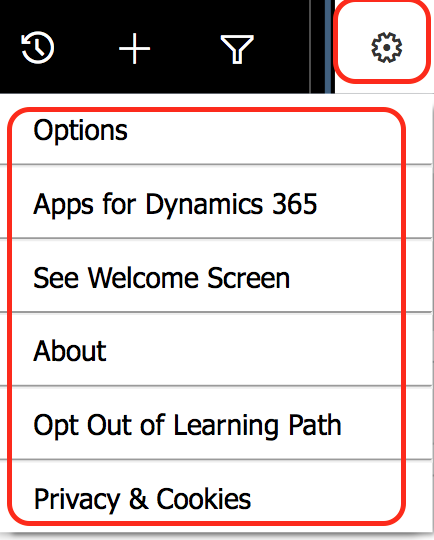
- Click on Options.
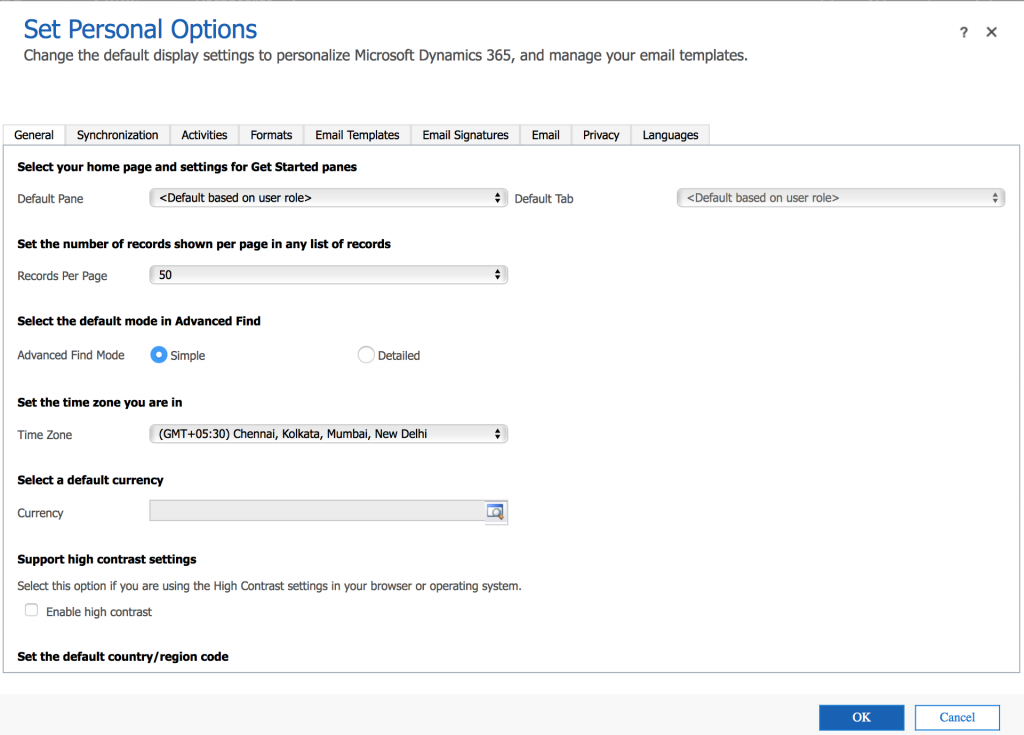
As shown above screen, we can setup time zone, default currency, email templates, Email signature, Can set language and many more.
These settings affect how Dynamics 365 appears for the signed-in user. For example, the time zone changes how date and time values are displayed, the language option changes labels where language packs are available, and the email signature can be inserted into outgoing email activities. Changing personal options does not change the organization-wide configuration for other users.
How to Open recent pages in Microsoft Dynamics 365?
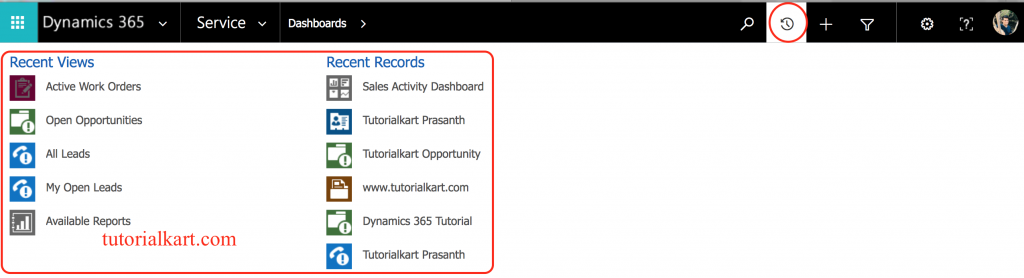
To view recently viewed files click on clock icon in the navigation bar. Now this option lists many more entities to choose from than the drop-down arrow’s list of recently viewed files as shown below.
How to Open recently viewed Options?
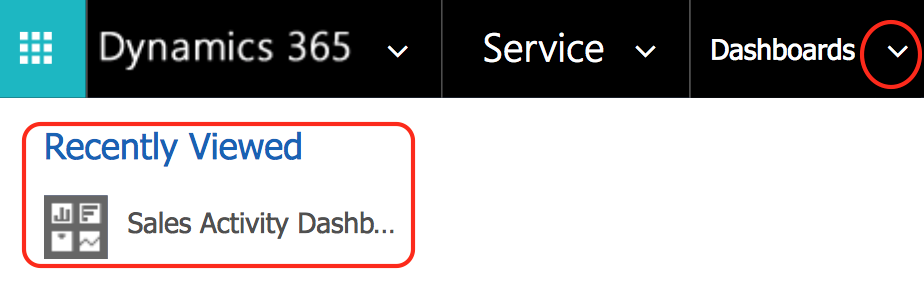
The drop-down arrow in the navigation bar is the Recently Viewed option. When you select this arrow, you see any records that have recently been accessed. When we click on drop down, it shows sales activity dashboard that have recently been viewed, and you can select one to easily navigate to it from here.
Recent records are useful when you are moving between related work items. For example, while reviewing an account, you may open a contact, then a case, and then return to the original account without searching again. If a record is not shown in recent items, use search or navigate through the relevant table view.
Create and open records from Dynamics 365 views
In Dynamics 365, most business data is stored as records. Accounts, contacts, leads, opportunities, cases, activities, work orders, and projects are examples of records. A view displays a list of records, and a form displays the details of one record.
How to create new record and Customize a record in Dynamics 365?
When working with Records in Dynamics 365, a new record can be created by clicking on +New button and can be deleted by delete button. As shown below we have opened Contacts in Sales module and a list of all Contacts displayed. The available menu option … will display drop down options depending on the entity that we are working and the user permissions.
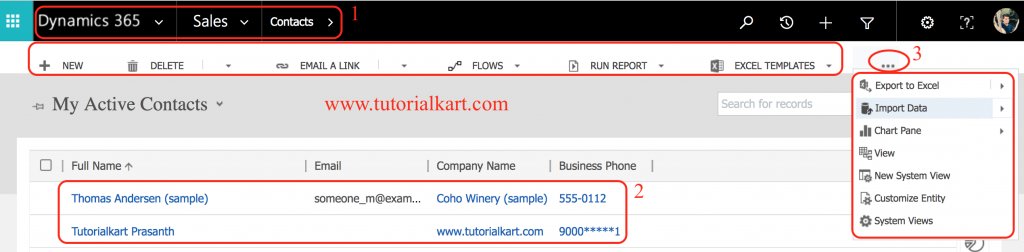
The following are the most common options on the dynamic submenu when you’re working on main (grouped) entities (such as Account or Contact).
| New | Delete | Email a Link |
| Run Report | Excel Templates | Export to Excel |
| Import Data | Chart Pane | View |
| Form | Add to Queue | Share |
| System view | Customize Entity | New System View |
Some commands are available only to users with the right privileges. For example, a user may be able to create a contact but not delete it, export data, customize the table, or share the record. If a button is missing, it is usually because the selected table, selected record, app configuration, or user security role does not allow that action.
Menu Options for existing contact
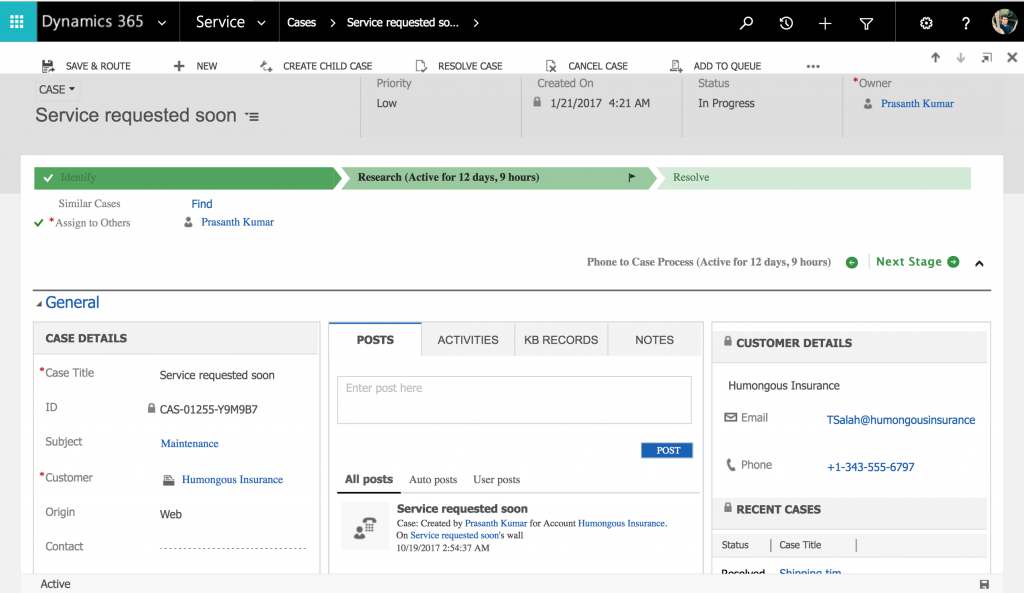
When users navigate to a record, they are presented with a variety of menu options at the top of the page. These options are dynamic and varied, depending on what the record allows or what it has been customised to include. As shown below we have a opened Contacts records.
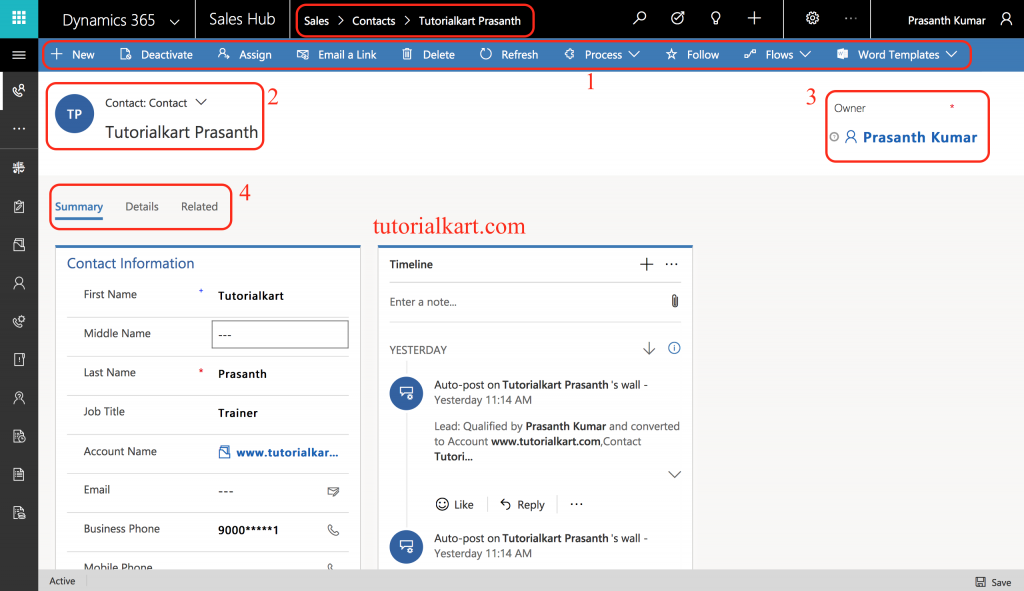
As shown below, menu options for contacts and cases are different with each other.
Why Dynamics 365 record commands change between contacts, cases, and other tables
Dynamics 365 commands are context-sensitive. The command bar changes depending on the table, the selected records, the app, and the user permissions. This is why a contact record can show options that are not available on a case record, and a case record can show service-related commands that are not useful for contacts.
| Where you are in Dynamics 365 | Why the command bar changes | Example |
|---|---|---|
| Contact record | The record stores person details and relationship information. | Commands may include activities, email, assign, share, or related records. |
| Case record | The record is used for customer service work. | Commands may include resolve case, assign, add to queue, or service-related actions. |
| View page | The page lists many records at once. | Commands may include new, delete, export, import, charts, and view options. |
| Dashboard page | The page summarizes information instead of editing one record. | Commands may focus on refresh, open chart data, or change dashboard. |
Dynamics 365 navigation tips for new users
- Start from the correct app: If you cannot find a table such as Contacts, Cases, or Work Orders, first check whether you are in the right Dynamics 365 app.
- Use recent items for repeated work: Recent items are faster than searching again when you are moving between the same few records.
- Use views before opening records: A view helps you filter records such as My Active Accounts, Open Opportunities, or Active Cases before opening a specific record.
- Check command buttons after selecting records: Some buttons appear only after selecting one or more rows in a view.
- Remember that security roles control visibility: Missing apps, areas, records, or commands may be caused by permissions rather than a navigation issue.
Troubleshooting missing Dynamics 365 navigation options
If a menu, app, record, or command is not visible, check the following items before assuming that Dynamics 365 is not working correctly.
- Confirm that you are signed in with the correct work or school account.
- Check whether the required Dynamics 365 app is assigned to your user.
- Open the correct app, such as Sales Hub, Customer Service Hub, Field Service, or another organization-specific app.
- Confirm with your administrator that your security role gives access to the table and command you need.
- Refresh the browser tab or sign out and sign in again if the app was recently assigned.
- Use search if the navigation pane does not show the record directly.
Microsoft Dynamics 365 navigation FAQ
Where is the main navigation menu in Microsoft Dynamics 365?
In the classic interface, the main navigation options are shown across the top of the screen. In newer model-driven Dynamics 365 apps, navigation is commonly shown in a left pane or site map. The exact layout depends on the app version and your organization’s configuration.
Why can I not see a Dynamics 365 app after signing in?
You may not have the required license, app assignment, or security role. Ask your Dynamics 365 administrator to confirm that the app is assigned to you and that your user has the correct permissions.
How do I open recently viewed records in Dynamics 365?
Use the recent items option, shown as a clock icon or recent drop-down in many interfaces. It lists records and pages that you opened recently, so you can return to them without searching again.
Why are command buttons different for contacts and cases?
Command buttons are based on context. Contacts and cases are different tables, so they support different actions. Your security role, selected record, app configuration, and customizations can also change which commands appear.
Can I change my personal time zone and language in Dynamics 365?
Yes. Open the settings gear and choose personal options or settings. From there, you can manage user-specific options such as time zone, language, default currency, and email-related preferences, depending on your organization’s configuration.
Editorial QA checklist for this Dynamics 365 navigation tutorial
- Verify that the tutorial clearly explains sign-in, app selection, navigation bar usage, recent items, settings, and record commands.
- Confirm that older screenshot-based instructions are described as classic Dynamics 365 interface guidance where relevant.
- Check that newer model-driven app users understand that navigation may appear in a left pane or site map.
- Ensure missing menus and buttons are explained through app assignment, licensing, table context, and security roles.
- Confirm that FAQ questions answer practical Dynamics 365 navigation problems rather than generic CRM questions.