Flutter Animation Basic Example

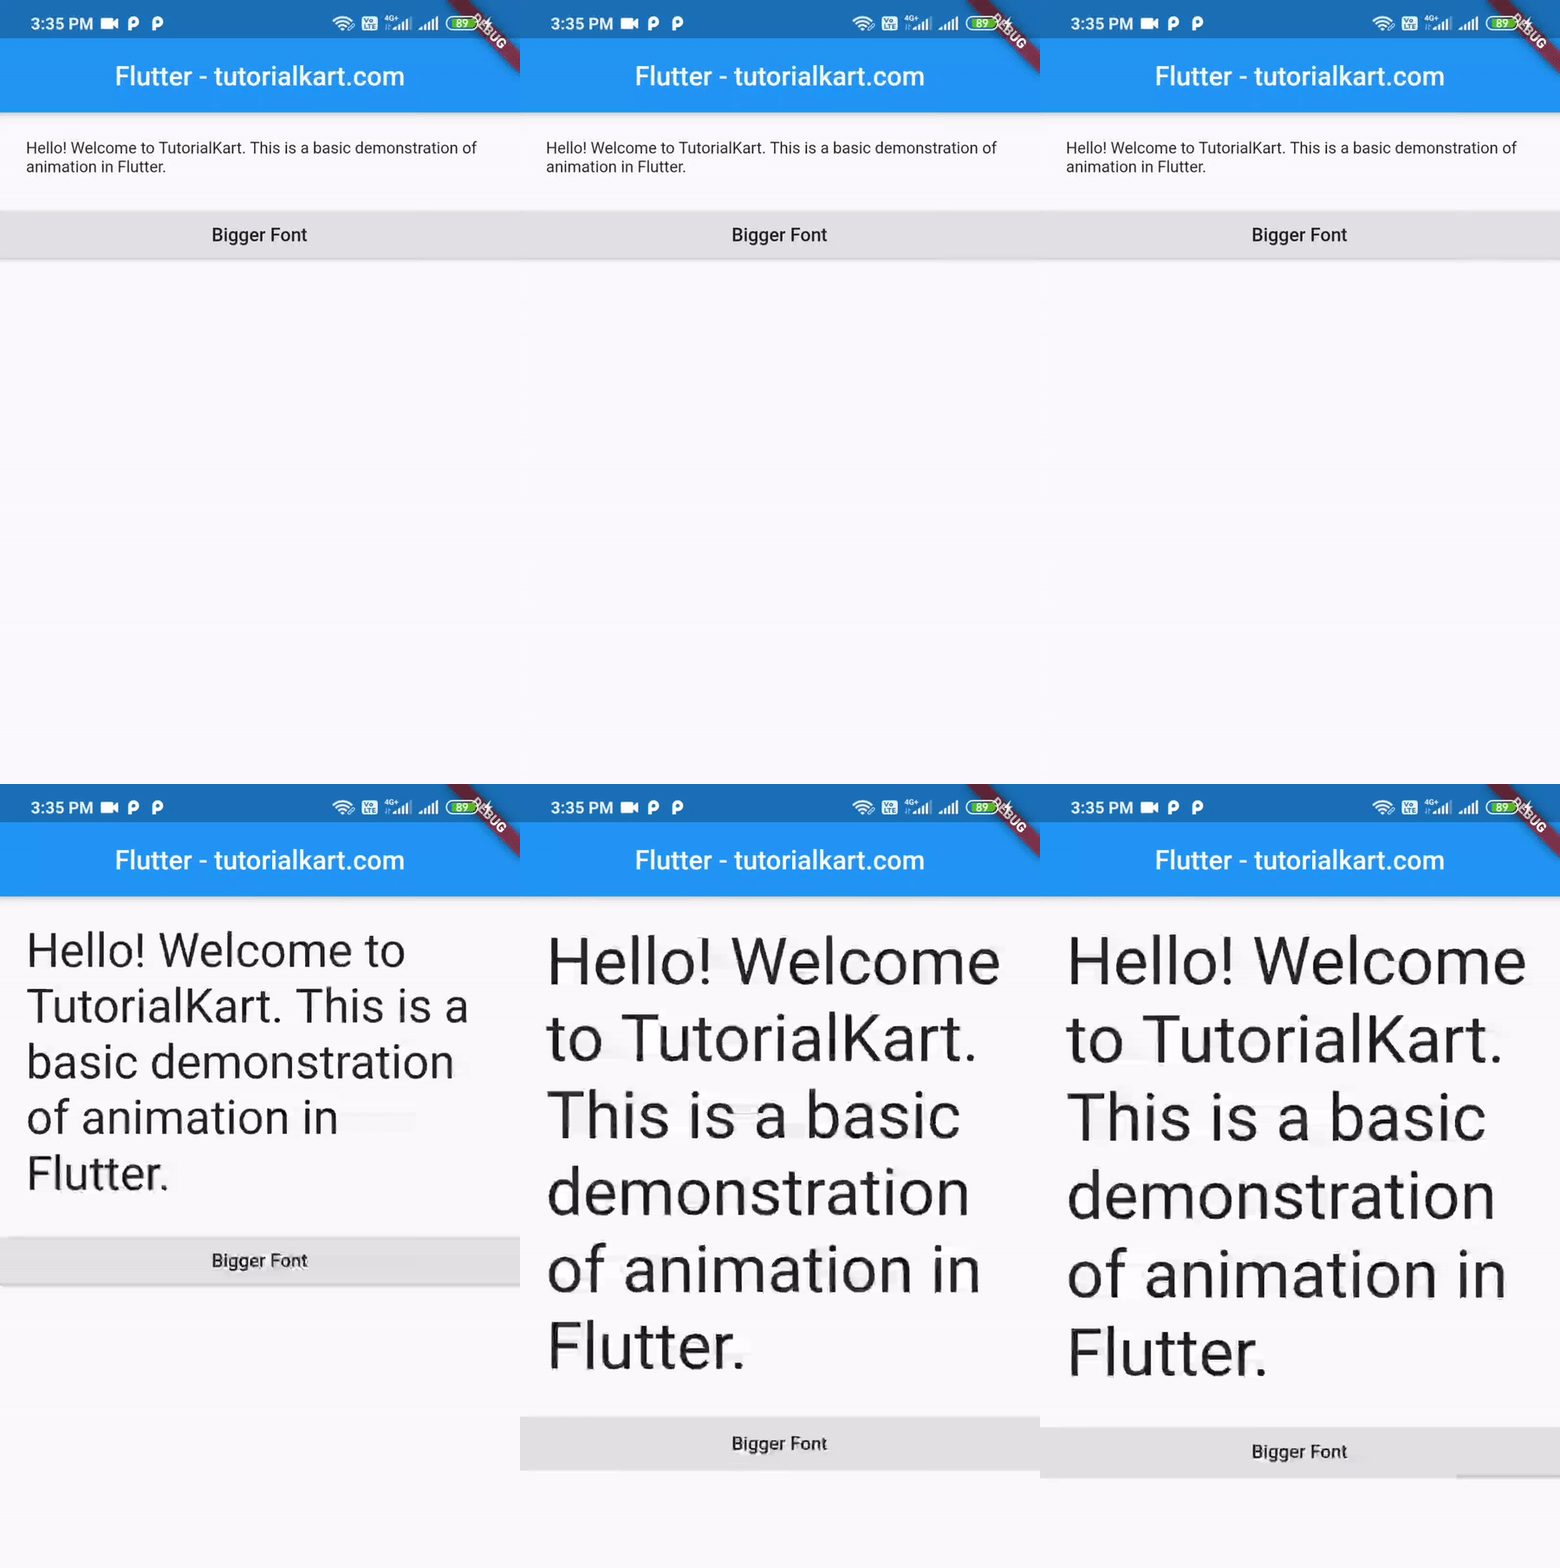
Flutter animations let a widget move smoothly from one visual state to another. In this example, a Text widget grows from a small font size to a larger font size when the user presses a button.

The tutorial first shows an immediate font-size change and then replaces that abrupt update with an AnimationController and a Tween<double>.

Changing Flutter Text Size Without Animation

Consider the following Flutter application. It displays text with a font size of 20 and changes the font size to 40 when the button is pressed.

main.dart

</>
Copy
import 'package:flutter/material.dart';

void main() {
  runApp(MyApp());
}

class MyApp extends StatefulWidget {
  @override
  _MyAppState createState() => _MyAppState();
}

class _MyAppState extends State<MyApp> {
  double _fontSize = 20;

  void increaseFontSize() {
    setState(() {
      _fontSize = 40;
    });
  }

  @override
  Widget build(BuildContext context) {
    return MaterialApp(
        home: Scaffold(
      appBar: AppBar(
        title: Center(child: Text('Flutter - tutorialkart.com')),
      ),
      body: ListView(children: <Widget>[
        Container(
            margin: EdgeInsets.all(20),
            child: Text(
              'Hello! Welcome to TutorialKart. We shall zoom this text when you long press on it.',
              style: TextStyle(fontSize: _fontSize),
            )),
        RaisedButton(
          onPressed: () => {increaseFontSize()},
          child: Text('Bigger Font'),
        )
      ]),
    ));
  }
}

Calling setState() rebuilds the widget with the new value of _fontSize. The text jumps directly from 20 to 40 because no intermediate values are produced.

How the Flutter Font-Size Animation Works

To make the transition smooth, Flutter needs a sequence of values between the starting and ending font sizes. The animation in this example uses these parts:

  • AnimationController controls the animation duration and progress.
  • Tween<double> defines the range from the beginning font size to the ending font size.
  • SingleTickerProviderStateMixin supplies the ticker used by the controller.
  • An animation listener calls setState() as the animation value changes.

The result is a gradual increase in the text size instead of an immediate jump.

Flutter Animation Basic Example

Steps to Animate Text Font Size in Flutter

1. Import Flutter Animation Classes

Import the animation library so the application can use Animation, AnimationController, and Tween.

</>
Copy
import 'package:flutter/animation.dart';

The Material library also exports many animation classes, but the explicit import makes the example’s dependency clear.

2. Add SingleTickerProviderStateMixin to the State Class

Declare the state class with SingleTickerProviderStateMixin. The mixin provides a ticker that advances the animation frame by frame while it is active.

</>
Copy
class _MyAppState extends State<MyApp> with SingleTickerProviderStateMixin {
 ...
}

Use SingleTickerProviderStateMixin when the state owns one animation controller. A state that manages multiple controllers commonly uses TickerProviderStateMixin.

3. Declare the Animation and Controller

Declare an animation that produces double values and a controller that manages its timing.

</>
Copy
Animation<double> animation;
AnimationController controller;

4. Configure the Font-Size Tween in initState()

Create the controller in initState(), set its duration to one second, and connect it to a tween that generates values from 12.0 to 50.0.

</>
Copy
void initState() {
  super.initState();
  controller =
  	AnimationController(duration: const Duration(seconds: 1), vsync: this);
  animation = Tween<double>(begin: 12.0, end: 50.0).animate(controller)
    ..addListener(() {
  	setState(() {
  	  // The state that has changed here is the animation object’s value.
  	});
    });
}

During the animation, animation.value changes repeatedly. The listener rebuilds the widget so the current value can be applied to TextStyle.fontSize.

5. Start the Flutter Animation

Call forward() when the user presses the button. The controller then progresses from its lower bound to its upper bound.

</>
Copy
controller.forward();

After the animation has completed, calling forward() again does not restart it automatically. Call controller.reset() before forward(), or use controller.forward(from: 0), when the animation should replay from the beginning.

6. Dispose the AnimationController

An AnimationController uses a ticker and must be disposed when the state is removed. Calling controller.dispose() releases those resources and prevents the controller from continuing after the widget is gone.

Complete Flutter Animation Example

The following original example combines the controller, tween, listener, button callback, and cleanup logic in one file.

main.dart

</>
Copy
import 'package:flutter/animation.dart';
import 'package:flutter/material.dart';

void main() {
  runApp(MyApp());
}

class MyApp extends StatefulWidget {
  @override
  _MyAppState createState() => _MyAppState();
}

class _MyAppState extends State<MyApp> with SingleTickerProviderStateMixin {
  Animation<double> animation;
  AnimationController controller;

  @override
  void initState() {
    super.initState();
    controller =
        AnimationController(duration: const Duration(seconds: 1), vsync: this);
    animation = Tween<double>(begin: 12.0, end: 50.0).animate(controller)
      ..addListener(() {
        setState(() {
          // The state that has changed here is the animation object’s value.
        });
      });
  }

  void increaseFontSize() {
    controller.forward();
  }

  @override
  Widget build(BuildContext context) {
    return MaterialApp(
        home: Scaffold(
      appBar: AppBar(
        title: Center(child: Text('Flutter - tutorialkart.com')),
      ),
      body: ListView(children: <Widget>[
        Container(
            margin: EdgeInsets.all(20),
            child: Text(
              'Hello! Welcome to TutorialKart. This is a basic demonstration of animation in Flutter.',
              style: TextStyle(fontSize: animation.value),
            )),
        RaisedButton(
          onPressed: () => {increaseFontSize()},
          child: Text('Bigger Font'),
        )
      ]),
    ));
  }

  @override
  void dispose() {
    controller.dispose();
    super.dispose();
  }
}

This code reflects the Flutter API style used when the tutorial was originally written. In current null-safe Flutter projects, fields should be initialized safely, and ElevatedButton is used instead of the deprecated RaisedButton.

Null-Safe Flutter Version with AnimatedBuilder

The following updated example uses null safety, ElevatedButton, a curved animation, and AnimatedBuilder. AnimatedBuilder rebuilds only the part of the interface that depends on the animation, so a manual animation listener is not required.

</>
Copy
import 'package:flutter/material.dart';

void main() {
  runApp(const MyApp());
}

class MyApp extends StatelessWidget {
  const MyApp({super.key});

  @override
  Widget build(BuildContext context) {
    return const MaterialApp(
      home: FontSizeAnimationPage(),
    );
  }
}

class FontSizeAnimationPage extends StatefulWidget {
  const FontSizeAnimationPage({super.key});

  @override
  State<FontSizeAnimationPage> createState() =>
      _FontSizeAnimationPageState();
}

class _FontSizeAnimationPageState extends State<FontSizeAnimationPage>
    with SingleTickerProviderStateMixin {
  late final AnimationController _controller;
  late final Animation<double> _fontSizeAnimation;

  @override
  void initState() {
    super.initState();

    _controller = AnimationController(
      duration: const Duration(seconds: 1),
      vsync: this,
    );

    _fontSizeAnimation = Tween<double>(
      begin: 20,
      end: 40,
    ).animate(
      CurvedAnimation(
        parent: _controller,
        curve: Curves.easeInOut,
      ),
    );
  }

  void _toggleFontSize() {
    if (_controller.status == AnimationStatus.completed) {
      _controller.reverse();
    } else {
      _controller.forward();
    }
  }

  @override
  Widget build(BuildContext context) {
    return Scaffold(
      appBar: AppBar(
        title: const Text('Flutter Font Size Animation'),
      ),
      body: Padding(
        padding: const EdgeInsets.all(20),
        child: Column(
          children: [
            AnimatedBuilder(
              animation: _fontSizeAnimation,
              builder: (context, child) {
                return Text(
                  'Press the button to animate this text.',
                  style: TextStyle(
                    fontSize: _fontSizeAnimation.value,
                  ),
                );
              },
            ),
            const SizedBox(height: 24),
            ElevatedButton(
              onPressed: _toggleFontSize,
              child: const Text('Toggle Font Size'),
            ),
          ],
        ),
      ),
    );
  }

  @override
  void dispose() {
    _controller.dispose();
    super.dispose();
  }
}

The button alternates between forward() and reverse(), so the text can grow and shrink repeatedly.

Using AnimatedDefaultTextStyle for a Simpler Text Animation

For a straightforward transition between two text styles, an implicit animation is often shorter. AnimatedDefaultTextStyle automatically interpolates the style whenever its style property changes.

</>
Copy
class SimpleTextAnimation extends StatefulWidget {
  const SimpleTextAnimation({super.key});

  @override
  State<SimpleTextAnimation> createState() => _SimpleTextAnimationState();
}

class _SimpleTextAnimationState extends State<SimpleTextAnimation> {
  bool _isLarge = false;

  @override
  Widget build(BuildContext context) {
    return Column(
      children: [
        AnimatedDefaultTextStyle(
          duration: const Duration(milliseconds: 600),
          curve: Curves.easeInOut,
          style: TextStyle(
            fontSize: _isLarge ? 40 : 20,
            color: Colors.black,
          ),
          child: const Text('Animated Flutter text'),
        ),
        ElevatedButton(
          onPressed: () {
            setState(() {
              _isLarge = !_isLarge;
            });
          },
          child: const Text('Change Text Size'),
        ),
      ],
    );
  }
}

Use this implicit approach when you only need Flutter to animate between old and new style values. Use an AnimationController when you need direct control over starting, reversing, repeating, pausing, or coordinating the animation.

Common Flutter Animation Problems in This Example

  • The animation runs only once: restart it with forward(from: 0), reset the controller first, or reverse it after completion.
  • The text does not update: make sure the animated value is used by the widget and that the UI rebuilds through a listener, AnimatedBuilder, or another animated widget.
  • A ticker warning appears: dispose the controller in dispose().
  • The app reports a late initialization error: initialize each late controller and animation in initState() before the build method uses them.
  • The old button class fails in a current project: replace RaisedButton with ElevatedButton.

Flutter Font-Size Animation FAQs

What does vsync do in AnimationController?

The vsync argument connects the controller to a ticker provider. This allows Flutter to schedule animation frames efficiently and stop unnecessary ticking when the widget is not visible.

Why is SingleTickerProviderStateMixin used?

It provides one ticker for one AnimationController. It is suitable when the state object manages a single controller.

How can the text animation run again?

Call controller.forward(from: 0) to replay it from the start. To alternate between larger and smaller text, call reverse() after the forward animation completes.

Should I use AnimatedDefaultTextStyle or AnimationController?

Use AnimatedDefaultTextStyle for a simple automatic transition between text styles. Use AnimationController when the animation needs precise timing, direction, repetition, status handling, or coordination with other animations.

Flutter Animation Example Summary

In this Flutter Tutorial, we learned how to animate the font size of a Text widget. The explicit example uses an AnimationController and Tween<double>, while the implicit example uses AnimatedDefaultTextStyle for a shorter implementation.