
Flutter Canvas Draw Rectangle

To draw a rectangle on a Flutter canvas, use Canvas.drawRect(). The method takes a Rect that defines the rectangle’s position and dimensions, and a Paint object that controls how the rectangle is rendered.

A common way to use drawRect() in a Flutter application is inside the paint() method of a CustomPainter. This gives you direct access to the Canvas and the available drawing size.

Flutter Canvas.drawRect() syntax

Following is the syntax of drawRect() function in Flutter.

</>
Copy
void drawRect(Rect rect, Paint paint)

The rect argument specifies the rectangle’s bounds. The paint argument specifies properties such as color, fill or stroke style, and stroke width.

A quick example of drawRect() is given below.

</>
Copy
canvas.drawRect(Offset(100, 100) & const Size(200, 150), Paint());

Here, Offset(100, 100) defines the top-left position of the rectangle and Size(200, 150) gives it a width of 200 logical pixels and a height of 150 logical pixels.

Create a Flutter Rect using Offset and Size

The & operator can combine an Offset and a Size to create a Rect. The following two approaches describe the same rectangle.

</>
Copy
final rect1 = const Offset(100, 100) & const Size(200, 150);
final rect2 = Rect.fromLTWH(100, 100, 200, 150);

Rect.fromLTWH(left, top, width, height) can be easier to read when the position and dimensions are already available as separate values.

Draw a rectangle with CustomPainter in Flutter

To draw a rectangle in our Flutter Application, we shall follow the below steps.

  1. Create a class that extends CustomPainter. This is our widget that has canvas and allows user to paint on to the canvas.
  2. Override paint() and shouldRepaint() methods of the CustomPainter class. In the paint() method, we have access to canvas and size of the canvas.
  3. Draw a rectangle on the canvas using canvas.drawRect() method.

main.dart

</>
Copy
import 'package:flutter/cupertino.dart';
import 'package:flutter/material.dart';

void main() {
  runApp(MyApp());
}

class MyApp extends StatelessWidget {
  @override
  Widget build(BuildContext context) {
    return MaterialApp(
      title: 'Flutter TutorialKart',
      home: MyHomePage(),
    );
  }
}

class MyHomePage extends StatefulWidget {
  @override
  _MyHomePageState createState() => _MyHomePageState();
}

class _MyHomePageState extends State<MyHomePage> {

  @override
  Widget build(BuildContext context) {
    return Scaffold(
      appBar: AppBar(
        title: Text('Flutter - www.tutorialkart.com'),
      ),
      body: ListView(children: <Widget>[
        Container(
          width: 400,
          height: 400,
          child: CustomPaint(
            painter: OpenPainter(),
          ),
        ),
      ]),
    );
  }
}

class OpenPainter extends CustomPainter {
  @override
  void paint(Canvas canvas, Size size) {
    var paint1 = Paint()
      ..color = Color(0xff995588)
      ..style = PaintingStyle.fill;
    canvas.drawRect(Offset(100, 100) & const Size(200, 150), paint1);
  }

  @override
  bool shouldRepaint(CustomPainter oldDelegate) => true;
}

The Paint object in this example uses PaintingStyle.fill, so the complete area inside the rectangle is painted. The rectangle starts 100 logical pixels from the left and 100 logical pixels from the top of the canvas.

Run the application in your Android Device or Android Emulator.
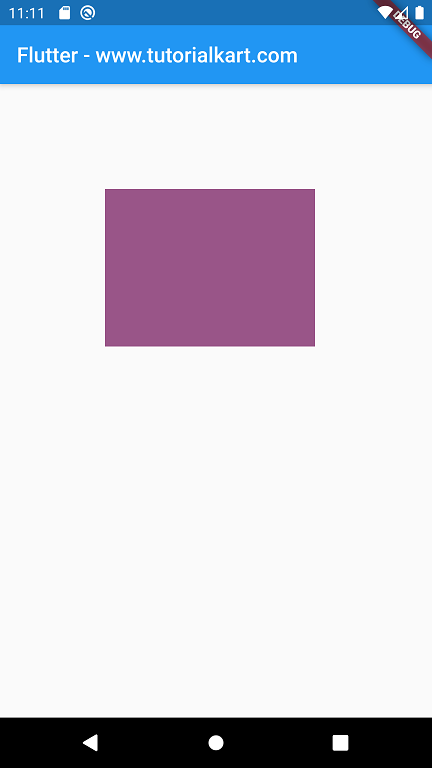
Flutter Canvas - CustomPainter - Draw Rectangle

Draw a filled rectangle with Flutter Canvas

Set Paint.style to PaintingStyle.fill when the inside of the rectangle should be painted.

</>
Copy
final paint = Paint()
  ..color = const Color(0xff995588)
  ..style = PaintingStyle.fill;

final rect = Rect.fromLTWH(40, 60, 200, 120);
canvas.drawRect(rect, paint);

The rectangle in this example begins at (40, 60), has a width of 200, and has a height of 120.

Draw only the rectangle border using PaintingStyle.stroke

To draw the outline of a rectangle instead of filling its interior, set the paint style to PaintingStyle.stroke. Use strokeWidth to control the thickness of the border.

</>
Copy
final paint = Paint()
  ..color = const Color(0xff1565c0)
  ..style = PaintingStyle.stroke
  ..strokeWidth = 4;

final rect = Rect.fromLTWH(40, 60, 200, 120);
canvas.drawRect(rect, paint);

This paints a 4-logical-pixel-wide border around the rectangle while leaving its interior unfilled.

Position a Flutter rectangle relative to the canvas size

Hard-coded coordinates are useful for a basic example, but a custom painter can also calculate the rectangle from the Size passed to paint(). This helps the drawing adapt to the actual space provided to CustomPaint.

</>
Copy
@override
void paint(Canvas canvas, Size size) {
  final paint = Paint()
    ..color = const Color(0xff995588)
    ..style = PaintingStyle.fill;

  final rect = Rect.fromLTWH(
    size.width * 0.1,
    size.height * 0.1,
    size.width * 0.8,
    size.height * 0.5,
  );

  canvas.drawRect(rect, paint);
}

In this version, the rectangle’s dimensions are calculated from the canvas dimensions instead of assuming a fixed 400 by 400 drawing area.

Flutter Canvas – Update Rectangle

You can update any property of the rectangle you would like to change in runtime.

To change a property of the rectangle you are painting, follow these steps.

Step 1: Declare the properties you would like to change, as a variable. Assign the default or initial value to it.

</>
Copy
Color rectColor = Color(0xff000000);
Size rectSize = Size(200, 150);

Step 2: Use this variables while you are painting the rectangle in CustomPainter class.

</>
Copy
void paint(Canvas canvas, Size size) {
  var paint1 = Paint()
    ..color = rectColor
    ..style = PaintingStyle.fill;
  canvas.drawRect(Offset(100, 100) & rectSize, paint1);
}

Step 3: When a change has to be made, like when user presses a button, assign the new value for property using the variable(declared in step 1).

</>
Copy
rectColor = Color(0xff885599);
rectSize = Size(200, 250);

Following is the complete code of this example application where we are changing the color and size of a rectangle.

main.dart

</>
Copy
import 'package:flutter/cupertino.dart';
import 'package:flutter/material.dart';

Color rectColor = Color(0xff000000);
Size rectSize = Size(200, 150);

void main() {
  runApp(MyApp());
}

class MyApp extends StatelessWidget {
  @override
  Widget build(BuildContext context) {
    return MaterialApp(
      title: 'Flutter TutorialKart',
      home: MyHomePage(),
    );
  }
}

class MyHomePage extends StatefulWidget {
  @override
  _MyHomePageState createState() => _MyHomePageState();
}

class _MyHomePageState extends State<MyHomePage> {

  @override
  Widget build(BuildContext context) {
    return Scaffold(
      appBar: AppBar(
        title: Text('Flutter - www.tutorialkart.com'),
      ),
      body: ListView(children: <Widget>[
        Text(
          'My Canvas',
          textAlign: TextAlign.center,
          style: TextStyle(fontSize: 20),
        ),
        Container(
          width: 400,
          height: 400,
          child: CustomPaint(
            painter: OpenPainter(),
          ),
        ),
        RaisedButton(
          child: Text('Repaint Canvas'),
          onPressed: (){
            setState(() {
              rectColor = Color(0xff885599);
              rectSize = Size(200, 250);
            });
          },
        ),
      ]),
    );
  }
}

class OpenPainter extends CustomPainter {
  @override
  void paint(Canvas canvas, Size size) {
    var paint1 = Paint()
      ..color = rectColor
      ..style = PaintingStyle.fill;
    canvas.drawRect(Offset(100, 100) & rectSize, paint1);
  }

  @override
  bool shouldRepaint(CustomPainter oldDelegate) => true;
}

Run the application in your Android Smartphone or Emulator, you will get the left screen as shown in the following screenshot. When you click the Repaint Canvas button, the color the rectangle is changed to a new value.
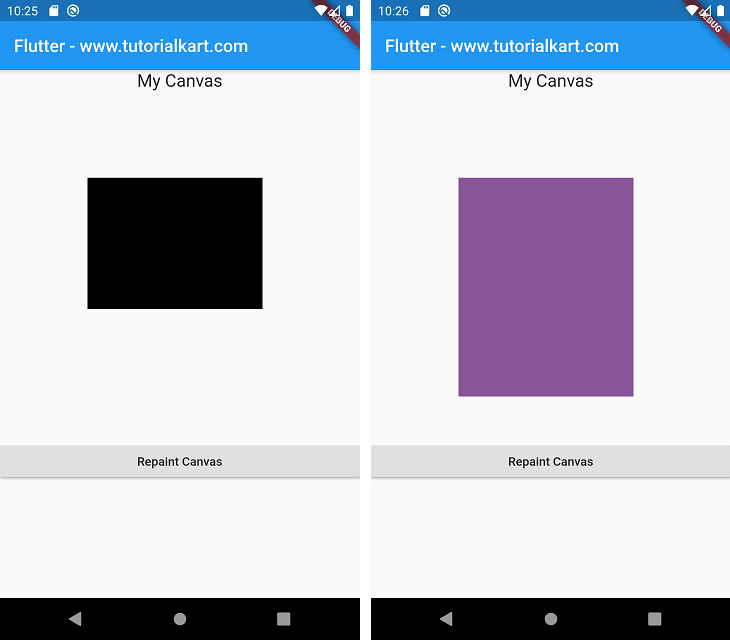
Flutter Canvas Draw Rectangle

Repaint a Flutter rectangle when its color or size changes

For changing drawings, it is useful to pass the current rectangle properties into the painter. Flutter can then create a new painter when state changes, and shouldRepaint() can determine whether the new values require the canvas to be painted again.

</>
Copy
class RectanglePainter extends CustomPainter {
  const RectanglePainter({
    required this.color,
    required this.rectSize,
  });

  final Color color;
  final Size rectSize;

  @override
  void paint(Canvas canvas, Size size) {
    final paint = Paint()
      ..color = color
      ..style = PaintingStyle.fill;

    final offset = Offset(
      (size.width - rectSize.width) / 2,
      (size.height - rectSize.height) / 2,
    );

    canvas.drawRect(offset & rectSize, paint);
  }

  @override
  bool shouldRepaint(covariant RectanglePainter oldDelegate) {
    return oldDelegate.color != color ||
        oldDelegate.rectSize != rectSize;
  }
}

This version repaints when either the rectangle color or its dimensions have changed. Returning true unconditionally is valid when every new painter must redraw, but comparing the properties makes the repaint condition explicit.

Update a Canvas rectangle with an ElevatedButton

The earlier example uses RaisedButton, which appears in older Flutter code. In current Flutter applications, the equivalent Material button is typically ElevatedButton. The rectangle values can remain in the widget state and be passed to the painter.

</>
Copy
class RectanglePage extends StatefulWidget {
  const RectanglePage({super.key});

  @override
  State<RectanglePage> createState() => _RectanglePageState();
}

class _RectanglePageState extends State<RectanglePage> {
  Color rectColor = const Color(0xff000000);
  Size rectSize = const Size(200, 150);

  @override
  Widget build(BuildContext context) {
    return Column(
      children: [
        SizedBox(
          width: 400,
          height: 400,
          child: CustomPaint(
            painter: RectanglePainter(
              color: rectColor,
              rectSize: rectSize,
            ),
          ),
        ),
        ElevatedButton(
          onPressed: () {
            setState(() {
              rectColor = const Color(0xff885599);
              rectSize = const Size(200, 250);
            });
          },
          child: const Text('Repaint Canvas'),
        ),
      ],
    );
  }
}

Calling setState() rebuilds the widget with the new color and size. A new RectanglePainter receives those values, and the custom painting logic draws the updated rectangle.

Use drawRRect() when the Flutter rectangle needs rounded corners

drawRect() creates a rectangle with square corners. If the shape needs rounded corners, create an RRect and draw it with Canvas.drawRRect().

</>
Copy
final rect = Rect.fromLTWH(40, 60, 200, 120);
final roundedRect = RRect.fromRectAndRadius(
  rect,
  const Radius.circular(16),
);

final paint = Paint()
  ..color = const Color(0xff995588);

canvas.drawRRect(roundedRect, paint);

Use drawRect() for square-cornered rectangles and drawRRect() when corner radii are required.

Flutter Canvas rectangle drawing checks

  • Make sure the Rect lies within the canvas area if the complete rectangle should remain visible.
  • Use PaintingStyle.fill for a solid rectangle and PaintingStyle.stroke for an outline.
  • Set strokeWidth when drawing a rectangle border.
  • Use the Size received by paint() when the rectangle should adapt to the available canvas dimensions.
  • Update painter properties and shouldRepaint() appropriately when the rectangle changes at runtime.
  • Use drawRRect(), rather than drawRect(), when rounded corners are required.

Flutter Canvas drawRect() summary

In this Flutter Tutorial, we learned how to draw a rectangle on a Canvas using CustomPainter class. A rectangle is defined with a Rect, its appearance is configured using Paint, and Canvas.drawRect() renders it. We also covered filled and outlined rectangles, canvas-relative positioning, repainting when properties change, and rounded rectangles with drawRRect().