Set Custom Range for Android SeekBar in Kotlin
In our previous tutorial : Android SeekBar – Kotlin Example, we have learnt to use a SeekBar. By observation, you might have found that the default range is [0,100].
In this tutorial, we will learn to set a custom range to progress of Seekbar.
A SeekBar works internally with integer progress values. To create a custom range such as 10 to 160 in steps of 5, keep the SeekBar progress starting from 0, and convert that progress into your required value in Kotlin.
The following diagram illustrates the minimum, maximum and step value for a SeekBar.
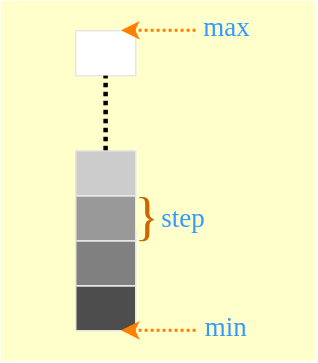
Android SeekBar custom range formula with MIN, MAX, and STEP
Consider that you require a range of [MIN, MAX] with a STEP value. Following two statements will set the custom range for SeekBar.
  seekbar.setMax( (MAX - MIN) / STEP );

  onProgressChanged {
	double progress_custom = MIN + (progress * STEP);
  }
The important point is that SeekBar.max does not become your final maximum value directly. It becomes the number of steps the user can move from the minimum value.
| Value | Meaning for custom SeekBar range | Example |
|---|---|---|
MIN | Smallest value you want to display or use | 10 |
MAX | Largest value you want to display or use | 160 |
STEP | Difference between two adjacent selectable values | 5 |
seekBar.max | Number of progress positions after mapping | (160 - 10) / 5 = 30 |
| Custom value | Actual value shown to the user | 10 + progress * 5 |
Kotlin expression to convert SeekBar progress to custom range value
For a custom range, use this Kotlin expression inside onProgressChanged().
val customValue = MIN + (progress * STEP)For example, when MIN = 10, MAX = 160, and STEP = 5, the possible values are 10, 15, 20, 25, and so on up to 160.
progress = 0  -> custom value = 10
progress = 1  -> custom value = 15
progress = 2  -> custom value = 20
progress = 30 -> custom value = 160
Make sure that (MAX - MIN) is exactly divisible by STEP. Otherwise, the last selectable value may not land exactly on MAX.
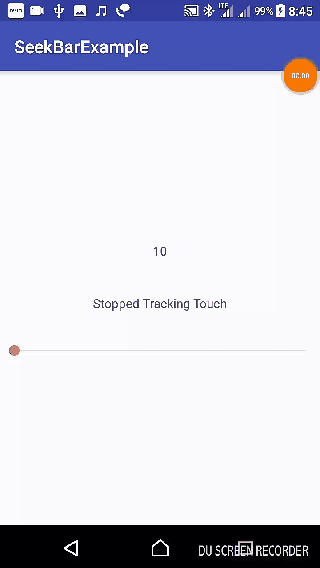
Android SeekBar Set Custom Range – Kotlin Example
We shall modify MainActivity.kt of the Android Application that we created in our previous tutorial, : Android SeekBar – Kotlin Example.
In this example, the SeekBar uses the custom range 10..160 with a step value of 5. The TextView displays the mapped custom value instead of the raw SeekBar progress.
activity_main.xml
<?xml version="1.0" encoding="utf-8"?>
<android.support.constraint.ConstraintLayout xmlns:android="http://schemas.android.com/apk/res/android"
    xmlns:tools="http://schemas.android.com/tools"
    android:layout_width="match_parent"
    android:layout_height="match_parent"
    tools:context="com.tutorialkart.seekbarexample.MainActivity">

    <LinearLayout
        android:layout_width="match_parent"
        android:layout_height="match_parent"
        android:gravity="center"
        android:orientation="vertical">

        <TextView
            android:id="@+id/progress"
            android:layout_width="wrap_content"
            android:layout_height="wrap_content"
            android:text="- -"
            android:padding="20dp"/>
        <TextView
            android:id="@+id/seekbarStatus"
            android:layout_width="wrap_content"
            android:layout_height="wrap_content"
            android:text="- -"
            android:padding="20dp"/>

        <SeekBar
            android:id="@+id/seekbar"
            android:layout_width="match_parent"
            android:padding="15dp"
            android:layout_height="wrap_content" />

    </LinearLayout>

</android.support.constraint.ConstraintLayout>
MainActivity.kt
package com.tutorialkart.seekbarexample

import android.os.Build
import android.support.v7.app.AppCompatActivity
import android.os.Bundle
import android.widget.SeekBar
import android.widget.SeekBar.OnSeekBarChangeListener
import android.widget.TextView
import kotlinx.android.synthetic.main.activity_main.*

class MainActivity : AppCompatActivity(),OnSeekBarChangeListener {

    private var progressView: TextView? = null
    private var seekbarStatusView: TextView? = null
    private var seekbarView: SeekBar? = null

    // SeekBar Range
    var MIN = 10
    var MAX = 160
    var STEP = 5

    override fun onCreate(savedInstanceState: Bundle?) {
        super.onCreate(savedInstanceState)
        setContentView(R.layout.activity_main)

        progressView = this.progress
        seekbarStatusView = this.seekbarStatus

        seekbarView = this.seekbar
        // set max to seekbar
        seekbarView!!.max = (MAX - MIN) / STEP

        seekbarView!!.setOnSeekBarChangeListener(this)

    }

    override fun onProgressChanged(seekBar: SeekBar, progress: Int,
                                   fromUser: Boolean) {
        val progress_custom = MIN + ( progress * STEP )
        progressView!!.text = progress_custom.toString()
        seekbarStatusView!!.text = "Tracking Touch"
    }

    override fun onStartTrackingTouch(seekBar: SeekBar) {
        seekbarStatusView!!.text = "Started Tracking Touch"
    }

    override fun onStopTrackingTouch(seekBar: SeekBar) {
        seekbarStatusView!!.text = "Stopped Tracking Touch"
    }
}
Output
Set a custom SeekBar range from 5 to 15 in Kotlin
If you need a smaller range, such as values from 5 to 15, use the same formula. With a step of 1, the SeekBar has 10 progress positions after the minimum value.
val minValue = 5
val maxValue = 15
val stepValue = 1

seekBar.max = (maxValue - minValue) / stepValue

seekBar.setOnSeekBarChangeListener(object : SeekBar.OnSeekBarChangeListener {
    override fun onProgressChanged(seekBar: SeekBar, progress: Int, fromUser: Boolean) {
        val selectedValue = minValue + (progress * stepValue)
        textView.text = selectedValue.toString()
    }

    override fun onStartTrackingTouch(seekBar: SeekBar) = Unit

    override fun onStopTrackingTouch(seekBar: SeekBar) = Unit
})
This gives selectable values from 5 to 15, including both 5 and 15.
Modern AndroidX SeekBar custom range example with View Binding
The original example above uses an older Android Support Library layout and Kotlin synthetic view access. For new Kotlin Android projects, you can use AndroidX and View Binding. The range logic remains the same: set max using (max - min) / step, and map the raw progress to the actual value.
Enable View Binding in build.gradle.kts
android {
    buildFeatures {
        viewBinding = true
    }
}
AndroidX layout with a range SeekBar
<?xml version="1.0" encoding="utf-8"?>
<androidx.constraintlayout.widget.ConstraintLayout xmlns:android="http://schemas.android.com/apk/res/android"
    xmlns:app="http://schemas.android.com/apk/res-auto"
    android:layout_width="match_parent"
    android:layout_height="match_parent">

    <LinearLayout
        android:layout_width="0dp"
        android:layout_height="wrap_content"
        android:gravity="center"
        android:orientation="vertical"
        android:padding="24dp"
        app:layout_constraintBottom_toBottomOf="parent"
        app:layout_constraintEnd_toEndOf="parent"
        app:layout_constraintStart_toStartOf="parent"
        app:layout_constraintTop_toTopOf="parent">

        <TextView
            android:id="@+id/selectedValueText"
            android:layout_width="wrap_content"
            android:layout_height="wrap_content"
            android:padding="16dp"
            android:text="10" />

        <SeekBar
            android:id="@+id/rangeSeekBar"
            android:layout_width="match_parent"
            android:layout_height="wrap_content" />

    </LinearLayout>

</androidx.constraintlayout.widget.ConstraintLayout>
MainActivity.kt with custom range mapping
package com.tutorialkart.seekbarexample

import android.os.Bundle
import android.widget.SeekBar
import androidx.appcompat.app.AppCompatActivity
import com.tutorialkart.seekbarexample.databinding.ActivityMainBinding

class MainActivity : AppCompatActivity() {

    private lateinit var binding: ActivityMainBinding

    private val minValue = 10
    private val maxValue = 160
    private val stepValue = 5

    override fun onCreate(savedInstanceState: Bundle?) {
        super.onCreate(savedInstanceState)

        binding = ActivityMainBinding.inflate(layoutInflater)
        setContentView(binding.root)

        binding.rangeSeekBar.max = (maxValue - minValue) / stepValue
        binding.selectedValueText.text = minValue.toString()

        binding.rangeSeekBar.setOnSeekBarChangeListener(object : SeekBar.OnSeekBarChangeListener {
            override fun onProgressChanged(seekBar: SeekBar, progress: Int, fromUser: Boolean) {
                val selectedValue = minValue + (progress * stepValue)
                binding.selectedValueText.text = selectedValue.toString()
            }

            override fun onStartTrackingTouch(seekBar: SeekBar) = Unit

            override fun onStopTrackingTouch(seekBar: SeekBar) = Unit
        })
    }
}
Use Kotlin ranges to validate a SeekBar custom value
Kotlin ranges are useful when you want to check whether the selected value is inside the expected range. After converting the raw SeekBar progress to a custom value, you can validate it with the in operator.
val selectedValue = minValue + (progress * stepValue)

if (selectedValue in minValue..maxValue) {
    selectedValueText.text = selectedValue.toString()
}
This is not required for a simple SeekBar setup, but it is useful when values come from saved preferences, restored state, or external input.
When to use SeekBar range mapping instead of a custom RangeSeekBar
The example in this tutorial selects one value from a custom range. For that use case, a normal Android SeekBar is enough. Use range mapping when the user needs to choose one value such as volume, age, duration, quantity, or percentage.
A custom RangeSeekBar is different. It usually has two thumbs, one for the lower value and one for the upper value. Use a two-thumb range component only when the user must choose a range, such as price from 500 to 2000 or age from 18 to 60.
Common mistakes while setting custom range for Android SeekBar
- Setting
seekBar.max = MAXdirectly: For a mapped custom range, setseekBar.max = (MAX - MIN) / STEP. - Displaying raw progress: Use
MIN + progress * STEPbefore showing the value to the user. - Choosing a STEP that does not fit the range: If
(MAX - MIN)is not divisible bySTEP, the final value may not equalMAX. - Confusing SeekBar with RangeSeekBar: A normal SeekBar selects one value. A RangeSeekBar generally selects a lower and upper value.
- Using Kotlin synthetic access in new projects: Prefer View Binding or
findViewById()in new Android projects.
Android SeekBar custom range FAQ
How do I set a custom range for Android SeekBar in Kotlin?
Set the SeekBar maximum as (MAX - MIN) / STEP. Then convert the raw progress to the actual value using MIN + progress * STEP inside onProgressChanged().
How do I get the selected value from a custom range SeekBar?
Read the raw progress from the callback or from seekBar.progress, and then apply the custom range formula. For example, val selectedValue = minValue + seekBar.progress * stepValue.
How can I create a SeekBar range between 5 and 15 in Kotlin?
Use minValue = 5, maxValue = 15, and stepValue = 1. Set seekBar.max = 10, and display 5 + progress as the selected value.
Can Android SeekBar have a step value?
A SeekBar progress changes by integer positions. You can create a step value by mapping each progress position to your actual value, such as MIN + progress * STEP.
Is a custom range SeekBar the same as a RangeSeekBar?
No. A custom range SeekBar in this tutorial selects one value from a mapped range. A RangeSeekBar usually has two thumbs and lets the user select a lower and upper value.
Editorial QA checklist for Android SeekBar custom range Kotlin code
- The tutorial explains that the SeekBar still uses raw progress internally.
- The custom value formula is shown as
MIN + progress * STEP. - The
seekBar.maxvalue is calculated from(MAX - MIN) / STEP. - The example clearly distinguishes a one-value SeekBar from a two-thumb RangeSeekBar.
- The code examples use Kotlin-specific syntax and the new code blocks use PrismJS-compatible classes.
- The existing Android SeekBar custom range images and links remain unchanged.
Android SeekBar custom range references
- Android Developers: SeekBar
- Android Developers: SeekBar.OnSeekBarChangeListener
- Kotlin Documentation: Ranges and progressions
Android SeekBar custom range summary
In this Android Tutorial – Android SeekBar Set Custom Range, we have learnt to set custom range, [MIN, MAX] and STEP for SeekBar. The main idea is to keep the SeekBar progress as an integer position and convert it to the required value using MIN + progress * STEP.