Android Game Development with Kotlin and SurfaceView
Android game development can be done in different ways. You can build a simple 2D game directly with Android views, Canvas, SurfaceView, and Kotlin, or you can use a full game engine when the project needs physics, scenes, tooling, and cross-platform support. This Kotlin Android Tutorial focuses on the first path: creating a small Android game from scratch using Kotlin, SurfaceView, a game loop, sprites, and touch input.
The example is intentionally simple. By the end, you will understand how to create a drawing surface, run a separate game thread, update sprite positions, draw bitmaps on a Canvas, and move a player object based on screen touch.
When Kotlin is suitable for Android game development
Kotlin is a good choice for Android games that are mostly 2D, UI-driven, puzzle-based, educational, arcade-style, or casual. It works well when you want to use Android Studio, Android APIs, touch input, audio, storage, ads, and Play Store features without adding a separate game engine.
For graphics-heavy 3D games or games that need advanced physics, asset pipelines, multiplayer tooling, and multi-platform releases, a game engine may be more practical. For learning how Android games work internally, however, Kotlin with SurfaceView is a useful starting point.
- Use Kotlin and SurfaceView for a small custom 2D game, learning project, simple arcade game, or prototype.
- Use a game engine when you need advanced rendering, level editors, complex physics, or easier multi-platform deployment.
- Use Jetpack Compose carefully for game-like UI or lightweight games, but SurfaceView or a dedicated rendering approach is still useful when you need a continuous drawing loop.
Game story for this Kotlin Android example
Any game that you would like to develop should have a story and script. You have to decide about the players in the game, the strategies, how you level up in the game, and what objects are going to be used. When you are ready with a fully scripted idea, you are ready to take it to application development mode.
Small changes to the script during development may not cost much time, but major changes to the game plan can affect your development schedule. This can be controlled to some extent by keeping the code modular. In this tutorial, the game story is simple: there is a grenade moving on the screen, and the player has to avoid it. This gives us enough scope to learn the basic Android game development structure.
Android game development techniques covered in this Kotlin tutorial
For any Android application development, we need some techniques. For example, if you are creating a Contacts application, you should know how to get the list of contacts and how to present it to the user. Similarly, for this Android game, we shall learn the following techniques.
- Playground: Use SurfaceView and SurfaceHolder.Callback to create a drawing area.
- Game loop: Use a dedicated thread to update game state and redraw the Canvas repeatedly.
- Sprites on Canvas: Draw bitmap images on the SurfaceView Canvas.
- Sprite movement: Redraw sprites at different positions to create movement.
- Touch-controlled player movement: Track screen touch and update the player sprite position.
- Basic game object structure: Keep each sprite in its own Kotlin class with update and draw functions.
Example – Create an Android Game in Kotlin
Following is a step-by-step guide to develop an Android game in Kotlin programming language. Or if you like to get to the code and go through it yourself, you may find the zipped file at https://github.com/tutorialkart/Android-Game-Examples/blob/master/ExampleGame.zip.
The screenshots below use an older Android Studio project creation flow. In current Android Studio versions, the exact screen labels may be different, but the project idea is the same: create an Android project with Kotlin support, add a custom SurfaceView, and use it from the activity layout.
Step 1: Create an Android project for the Kotlin game
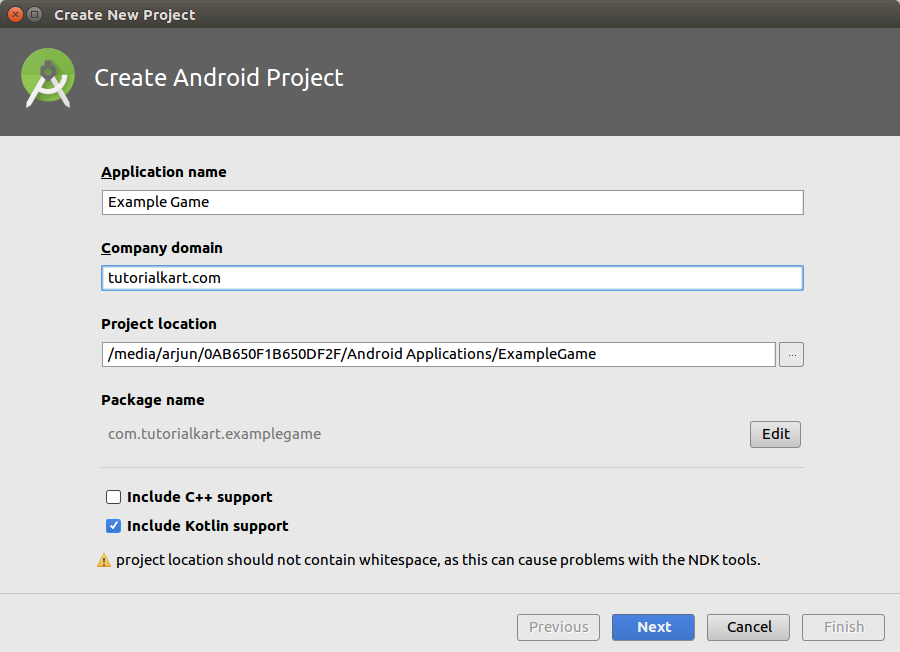
Open Android Studio and create a new Application with Kotlin support.
Lets name our application with “Example Game” and Click on Next.
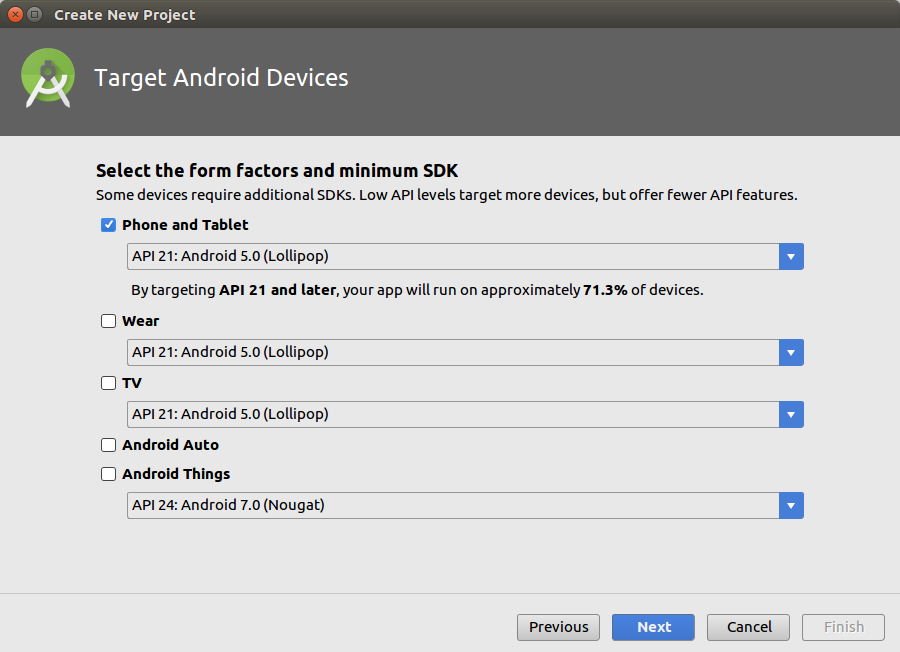
Select API version. For this project, we have selected Android 5.0 as minimum supported Android version. Click on Next.
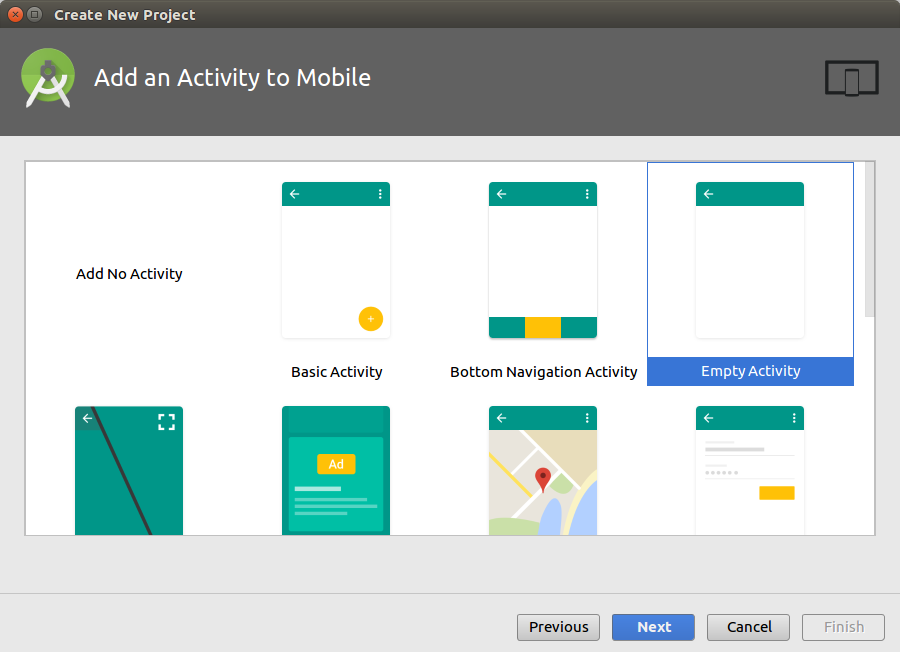
Select “Empty Activity” and Click on Next.
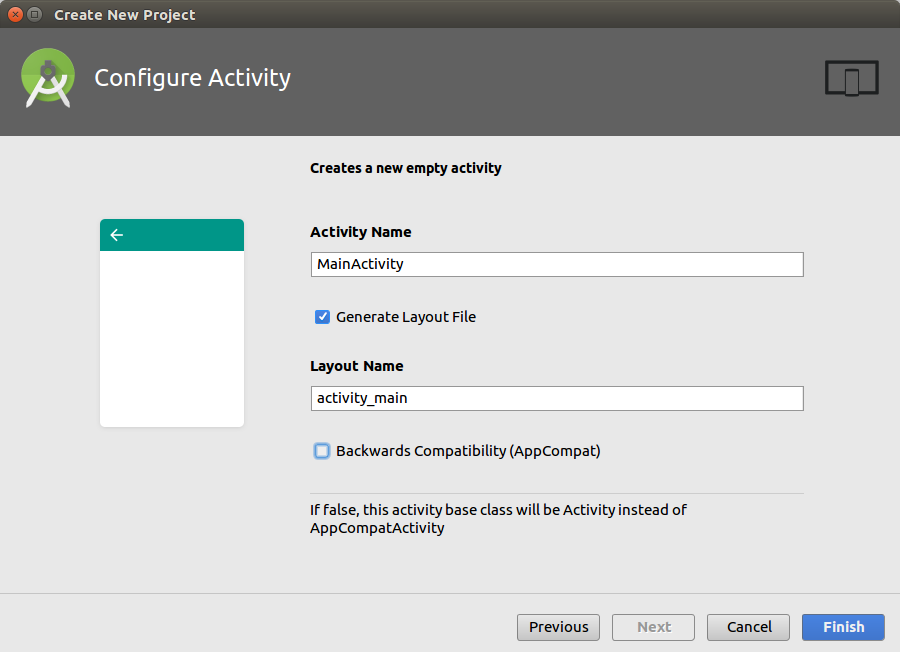
Name your Main Activity file and layout file. Uncheck “Backwards Compatibility(AppCompat)” and click on Finish. Our Android Application is created.
If you are using a newer Android Studio template, you may get a Compose-based project by default. For this tutorial, choose a view-based Empty Activity or create an XML layout manually, because the example places a custom GameView inside activity_main.xml.
Step 2: Add SurfaceView and SurfaceHolder.Callback for the game screen
SurfaceView by default does not help us much. So, we shall create a class that extends SurfaceView and implements SurfaceHolder.Callback.
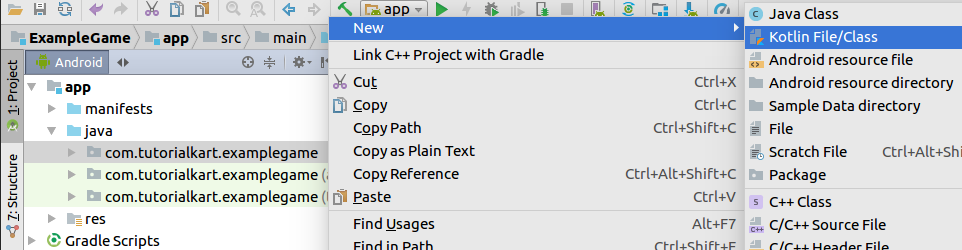
Right Click on the package “com.tutorialkart.examplegame” and follow the actions.
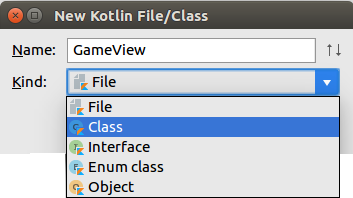
Give name as “GameView” and select “Class” for Kind.
GameView.kt
class GameView {
}
Change the primary constructor or GameView to GameView(context: Context, attributes: AttributeSet) and extend with SurfaceView(context, attributes), SurfaceHolder.Callback.
You should override some of the functions of SurfaveHolder.Callback as shown in the below program.
Also, in order to update the position of our players and draw them on the Canvas of SurfaceView, we need to create a function update() and override draw(Canvas: canvas) function of SurfaceView.
GameView.kt
import android.content.Context
import android.graphics.Canvas
import android.util.AttributeSet
import android.view.SurfaceHolder
import android.view.SurfaceView

class GameView(context: Context, attributes: AttributeSet) : SurfaceView(context, attributes), SurfaceHolder.Callback {
    override fun surfaceDestroyed(p0: SurfaceHolder?) {
        TODO("not implemented") //To change body of created functions use File | Settings | File Templates.
    }

    override fun surfaceCreated(p0: SurfaceHolder?) {
        TODO("not implemented") //To change body of created functions use File | Settings | File Templates.
    }

    override fun surfaceChanged(p0: SurfaceHolder?, p1: Int, p2: Int, p3: Int) {
        TODO("not implemented") //To change body of created functions use File | Settings | File Templates.
    }

    /**
     * Function to update the positions of player and game objects
     */
    fun update() {

    }

    /**
     * Everything that has to be drawn on Canvas
     */
    override fun draw(canvas: Canvas) {
        super.draw(canvas)
    }

}
In this class, surfaceCreated() is where the drawing surface becomes available, surfaceDestroyed() is where the game thread should stop, and draw() is where sprites are rendered on the Canvas.
Step 3: Add GameView to activity_main.xml
We shall use the GameView in activity_main.xml.
activity_main.xml
<?xml version="1.0" encoding="utf-8"?>
<RelativeLayout xmlns:android="http://schemas.android.com/apk/res/android"
    xmlns:tools="http://schemas.android.com/tools"
    android:layout_width="match_parent"
    android:layout_height="match_parent"
    tools:context="com.tutorialkart.examplegame.MainActivity">

    <com.tutorialkart.examplegame.GameView
        android:layout_width="match_parent"
        android:layout_height="match_parent" />

</RelativeLayout>
And in the AndroidManifest.xml, lets set the theme as Theme.NoTitleBar.Fullscreen, for the MainActivity.
AndroidManifest.xml
<?xml version="1.0" encoding="utf-8"?>
<manifest xmlns:android="http://schemas.android.com/apk/res/android"
    package="com.tutorialkart.examplegame">

    <application
        android:allowBackup="true"
        android:icon="@mipmap/ic_launcher"
        android:label="@string/app_name"
        android:roundIcon="@mipmap/ic_launcher_round"
        android:supportsRtl="true"
        android:theme="@style/AppTheme">
        <activity android:name=".MainActivity"
            android:theme="@android:style/Theme.NoTitleBar.Fullscreen">
            <intent-filter>
                <action android:name="android.intent.action.MAIN" />
                <category android:name="android.intent.category.LAUNCHER" />
            </intent-filter>
        </activity>
    </application>

</manifest>
For a current Android project, you may prefer a theme-based fullscreen setup instead of only setting it in the manifest. The main idea remains the same: the activity should show the custom game surface without unnecessary UI bars if the game needs full-screen space.
Step 4: Make MainActivity fullscreen for the Android game
Make your Activity get rid of the notification bar and title bar.
MainActivity.kt
package com.tutorialkart.examplegame

import android.app.Activity
import android.os.Bundle
import android.view.WindowManager
import android.util.DisplayMetrics

class MainActivity : Activity() {

    override fun onCreate(savedInstanceState: Bundle?) {
        super.onCreate(savedInstanceState)

        // remove notification bar
        this.getWindow().setFlags(WindowManager.LayoutParams.FLAG_FULLSCREEN, WindowManager.LayoutParams.FLAG_FULLSCREEN)

        setContentView(R.layout.activity_main)
    }
}
The above activity loads the XML layout that contains GameView. Once GameView is attached and the surface is created, the game loop can start drawing frames.
Step 5: Create a Kotlin game thread for update and draw calls
Next thing we need to do is, creating a thread which calls GameView for : updating the state of the game and drawing the game objects on to Canvas. GameView runs on UI Thread and it could go through different stages of life cycle. We do not want this to mess up with the smoothness of our game, which is why we are using a dedicated thread.
We shall create a Kotlin Class named, “GameThread”. The process of creating this Kotlin Class is same as that of GameView Class.
GameThread.kt
package com.tutorialkart.examplegame

import android.graphics.Canvas
import android.view.SurfaceHolder

/**
 * Created by arjun on 26/12/17.
 */

class GameThread(private val surfaceHolder: SurfaceHolder, private val gameView: GameView) : Thread() {
    private var running: Boolean = false

    private val targetFPS = 50 // frames per second, the rate at which you would like to refresh the Canvas

    fun setRunning(isRunning: Boolean) {
        this.running = isRunning
    }

    override fun run() {
        var startTime: Long
        var timeMillis: Long
        var waitTime: Long
        val targetTime = (1000 / targetFPS).toLong()

        while (running) {
            startTime = System.nanoTime()
            canvas = null

            try {
                // locking the canvas allows us to draw on to it
                canvas = this.surfaceHolder.lockCanvas()
                synchronized(surfaceHolder) {
                    this.gameView.update()
                    this.gameView.draw(canvas!!)
                }
            } catch (e: Exception) {
                e.printStackTrace()
            } finally {
                if (canvas != null) {
                    try {
                        surfaceHolder.unlockCanvasAndPost(canvas)
                    } catch (e: Exception) {
                        e.printStackTrace()
                    }
                }
            }

            timeMillis = (System.nanoTime() - startTime) / 1000000
            waitTime = targetTime - timeMillis

            try {
                sleep(waitTime)
            } catch (e: Exception) {
                e.printStackTrace()
            }
        }
    }

    companion object {
        private var canvas: Canvas? = null
    }

}
The important things to note here is the following four lines of code, in the try block.
canvas = this.surfaceHolder.lockCanvas()
synchronized(surfaceHolder) {
    this.gameView.update()
    this.gameView.draw(canvas!!)
}- We locked the Canvas, so that it allows us to draw on it.
- Using synchronized(surfaceHolder) means, we are not letting any other threads do any modifications to surfaceHolder (where Canvas is).
- Then we update the game state and draw the canvas with the new state of sprites.
- Once we are done updating the canvas, unlock it in the finally block.
surfaceHolder.unlockCanvasAndPost(canvas)The rest of the code is trying to update the canvas at the frequency set by targetFPS.
When you write your own game loop, make sure the wait time does not become negative. A frame can take longer than expected on slower devices. In that case, calling sleep() with a negative value can cause an exception. One simple safety check is to sleep only when the calculated wait time is greater than zero.
if (waitTime > 0) {
    sleep(waitTime)
}
And finally where we are going to start this GameThread ? Ofcourse from GameView.
GameView.kt
package com.tutorialkart.examplegame

import android.content.Context
import android.graphics.Canvas
import android.util.AttributeSet
import android.view.SurfaceView
import android.view.SurfaceHolder

/**
 * GameView is our playground.
 */

class GameView(context: Context, attributes: AttributeSet) : SurfaceView(context, attributes), SurfaceHolder.Callback {
    private val thread: GameThread

    init {

        // add callback
        holder.addCallback(this)

        // instantiate the game thread
        thread = GameThread(holder, this)
    }


    override fun surfaceCreated(surfaceHolder: SurfaceHolder) {
        // start the game thread
        thread.setRunning(true)
        thread.start()
    }

    override fun surfaceChanged(surfaceHolder: SurfaceHolder, i: Int, i1: Int, i2: Int) {

    }

    override fun surfaceDestroyed(surfaceHolder: SurfaceHolder) {
        var retry = true
        while (retry) {
            try {
                thread.setRunning(false)
                thread.join()
            } catch (e: Exception) {
                e.printStackTrace()
            }

            retry = false
        }
    }

    /**
     * Function to update the positions of player and game objects
     */
    fun update() {

    }

    /**
     * Everything that has to be drawn on Canvas
     */
    override fun draw(canvas: Canvas) {
        super.draw(canvas)
    }

}
Try giving it a run on an Android Phone. If all you are seeing is a black screen! Good. We have successfully learned to use create a SurfaceView. And we have prepared our playground. Now its time to introduce some players on to the field.
Step 6: Add a moving grenade sprite to the Kotlin game
Now, we shall introduce a sprite that moves on the Canvas. And keeping the idea that our game should be maintainable, when it becomes huge with code, we shall try to abstract a game object with a Class. We shall use the class to hold bitmap image, its position and state through the game. We shall take a Grenade as a Sprite.
Grenade.kt
package com.tutorialkart.examplegame

import android.content.res.Resources
import android.graphics.Bitmap
import android.graphics.Canvas

/**
 * Grenade Class.
 * It could be considered as System. System is playing against you in the game.
 * Grenade is the opponent.
 */

class Grenade(var image: Bitmap) {
    var x: Int = 0
    var y: Int = 0
    var w: Int = 0
    var h: Int = 0
    private var xVelocity = 20
    private var yVelocity = 20
    private val screenWidth = Resources.getSystem().displayMetrics.widthPixels
    private val screenHeight = Resources.getSystem().displayMetrics.heightPixels

    init {
        w = image.width
        h = image.height

        x = screenWidth/2
        y = screenHeight/2
    }

    /**
     * Draws the object on to the canvas.
     */
    fun draw(canvas: Canvas) {
        canvas.drawBitmap(image, x.toFloat(), y.toFloat(), null)
    }

    /**
     * update properties for the game object
     */
    fun update() {
        // val randomNum = ThreadLocalRandom.current().nextInt(1, 5)

        if (x > screenWidth - image.width || x < image.width) {
            xVelocity = xVelocity * -1
        }
        if (y > screenHeight - image.height || y < image.height) {
            yVelocity = yVelocity * -1
        }

        x += (xVelocity)
        y += (yVelocity)
    }

}
Take away from this class is that, we have two functions namely update() and draw(). We shall instantiate Grenade when Surface is created, and call Grenade.update() from GameView.update() and Grenade.draw() from GameView.draw().
This is kind of our scaling dimension. We can add as many types of sprites as per the game plan (script), and instantiate the sprites in GameView.surfaceCreated(), update the sprites’ state in GameView.update() and draw the sprite on to Canvas in GameView.draw().
GameView.kt
package com.tutorialkart.examplegame

import android.content.Context
import android.graphics.BitmapFactory
import android.graphics.Canvas
import android.util.AttributeSet
import android.view.SurfaceView
import android.view.SurfaceHolder

/**
 * GameView is our playground.
 */

class GameView(context: Context, attributes: AttributeSet) : SurfaceView(context, attributes), SurfaceHolder.Callback {
    private val thread: GameThread
    private var grenade: Grenade? = null

    init {

        // add callback
        holder.addCallback(this)

        // instantiate the game thread
        thread = GameThread(holder, this)
    }


    override fun surfaceCreated(surfaceHolder: SurfaceHolder) {
        // game objects
        grenade = Grenade(BitmapFactory.decodeResource(resources, R.drawable.grenade))

        // start the game thread
        thread.setRunning(true)
        thread.start()
    }

    override fun surfaceChanged(surfaceHolder: SurfaceHolder, i: Int, i1: Int, i2: Int) {

    }

    override fun surfaceDestroyed(surfaceHolder: SurfaceHolder) {
        var retry = true
        while (retry) {
            try {
                thread.setRunning(false)
                thread.join()
            } catch (e: Exception) {
                e.printStackTrace()
            }

            retry = false
        }
    }

    /**
     * Function to update the positions of sprites
     */
    fun update() {
        grenade!!.update()
    }

    /**
     * Everything that has to be drawn on Canvas
     */
    override fun draw(canvas: Canvas) {
        super.draw(canvas)

        grenade!!.draw(canvas)
    }
}
Add the following image file to res/drawable

Output
When run the application in an Android device, the result would look like below.
Step 7: Add a touch-controlled player sprite in Kotlin
For the player, we shall use a circle kind of image and make it track the touch on the screen. And like Grenade.kt, we are going to have update() and draw() functions.
Player.kt
package com.tutorialkart.examplegame

import android.content.res.Resources
import android.graphics.Bitmap
import android.graphics.Canvas

/**
 * Player Class.
 */

class Player(private val image: Bitmap) {
    private var x: Int = 0
    private var y: Int = 0
    private val w: Int
    private val h: Int
    private val screenWidth = Resources.getSystem().displayMetrics.widthPixels
    private val screenHeight = Resources.getSystem().displayMetrics.heightPixels

    init {
        w = image.width
        h = image.height

        x = screenWidth/2
        y = screenHeight - 200
    }

    /**
     * Draws the object on to the canvas.
     */
    fun draw(canvas: Canvas) {
        canvas.drawBitmap(image, x.toFloat(), y.toFloat(), null)
    }

    /**
     * update properties for the game object
     * when the player touches the screen, position the player bitmap there
     */
    fun updateTouch(touch_x: Int, touch_y: Int) {
        x = touch_x - w / 2
        y = touch_y - h / 2
    }

}
Now we have to make use of Player in our GameView, just as we did for Grenade.kt. But we are going to learn one more thing in this step. That is, how to track user touch input. And we shall make our Player track the touch.
To track touch input, we shall override onTouchEvent(event: MotionEvent) method in GameView Class. And with the introduction of Player.kt to GameView. Following is the updated GameView.kt file.
GameView.kt
package com.tutorialkart.examplegame

import android.content.Context
import android.graphics.BitmapFactory
import android.graphics.Canvas
import android.util.AttributeSet
import android.view.MotionEvent
import android.view.SurfaceView
import android.view.SurfaceHolder

/**
 * GameView is our playground.
 */

class GameView(context: Context, attributes: AttributeSet) : SurfaceView(context, attributes), SurfaceHolder.Callback {
    private val thread: GameThread
    private var grenade: Grenade? = null
    private var player: Player? = null

    private var touched: Boolean = false
    private var touched_x: Int = 0
    private var touched_y: Int = 0

    init {

        // add callback
        holder.addCallback(this)

        // instantiate the game thread
        thread = GameThread(holder, this)
    }

    override fun surfaceCreated(surfaceHolder: SurfaceHolder) {
        // game objects
        grenade = Grenade(BitmapFactory.decodeResource(resources, R.drawable.grenade))

        // start the game thread
        thread.setRunning(true)
        thread.start()
    }

    override fun surfaceChanged(surfaceHolder: SurfaceHolder, i: Int, i1: Int, i2: Int) {

    }

    override fun surfaceDestroyed(surfaceHolder: SurfaceHolder) {
        var retry = true
        while (retry) {
            try {
                thread.setRunning(false)
                thread.join()
            } catch (e: Exception) {
                e.printStackTrace()
            }

            retry = false
        }
    }

    /**
     * Function to update the positions of sprites
     */
    fun update() {
        grenade!!.update()
        if(touched) {
            player!!.update(touched_x, touched_y)
        }
    }

    /**
     * Everything that has to be drawn on Canvas
     */
    override fun draw(canvas: Canvas) {
        super.draw(canvas)

        grenade!!.draw(canvas)
        player!!.draw(canvas)
    }

    override fun onTouchEvent(event: MotionEvent): Boolean {
        // when ever there is a touch on the screen,
        // we can get the position of touch
        // which we may use it for tracking some of the game objects
        touched_x = event.x.toInt()
        touched_y = event.y.toInt()

        val action = event.action
        when (action) {
            MotionEvent.ACTION_DOWN -> touched = true
            MotionEvent.ACTION_MOVE -> touched = true
            MotionEvent.ACTION_UP -> touched = false
            MotionEvent.ACTION_CANCEL -> touched = false
            MotionEvent.ACTION_OUTSIDE -> touched = false
        }
        return true
    }

}
Run the application and you will observe that the circle (Player bitmap), shall track your touch.
Small compile fix for the player sprite example
In the player step, make sure the Player object is created before the game thread starts, and call the same function name that exists in Player.kt. In the Player.kt class above, the touch movement function is named updateTouch(). Therefore, the player setup in GameView.kt should follow this pattern.
override fun surfaceCreated(surfaceHolder: SurfaceHolder) {
    grenade = Grenade(BitmapFactory.decodeResource(resources, R.drawable.grenade))
    player = Player(BitmapFactory.decodeResource(resources, R.drawable.player))

    thread.setRunning(true)
    thread.start()
}

fun update() {
    grenade?.update()
    if (touched) {
        player?.updateTouch(touched_x, touched_y)
    }
}
You also need a drawable resource for the player image, for example res/drawable/player.png. If your file name is different, update R.drawable.player accordingly.
How the Kotlin Android game loop works
The basic structure of this Android game is simple. The activity displays GameView. The GameView owns the game objects. The GameThread repeatedly locks the Canvas, calls update(), calls draw(), and posts the frame back to the screen.
- GameView manages the SurfaceView lifecycle and coordinates the game objects.
- GameThread creates the repeated frame loop.
- Grenade stores bitmap, position, velocity, update logic, and draw logic for the opponent sprite.
- Player stores bitmap and touch-based position logic for the user-controlled sprite.
- Canvas is the drawing target where each frame is rendered.
This pattern is useful for beginner Android game development because it separates responsibilities. A sprite class should not know about the activity. The activity should not directly handle sprite movement. The game view should connect the surface lifecycle, game loop, touch input, and game objects.
Important improvements before turning this Kotlin example into a real game
The tutorial example is meant for learning. Before using the same structure in a production Android game, consider these improvements.
- Use the actual view size instead of
Resources.getSystem().displayMetrics, because the available drawing area may differ from the full physical screen. - Avoid force unwrapping with
!!in game loop code. A null sprite can crash the loop. - Handle pause and resume from the activity lifecycle, especially when the user switches apps or locks the device.
- Use delta time for smoother movement instead of moving every sprite by a fixed number of pixels per frame.
- Recycle or reuse bitmap resources carefully when the game becomes larger.
- Add collision detection between the grenade and player if you want the game to detect win or lose conditions.
- Separate input state from drawing as the game grows, so touch handling does not become mixed with rendering logic.
Simple collision check between grenade and player sprites
The current example moves two sprites but does not yet detect whether they touch each other. A beginner-friendly way to start is rectangle-based collision detection. Each sprite can expose its bounds, and the game view can check whether the two rectangles overlap.
import android.graphics.Rect

fun getBounds(x: Int, y: Int, width: Int, height: Int): Rect {
    return Rect(x, y, x + width, y + height)
}

fun isCollision(playerBounds: Rect, grenadeBounds: Rect): Boolean {
    return Rect.intersects(playerBounds, grenadeBounds)
}
For a circular player image or irregular sprite shape, rectangle collision may be rough. But it is simple, fast, and good enough for many beginner 2D Android game examples.
Kotlin Android game development checklist for this SurfaceView project
- The project uses a view-based Android layout where
GameViewis added toactivity_main.xml. GameViewextendsSurfaceViewand implementsSurfaceHolder.Callback.- The game thread starts only after
surfaceCreated()is called. - The game thread is stopped safely in
surfaceDestroyed(). - The Canvas is locked before drawing and unlocked in the finally block.
- Each sprite has its own Kotlin class with drawing and update logic.
- Touch input is handled in
onTouchEvent()and used to move the player sprite. - Bitmap drawable names match the resource names used in Kotlin code.
- The code avoids negative sleep time in the frame loop.
- The game is tested on a real Android device, not only in the emulator.
Common errors while creating a Kotlin SurfaceView game
- Only a black screen appears: This can be normal before sprites are added. If sprites are already added, check whether
draw()is called and whether the bitmap resource exists. - App crashes when touching the screen: Check whether
playeris initialized before calling player movement functions. - Unresolved reference for drawable: Confirm that the image file is inside
res/drawableand the resource name is lowercase with underscores if needed. - Thread already started error: A Java/Kotlin thread cannot be started twice. Create and manage the game thread carefully when the surface is recreated.
- Movement speed differs across devices: A fixed-pixel-per-frame movement depends on frame timing. Use delta time for more consistent movement.
FAQ on creating Android games with Kotlin
Can you make mobile games with Kotlin?
Yes. Kotlin can be used to make Android mobile games, especially 2D games, casual games, puzzle games, educational games, and prototypes. You can use Android APIs directly with SurfaceView and Canvas, or use Kotlin with other frameworks depending on the type of game.
Is Kotlin enough for Android game development?
Kotlin is enough for many Android-only 2D games and learning projects. For large 3D games, high-performance rendering, complex physics, or multi-platform releases, you may need a game engine or lower-level graphics tools.
Why use SurfaceView for a Kotlin Android game?
SurfaceView gives you a separate drawing surface that can be updated from a dedicated thread. This is useful for a game loop where the screen must be redrawn many times per second.
Is C++ faster than Kotlin for games?
C++ can be faster for low-level, performance-critical game systems, especially rendering engines and physics-heavy workloads. Kotlin is usually more convenient for Android app structure, UI, platform APIs, and simpler 2D games. The right choice depends on the game requirements.
Can Jetpack Compose be used for Android games?
Jetpack Compose can be used for game-like interfaces and simple interactive screens. For a continuous custom-rendered game loop, SurfaceView, Canvas, or a dedicated game framework may still be a better fit.
Conclusion: Building a simple Android game using Kotlin
In this Kotlin Android Tutorial, we built the base structure of a simple Android game using Kotlin. We created a SurfaceView playground, added a game thread, drew sprites on a Canvas, moved a grenade sprite, and controlled a player sprite using touch input.
This is only the foundation of Android game development. From here, you can add collision detection, scoring, sound effects, pause and resume handling, levels, menus, and game-over screens. Keep the code modular as the game grows, and place each major game object or system in its own Kotlin class.