Kotlin Android Login Form with Username, Password, Reset and Submit Buttons
In this Kotlin Android tutorial, we shall learn how to implement a simple login form in an Android Activity. The example uses a username field, a password field, a Reset button, and a Submit button.
This tutorial is useful when you want to understand the basic login screen layout and how to read values entered in EditText views using Kotlin. The example shows the entered username in a Toast so that you can clearly see how the Submit button reads the form values.
The Login Form shall include two edit text views for user name and password. There shall be a reset button to reset the fields and a submit button to read the values for user name and password and further process them. OnClickListeners are setup for reset and submit buttons.
In a real application, do not validate passwords only inside the Activity. A login form usually sends the credentials to a secure backend, Firebase Authentication, Auth0, or another authentication service over HTTPS. This example is intentionally kept simple so that beginners can focus on the Android UI and Kotlin click handling.
What This Kotlin Android Login Screen Example Covers
- Create a login screen layout with
TextView,EditText, andButtonwidgets. - Use
android:inputType="textPassword"to hide the password characters while the user types. - Read username and password values from the form in Kotlin.
- Clear both input fields when the Reset button is clicked.
- Handle the Submit button using a Kotlin
setOnClickListener.
A mock-up screenshot of the Login Form Example in Kotlin Android would be as shown in the following.
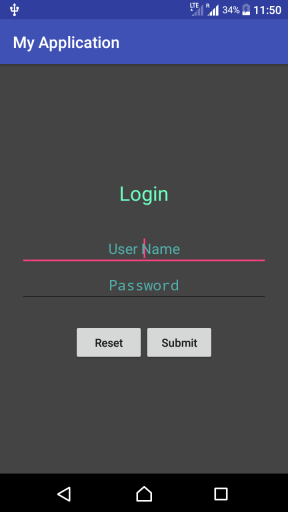
Example – Kotlin Android Login Screen
Create an Android Application with Kotlin Support and replace activity_main.xml and MainActivity.kt with the following content, which will help you create a Login Form.
activity_main.xml
<?xml version="1.0" encoding="utf-8"?>
<android.support.constraint.ConstraintLayout
    xmlns:android="http://schemas.android.com/apk/res/android"
    xmlns:tools="http://schemas.android.com/tools"
    android:layout_width="match_parent"
    android:layout_height="match_parent"
    tools:context="com.tutorialkart.myapplication.MainActivity">
    <LinearLayout
        android:id="@+id/ll_main_layout"
        android:layout_width="match_parent"
        android:layout_height="match_parent"
        android:gravity="center"
        android:background="#444444"
        android:padding="25dp"
        android:orientation="vertical">
        <TextView
            android:layout_width="wrap_content"
            android:layout_height="wrap_content"
            android:textSize="25dp"
            android:textColor="#6dffbf"
            android:padding="30dp"
            android:text="Login"/>
        <EditText
            android:id="@+id/et_user_name"
            android:hint="User Name"
            android:textColor="#6bfff7"
            android:textColorHint="#52afaa"
            android:textAlignment="center"
            android:layout_width="match_parent"
            android:layout_height="wrap_content"/>
        <EditText
            android:id="@+id/et_password"
            android:hint="Password"
            android:textColor="#6bfff7"
            android:textColorHint="#52afaa"
            android:textAlignment="center"
            android:inputType="textPassword"
            android:layout_width="match_parent"
            android:layout_height="wrap_content"/>
        <LinearLayout
            android:layout_width="match_parent"
            android:layout_height="wrap_content"
            android:gravity="center"
            android:padding="25dp"
            android:orientation="horizontal">
            <Button
                android:id="@+id/btn_reset"
                android:text="Reset"
                android:textAllCaps="false"
                android:layout_width="wrap_content"
                android:layout_height="wrap_content" />
            <Button
                android:id="@+id/btn_submit"
                android:text="Submit"
                android:textAllCaps="false"
                android:layout_width="wrap_content"
                android:layout_height="wrap_content" />
        </LinearLayout>
    </LinearLayout>

</android.support.constraint.ConstraintLayout>
MainActivity.kt
package com.tutorialkart.myapplication

import android.support.v7.app.AppCompatActivity
import android.os.Bundle
import android.view.View
import android.widget.*

/**
 * A Login Form Example in Kotlin Android
 */
class MainActivity : AppCompatActivity() {

    override fun onCreate(savedInstanceState: Bundle?) {
        super.onCreate(savedInstanceState)
        setContentView(R.layout.activity_main)

        // get reference to all views
        var et_user_name = findViewById(R.id.et_user_name) as EditText
        var et_password = findViewById(R.id.et_password) as EditText
        var btn_reset = findViewById(R.id.btn_reset) as Button
        var btn_submit = findViewById(R.id.btn_submit) as Button

        btn_reset.setOnClickListener {
            // clearing user_name and password edit text views on reset button click
            et_user_name.setText("")
            et_password.setText("")
        }

        // set on-click listener
        btn_submit.setOnClickListener {
            val user_name = et_user_name.text;
            val password = et_password.text;
            Toast.makeText(this@MainActivity, user_name, Toast.LENGTH_LONG).show()

            // your code to validate the user_name and password combination
            // and verify the same

        }
    }
}
How the Kotlin Login Form Layout Works
The root layout in this example is a ConstraintLayout. Inside it, a vertical LinearLayout is used to keep the login title, username field, password field, and buttons in one column. The android:gravity="center" attribute places the form content near the center of the screen.
The username field uses a normal EditText. The password field uses android:inputType="textPassword", so the typed characters are hidden. The Reset and Submit buttons are placed inside another horizontal LinearLayout, so they appear side by side.
How the Submit and Reset Button Clicks Work in Kotlin
In MainActivity.kt, the views are accessed using findViewById(). The Reset button calls setText("") on both input fields. The Submit button reads the values from et_user_name.text and et_password.text.
For simple validation, you can check whether the fields are empty before continuing. The following additional Kotlin snippet shows the usual pattern. This is not a replacement for server-side authentication; it only validates the form before you submit the values.
btn_submit.setOnClickListener {
    val userName = et_user_name.text.toString().trim()
    val password = et_password.text.toString()

    when {
        userName.isEmpty() -> {
            et_user_name.error = "Enter user name"
        }
        password.isEmpty() -> {
            et_password.error = "Enter password"
        }
        else -> {
            Toast.makeText(this, "Login form submitted", Toast.LENGTH_SHORT).show()
            // Send userName and password to your secure backend here.
        }
    }
}
AndroidX Note for New Kotlin Android Projects
The original example uses older Android support package names because it was written for earlier Android Studio project templates. In a current Android project, you may see AndroidX package names instead. For example, the support imports and layout class names are commonly replaced as shown below.
import androidx.appcompat.app.AppCompatActivity<androidx.constraintlayout.widget.ConstraintLayout
android:layout_width="match_parent"
android:layout_height="match_parent">
</androidx.constraintlayout.widget.ConstraintLayout>If your project uses AndroidX, keep the same login form idea but update the package names according to your project setup. The EditText, Button, Toast, and setOnClickListener logic remains the same.
Login Form Security Points for Kotlin Android Apps
This example is a beginner-friendly UI tutorial, not a complete authentication system. Before using a login form in a production app, keep the following points in mind.
- Do not hard-code real usernames or passwords inside the Android app.
- Do not show or log the password value in a Toast, Logcat message, or analytics event.
- Send credentials only over HTTPS to a trusted backend or authentication provider.
- Validate credentials on the server side, not only inside the Android Activity.
- Store login sessions using a suitable secure storage approach instead of saving plain passwords.
If you only need a demo login screen, the code in this tutorial is enough. If you need real user sign-in, connect this form to a proper authentication flow.
When you run this Android Application, you will get the following output.
User would be able to enter user name and password.
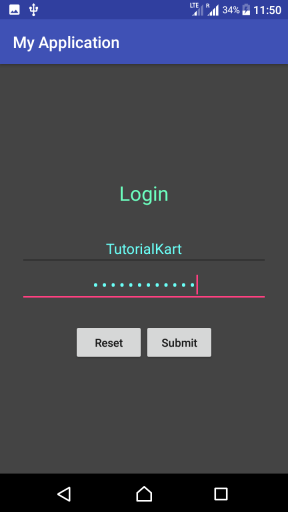
When the user clicks Submit, the example shows the entered user name in a Toast. In your own application, this is the place where you would validate the form, call your backend API, or start the next screen after a successful login.

Common Errors in Kotlin Android Login Form Example
| Issue | Likely reason | How to fix it |
|---|---|---|
R.id.et_user_name is unresolved | The ID in XML does not match the ID used in Kotlin. | Check that the EditText has android:id="@+id/et_user_name". |
AppCompatActivity import error | The project uses AndroidX but the code imports the old support package. | Use the AndroidX import shown above if your project is configured for AndroidX. |
| Password is visible while typing | The password field does not have the correct input type. | Add android:inputType="textPassword" to the password EditText. |
| Button click does nothing | The listener is not attached to the correct button reference. | Check the button IDs and the setOnClickListener blocks. |
| Empty values are submitted | No form validation is added before submission. | Add empty-field checks before calling your login logic. |
FAQs on Login Form Example in Kotlin Android
Can this Kotlin Android login form be used for real authentication?
The UI can be used as a starting point, but the example itself is not a complete authentication system. For real login, send the credentials securely to a backend or authentication provider and validate them there.
Why is the password field written with inputType textPassword?
The textPassword input type hides the entered characters and makes the field behave like a password input. It improves the user interface, but it does not replace secure authentication.
How do I clear username and password fields in Kotlin?
You can call setText("") on both EditText views. In this tutorial, the Reset button clears et_user_name and et_password.
Should I store the password in SharedPreferences after login?
No. Do not store plain passwords in SharedPreferences. Store a session token or authentication state using a secure approach recommended for your app architecture.
Can I use the same login screen with Firebase Authentication?
Yes. You can keep a similar username or email and password layout, then call Firebase Authentication from the Submit button handler instead of showing a Toast.
QA Checklist for This Kotlin Android Login Form Tutorial
- The XML contains both username and password
EditTextIDs used in Kotlin. - The password field uses
android:inputType="textPassword". - The Reset button clears both fields.
- The Submit button reads form values only after the user clicks it.
- The tutorial clearly separates demo UI behavior from real authentication security.
- AndroidX users are told which package names may need updating.
Conclusion
In this Kotlin Android Tutorial, we learned how to build a Login screen in Kotlin Android using basic widgets like TextView, EditText, Button, etc. We also saw how to clear the form, read entered values, add simple empty-field validation, and understand where secure authentication logic should be added in a real app.