Installing Salesforce Data Loader in macOS and Windows
Salesforce Data Loader is a desktop client application used to import, update, upsert, delete, export, and export all Salesforce records in bulk. In this Salesforce Tutorial, we learn What is Salesforce Data Loader, how to install Apex Data Loader on macOS and Windows, how to log in using OAuth or password authentication, and how a security token is used when required. After installation, you can use Data Loader to upload, delete, export, and Import records.
The current Salesforce Data Loader installation process is different from older versions because Java requirements and download locations can change by release. Always use the latest official Salesforce Data Loader download and review the installation notes for your operating system before installing it on a production admin machine.
What is Salesforce Data Loader?
Salesforce Data Loader is a desktop client application used in Salesforce to import, export, delete, insert, update, and upsert bulk records. It is mainly used by Salesforce administrators and developers when record volume is too large for manual editing or when an operation is not supported by Data Import Wizard.
Data Loader can work with CSV files and Salesforce objects that the logged-in user has permission to access. For large data loads, Salesforce Data Loader supports files with up to 5 million records. For smaller guided imports into supported objects, Data Import Wizard may be easier to use.
Salesforce Data Loader features and bulk data operations
- Using Data Loader we can load up to 5,000,000 records.
- Using Data Loader we can schedule the loads through command-line configuration where supported by the installed version and environment.
- We can import data from .csv (Comma Separated Values) files.
- Success and error log files are created in CSV format.
- Data Loader supports standard objects and custom objects that are accessible to the user.
- Drag-and-drop field mapping is available in the Data Loader user interface.
- Saved mapping files can be reused for repeated imports and updates.
Salesforce Data Loader operations after installation
Using Data Loader, we can perform the following operations after logging in to Salesforce.
- Insert – Insertion of new records.
- Update – Updating existing records by using Salesforce record IDs.
- Upsert – Updating existing records and inserting new records by using a Salesforce ID or an External ID. Learn more in How Apex loader is used to upload records.
- Delete – Deleting existing records and moving them to the Recycle Bin.
- Hard Delete – Permanently deleting records when the user has the required permission.
- Export – Exporting active records from Salesforce.
- Export All – Exporting all records, including records in the Recycle Bin and archived activities where applicable.
How to Install Salesforce Data Loader on macOS and Windows
Installing Data Loader and setting up Data Loader require basic knowledge of Java, Salesforce login methods, and security tokens. Before installing Data Loader in Windows or macOS, first check the current system requirements for the Data Loader release you plan to use. Salesforce provides the latest Data Loader download at the official Salesforce Data Loader page.
Salesforce Data Loader system requirements for Windows
- Use a supported Windows version listed in the release notes for the Data Loader version you are installing.
- Install Java Runtime Environment (JRE) version 17 or later unless the current release notes specify a newer requirement.
- Use a user account that has permission to install applications on the computer.
- Keep enough disk space for the installer, extracted files, mapping files, and success or error CSV files.
- Use the latest official Data Loader release because Salesforce support is focused on the current version.
Salesforce Data Loader system requirements for macOS
- Use a supported macOS version listed in the release notes for the Data Loader version you are installing.
- Install Java Runtime Environment (JRE) version 17 or later unless the current release notes specify a newer requirement.
- Use the correct installer for your Mac architecture where the release offers separate options.
- Make sure you have administrator privileges or approval from your IT team to install the application.
- Allow macOS security prompts if the installer or application asks for permission during the first launch.
For the latest platform-specific guidance, review Salesforce’s official installation documentation for Data Loader installation and Data Loader installation on macOS.
Installing Salesforce Data Loader in local system
After checking all system requirements, install Salesforce Data Loader in your local system. Follow the steps given below to install Salesforce Data Loader safely.
- Download Data Loader from Salesforce.
- Install the required Java Runtime Environment for your operating system.
- Extract or run the Data Loader installer as described in the official installation guide.
- Install Data Loader in macOS or Windows operating system.
- Open Data Loader and choose the required operation.
- Log in with OAuth or password authentication.
- Generate security token if password authentication requires it.
Downloading Salesforce Data Loader from Salesforce
Data Loader can be downloaded from Salesforce. In older Salesforce Setup screens, Data Loader can be found from Data Management. Go to Data Management | Data Loader. You can also download the latest version from the official Salesforce Developers Data Loader page.
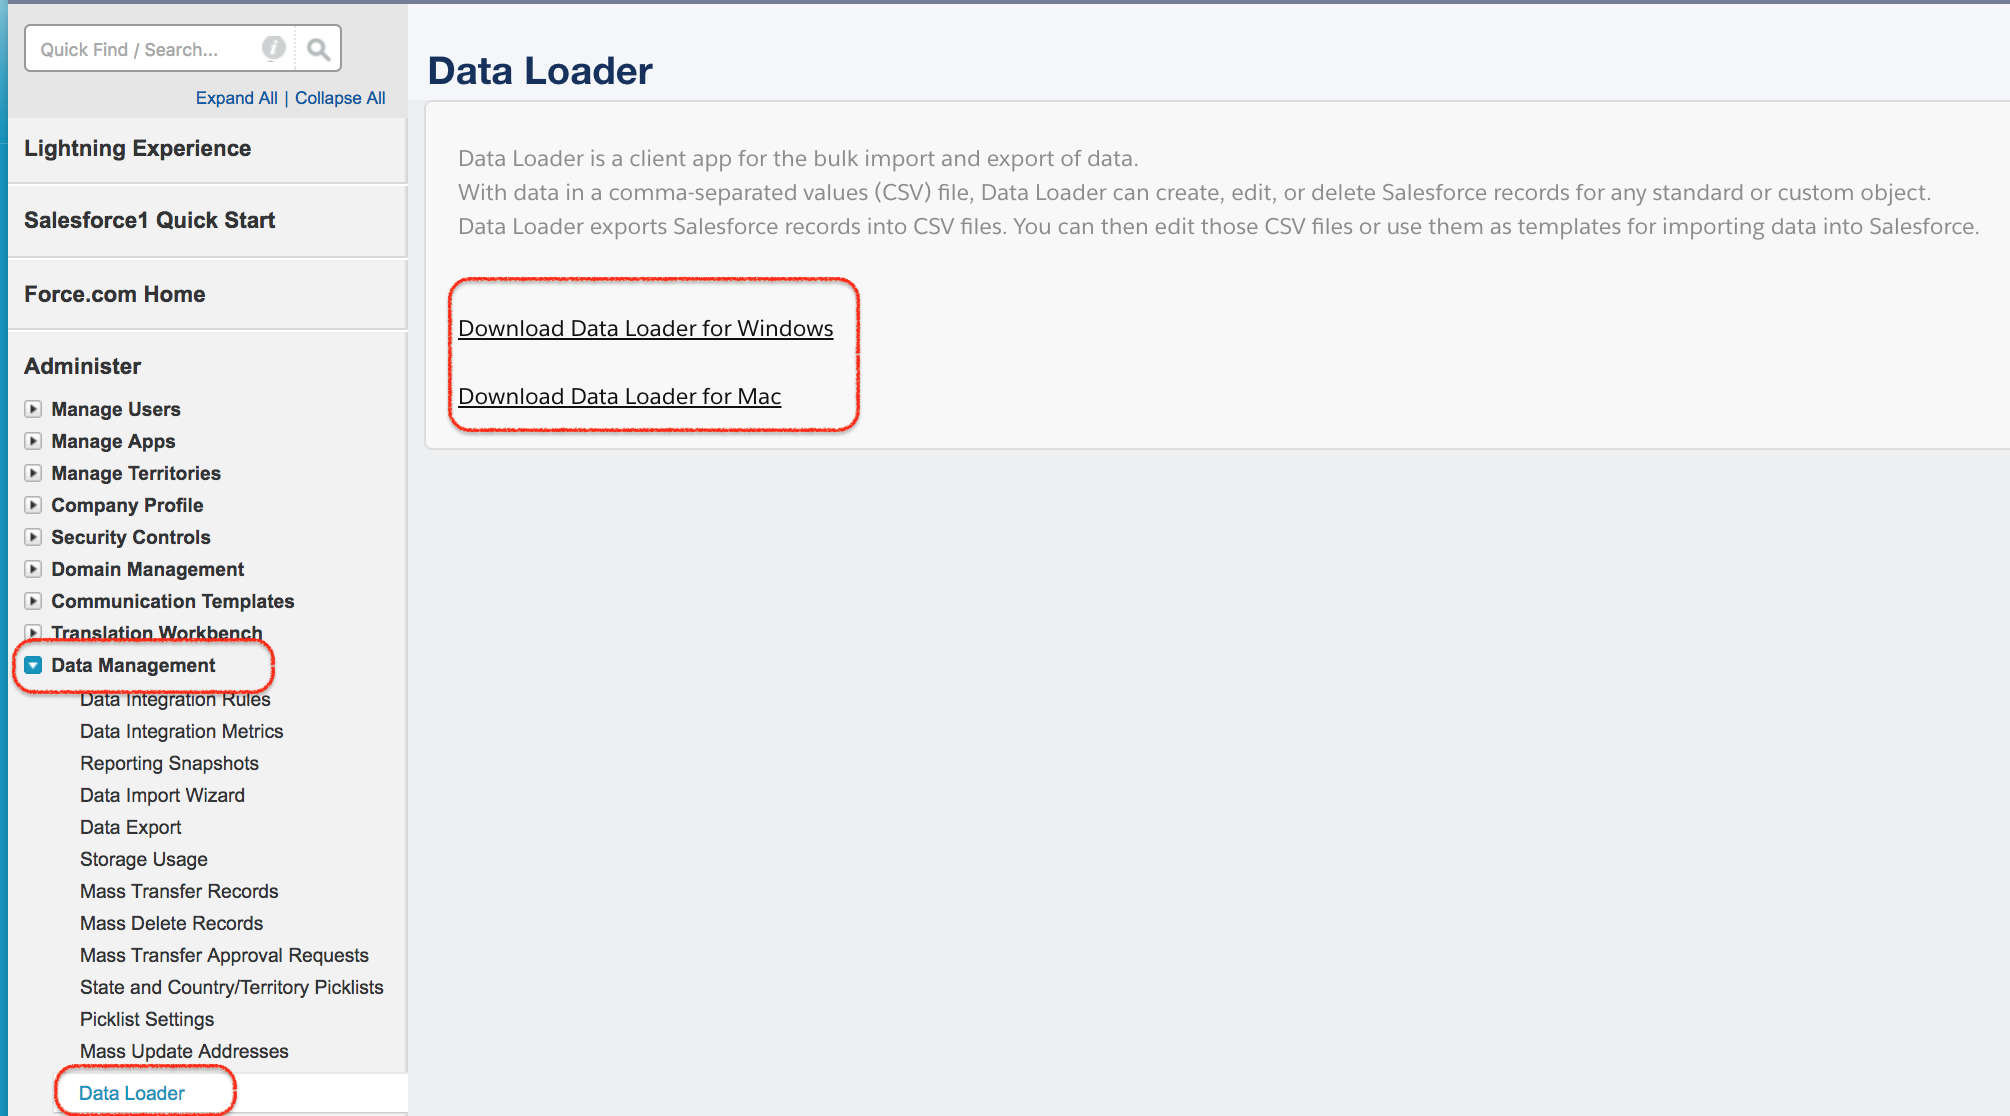
- Click on Data Loader and select the operating system to which you want to download.
- Now Apex Data Loader will download into our local system.
- Install the required Java version in your local system before running Data Loader.
- Now install Salesforce Data Loader by following the installer instructions for your operating system.
Installing Salesforce Data Loader on Windows step by step
- Download the latest Salesforce Data Loader package for Windows from the official Salesforce Data Loader page.
- Install JRE 17 or later if Java is not already installed on the computer.
- Extract the downloaded Data Loader package if it is provided as a compressed file.
- Run the Windows installation file from the extracted folder, not from inside the compressed file.
- Follow the installer prompts and complete the installation.
- Open Data Loader from the Start menu or installed application location.
- Choose an operation such as Insert, Update, Upsert, Delete, Export, or Export All.
Installing Salesforce Data Loader on macOS step by step
- Download the latest Salesforce Data Loader package for macOS from the official Salesforce Data Loader page.
- Install JRE 17 or later if Java is not already installed on the Mac.
- Extract the downloaded package if required.
- Run the macOS installation command or installer file as described in the Salesforce installation guide.
- If macOS blocks the first launch, review the security prompt and allow the application only if it came from the official Salesforce download.
- Open Data Loader and select the required Salesforce data operation.
- Log in to your production org or sandbox, depending on the environment you need.

- Choose any operation as shown above.
Logging in to Salesforce Data Loader after installation
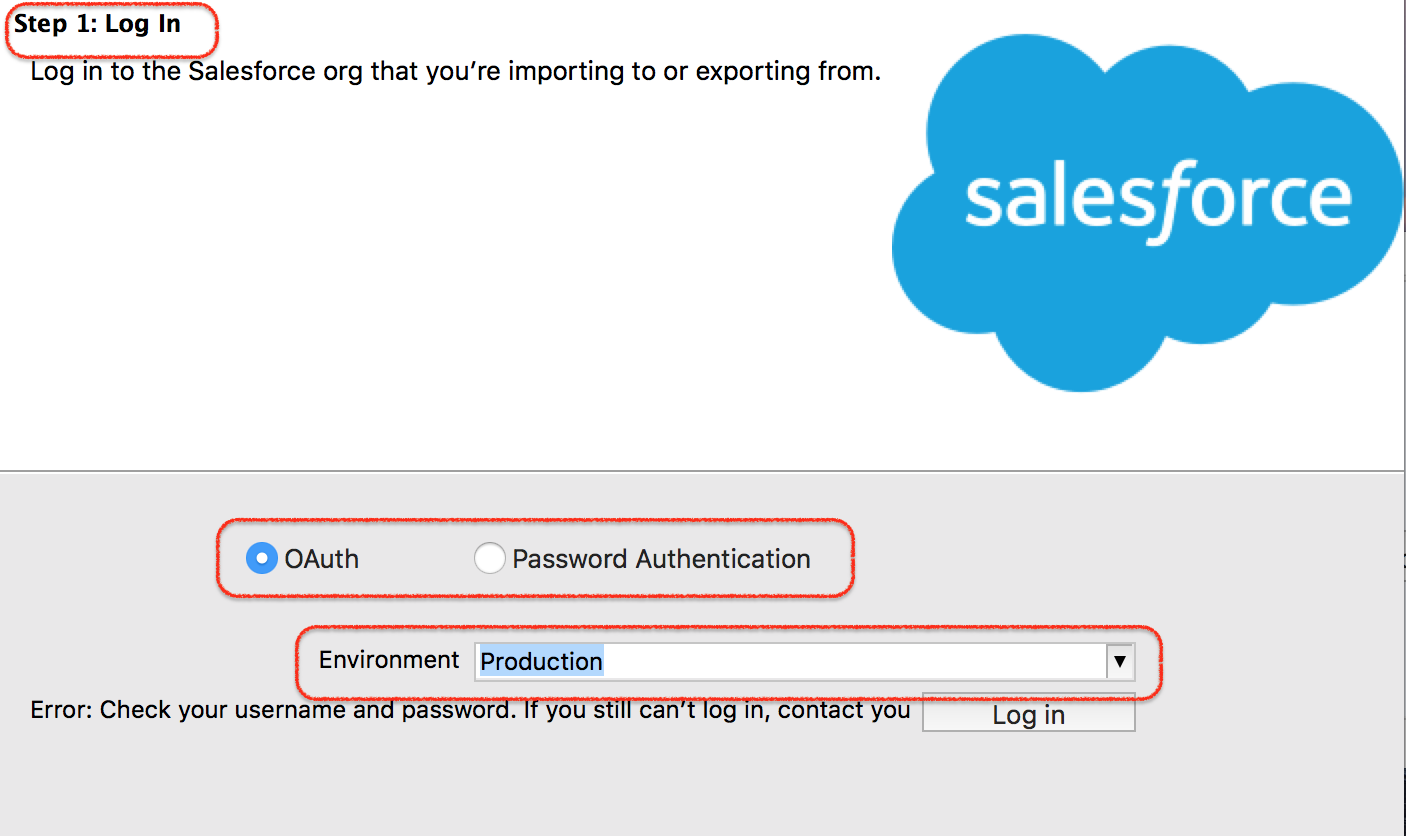
When we try to log in to Salesforce.com using Data Loader, we have two common options.
- OAuth.
- Password Authentication.
Salesforce Data Loader login through OAuth
Option 1 :- Salesforce login through OAuth.
- When we select OAuth option.
- Now select the Environment. (Production or Sandbox).
- Click on Login.
- Now a new pop window will be opened where we have to login into Salesforce.com account using username and password.
- Complete MFA or verification if your Salesforce org requires it.
- Now a verification code may be sent to your account email depending on your org settings.
- Enter verification code and click on Login if prompted.

- Click on Allow button to access as shown above.
OAuth is usually the preferred login method because it works with modern Salesforce authentication flows, including multi-factor authentication and browser-based sign-in.
Salesforce Data Loader login through password authentication
Option 2 :- Login through Password Authentication.
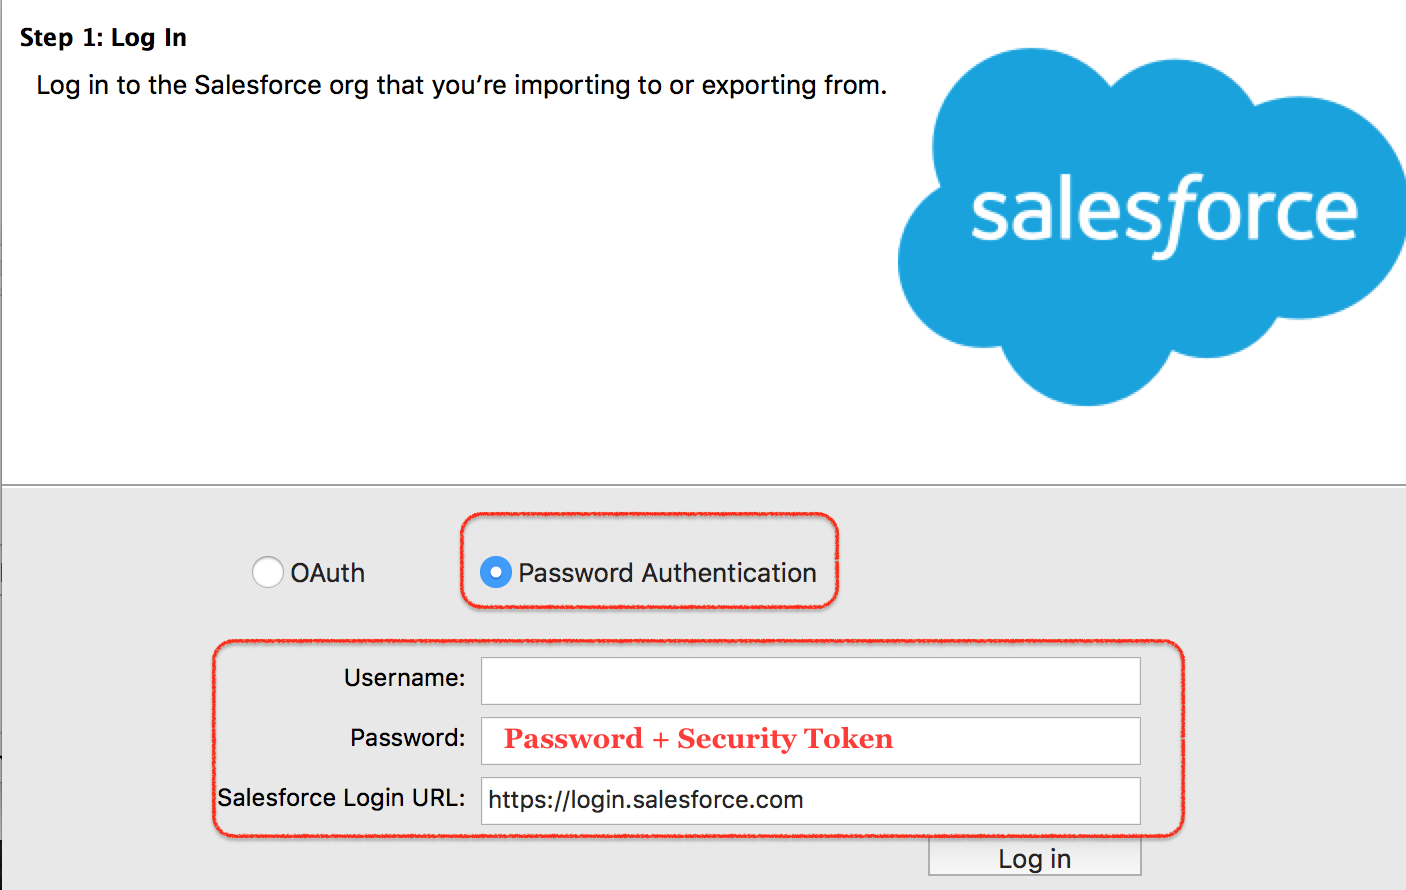
- Select password Authentication as shown above.
- Enter username and Password.
- Click on Login.
Where password is the combination of Salesforce account password and Security Token. This is commonly required when logging in from an IP address that is outside your org’s trusted network range.
- Now add Security Token after password.
Password = Password + Security Token.
Example:
Salesforce password: MyPassword
Security token: ABCDEFGHIJK12345
Data Loader password value: MyPasswordABCDEFGHIJK12345
Generating Security Token for Salesforce Data Loader
What is Security Token in Salesforce?
Security Token in Salesforce is a case-sensitive alphanumeric key that is used with a Salesforce account password to access Salesforce through API-based tools such as Data Loader. A security token is not the same as a password, and it should not be shared in email, chat, screenshots, or public documents.
How to generate Security Token?
To generate security token in Salesforce go to My Settings | Personal | Reset my security Token. In Lightning Experience, you can usually find the option from your profile menu by opening Settings and searching for Reset My Security Token.
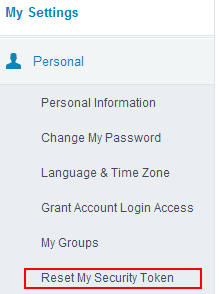
When we click on Reset my security token, an email will be sent to the email address of our account. To log in to Salesforce through password authentication, enter the Salesforce username and the password value formed by combining your Salesforce password and security token.
Salesforce Data Loader installation checklist before first data load
- Confirm that the Data Loader version is downloaded from the official Salesforce Developers page.
- Confirm that Java Runtime Environment 17 or later is installed and available to the system.
- Confirm whether you are connecting to Production or Sandbox before logging in.
- Use OAuth login when your org requires MFA or browser-based authentication.
- Check that your Salesforce profile or permission set has API access and object permissions for the records you want to load.
- Prepare a small test CSV before running a large insert, update, upsert, or delete job.
- Export backup data before mass update, delete, or hard delete operations.
- Review success and error CSV files after each Data Loader operation.
Common Salesforce Data Loader installation issues on macOS and Windows
- Java not found: Install the required JRE version and reopen Data Loader. If needed, restart the system so the Java path is available.
- Installer does not open on Windows: Extract the full downloaded package first, then run the installation file from the extracted folder.
- macOS blocks the application: Confirm the download came from Salesforce, then allow the application through macOS security settings if your organization permits it.
- Login fails with password authentication: Check whether the security token must be appended to the Salesforce password.
- Cannot access objects: Confirm object permissions, field-level security, profile settings, permission sets, and API access for the user.
- Production and sandbox confusion: Choose the correct environment on the Data Loader login screen before authentication.
Salesforce Data Loader installation FAQ
How do I install Salesforce Data Loader in macOS and Windows?
Download the latest Salesforce Data Loader from the official Salesforce Developers page, install the required Java Runtime Environment, run the installer for your operating system, open Data Loader, choose an operation, and log in to Salesforce using OAuth or password authentication.
Which Java version is required for Salesforce Data Loader?
Current Salesforce Data Loader installation documentation requires Java Runtime Environment version 17 or later. Always check the official installation guide for the exact Data Loader release you are installing.
Should I use OAuth or password authentication in Data Loader?
OAuth is usually better for normal admin use because it supports browser-based Salesforce login and modern authentication flows. Password authentication may require adding the Salesforce security token after the account password.
Why is Salesforce Data Loader asking for a security token?
Data Loader may require a security token when using password authentication from an untrusted network or when your org settings require it for API login. The token is appended directly after the Salesforce password.
Can Salesforce Data Loader be used for both production and sandbox?
Yes. On the login screen, choose the correct environment before logging in. Use Production for a live org and Sandbox for a test or development org.
Conclusion: installing Salesforce Data Loader correctly
In this Salesforce Tutorial, we learned what Salesforce Data Loader is, how to install Data Loader on macOS and Windows, what a security token is, how to generate a new security token, and how to log in using OAuth or password authentication. In our next Salesforce admin tutorial, we are going to learn about Salesforce Data loader operations.