Validation rules in salesforce | Salesforce validation rules
Validation rules in salesforce :- In our previous salesforce training tutorial we have learned about What are cross Object formulas and How to create custom cross object formula in Salesforce. In this Salesforce Tutorial we are going to learn about Validation Rules in Salesforce.
Validation rules in Salesforce help admins protect data quality before a record is saved. A validation rule checks a formula condition. When the formula returns True, Salesforce stops the save and displays the configured error message so the user can correct the record.
What is a Validation Rule in Salesforce?
A validation rule in Salesforce is a formula-based rule that evaluates record data and returns either True or False. The formula should describe the invalid condition. If the invalid condition is true, the record is blocked from saving. If it is false, the validation rule allows the save to continue.
- A validation rule contains a formula expression.
- It evaluates the data entered by the user or updated by automation.
- Validation Rule displays error message to user when the enter invalid values.
- We can create Validation rules in Salesforce for Objects, fields, campaign members etc.
Examples of validation Rules.
- Quantity cannot be Negative.
- A field to hold only certain values.
- Zip code, phone number to entered in certain format.
How Salesforce validation rule formulas block invalid record values
The most important point is that a Salesforce validation rule formula should return true only for the data that is not allowed. For a Quantity field, the invalid condition is that Quantity is less than zero.
Quantity__c < 0If the Quantity value is -50, the formula returns true and Salesforce shows the error message. If the Quantity value is 10, the formula returns false and the validation rule does not block the save.
Validation rule use cases for Salesforce data quality
Validation rules are useful when a business rule must be enforced every time a record is created or updated. They are commonly used for number limits, required fields by stage, date checks, format checks, and picklist-based conditions.
- Number range checks: Quantity, discount, age, or amount should not cross an allowed range.
- Required values by status: A field must be filled when a record reaches a specific stage or status.
- Format checks: Phone numbers, postal codes, employee IDs, and account numbers must follow a known format.
- Date checks: A start date, end date, or close date must be earlier or later than another date.
- Picklist checks: A value is allowed only when another field has a matching value.
For official reference, Salesforce provides documentation on field validation, and Trailhead provides a guided module called Get Started with Validation Rules.
Let us check with out applying a Validation Rules to Quantity field in Sample Object.
In Sample object we have a field called Quantity. Let us create a record in Samples and enter the quantity value as negative.
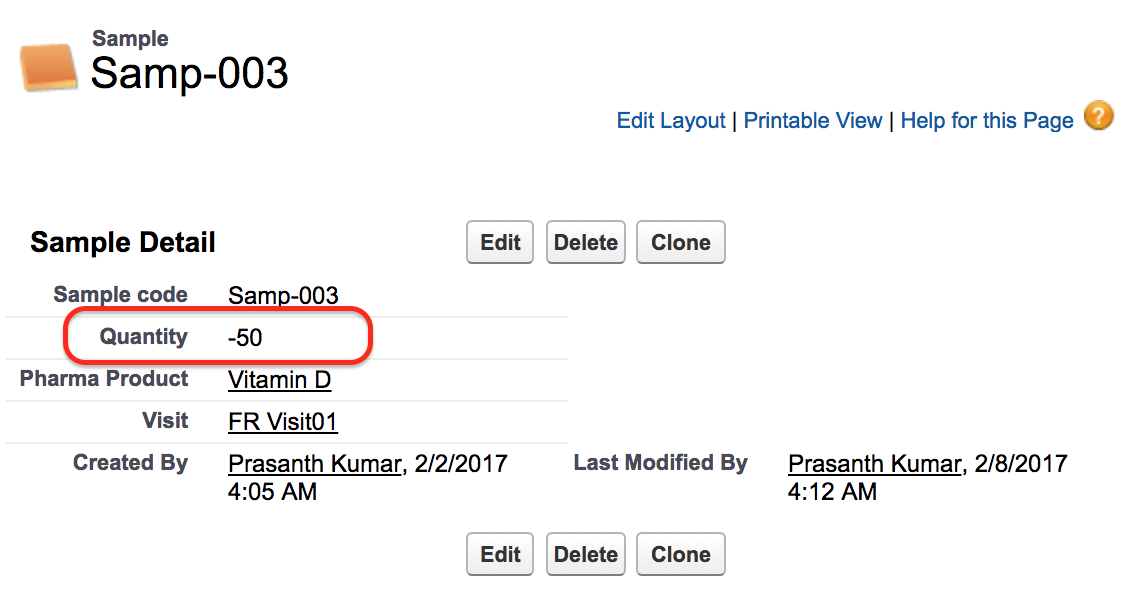
As shown above the quantity field is -5o. In general the quantity field must not be negative. In this case we have to apply validation rules. When ever a user enters negative value for a field Quantity then a error message must be displayed to Enter a positive value. Here we have to restrict user by entering negative value.
How to create Validation rules in salesforce?
To create validation rules in salesforce go to Setup | Build | Create | Objects | Sample | Validation Rules.
In Salesforce Lightning Experience, the common path is Setup | Object Manager | Sample | Validation Rules | New. The older setup path shown in this tutorial points to the same object-level validation rule area.

- Click on new Button to create new validation rule in Sample object.
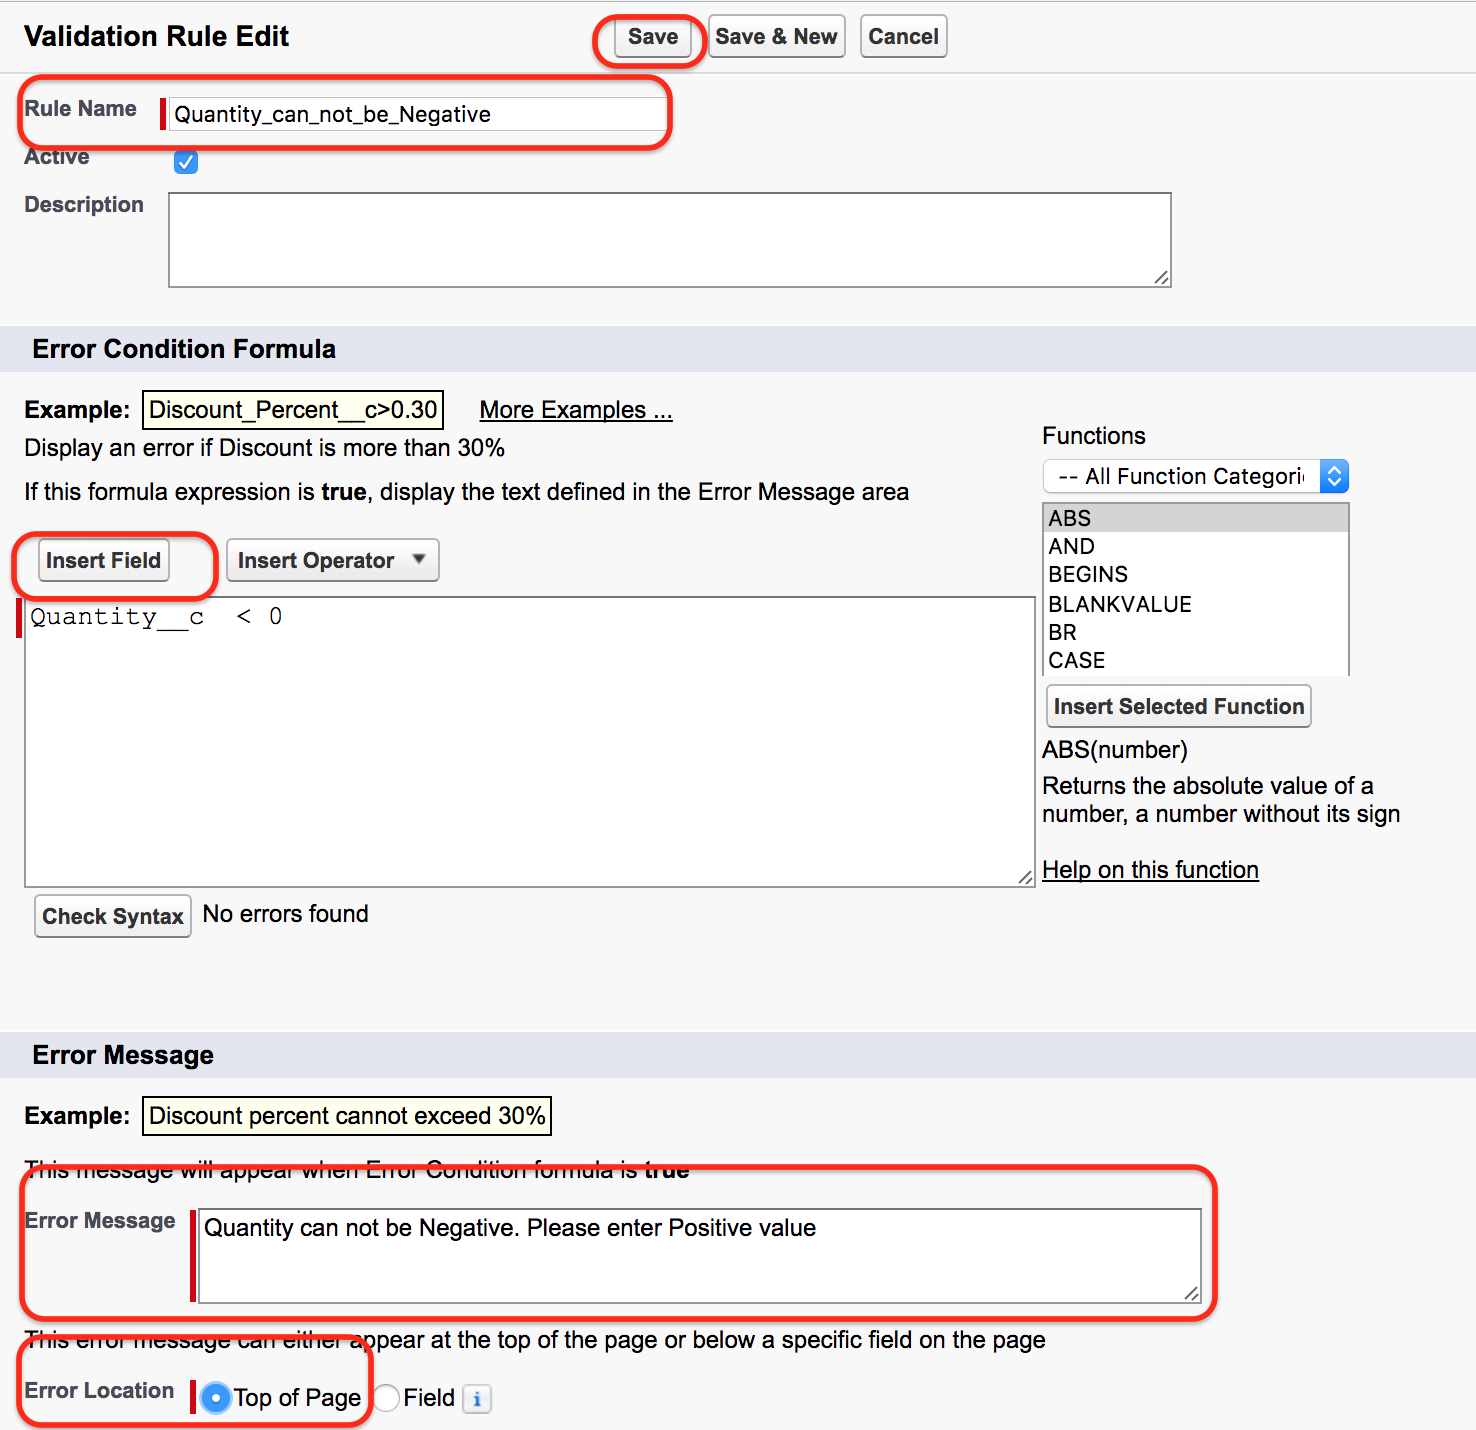
- Enter Rule Name.
- Click on Insert field and enter the syntax.
- Check Syntax whether it has any errors or not.
- Enter Error message.
- Enter Error location.
- Now click on Save button.
Recommended formula and error message for a negative Quantity validation rule
For the Sample object example, use a clear rule name and a direct error message. The exact API name of the field depends on your org. If the field is a custom field, the API name usually ends with __c.
Rule Name: Quantity_Must_Not_Be_Negative
Error Condition Formula:
Quantity__c < 0

Error Message:
Quantity must be zero or a positive value.
Place the error message near the Quantity field when possible. Field-level error placement is easier for users because they can immediately see which value needs correction.
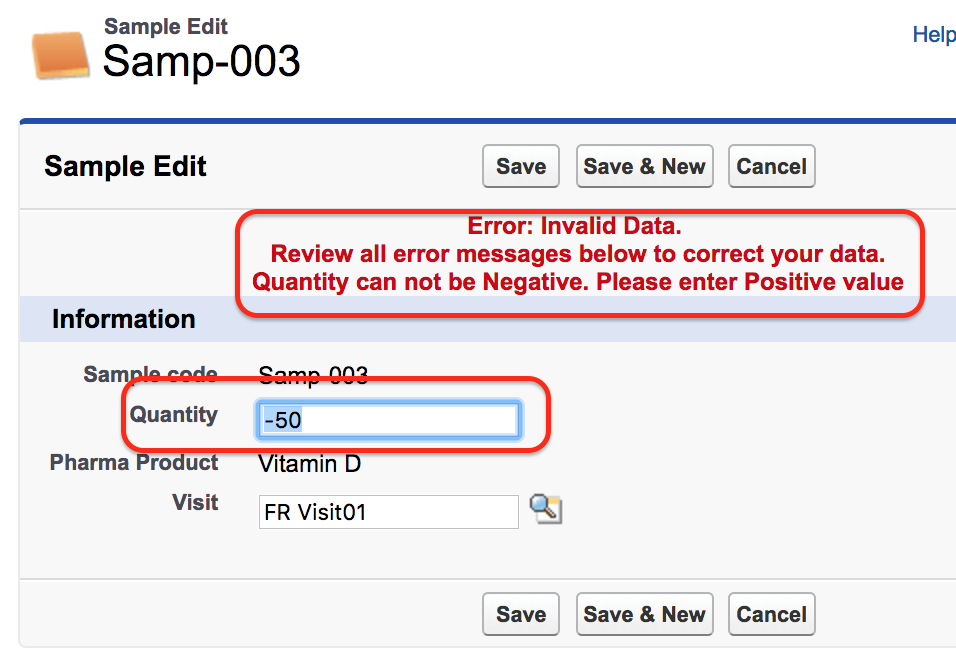
After creating Validation rule in Salesforce we can not enter negative value for Quantity. If we enter negative value an error message will be displayed at the top of the page as shown above. The record will only get saved when a quantity field is positive value.
Testing the Salesforce validation rule after saving it
After saving a validation rule, test both invalid and valid records. This confirms that the rule blocks only the unwanted value and does not prevent users from saving correct records.
- Create or edit a Sample record and enter a negative Quantity value such as
-5. - Click Save and confirm that the validation rule error message appears.
- Change Quantity to
0or a positive number and confirm that the record can be saved. - Test a blank value if the field is not required, because blank handling may need a separate formula condition.
Useful Salesforce validation rule formula patterns
The following examples show common validation rule patterns. Replace the field API names with the field names from your Salesforce object.
/* Require Reason__c when Status__c is Closed */
AND(
  ISPICKVAL(Status__c, "Closed"),
  ISBLANK(Reason__c)
)

/* Close Date cannot be in the past */
CloseDate < TODAY()

/* Discount cannot be greater than 30 percent */
Discount__c > 0.30

/* Phone must contain exactly 10 digits when entered */
AND(
  NOT(ISBLANK(Phone)),
  NOT(REGEX(Phone, "^[0-9]{10}$"))
)
Keep formulas as simple as possible. A validation rule should explain one clear restriction. If a rule becomes difficult to read, split it into separate rules with separate error messages.
How to Activate / Inactivate a validation Rule?
A validation rule in Salesforce can be activated or Inactivated. To de activate Salesforce validation rules follow the steps given below.
Go to Object | Validation Rule | Edit the Validation Rule.

- Click on Edit Button.
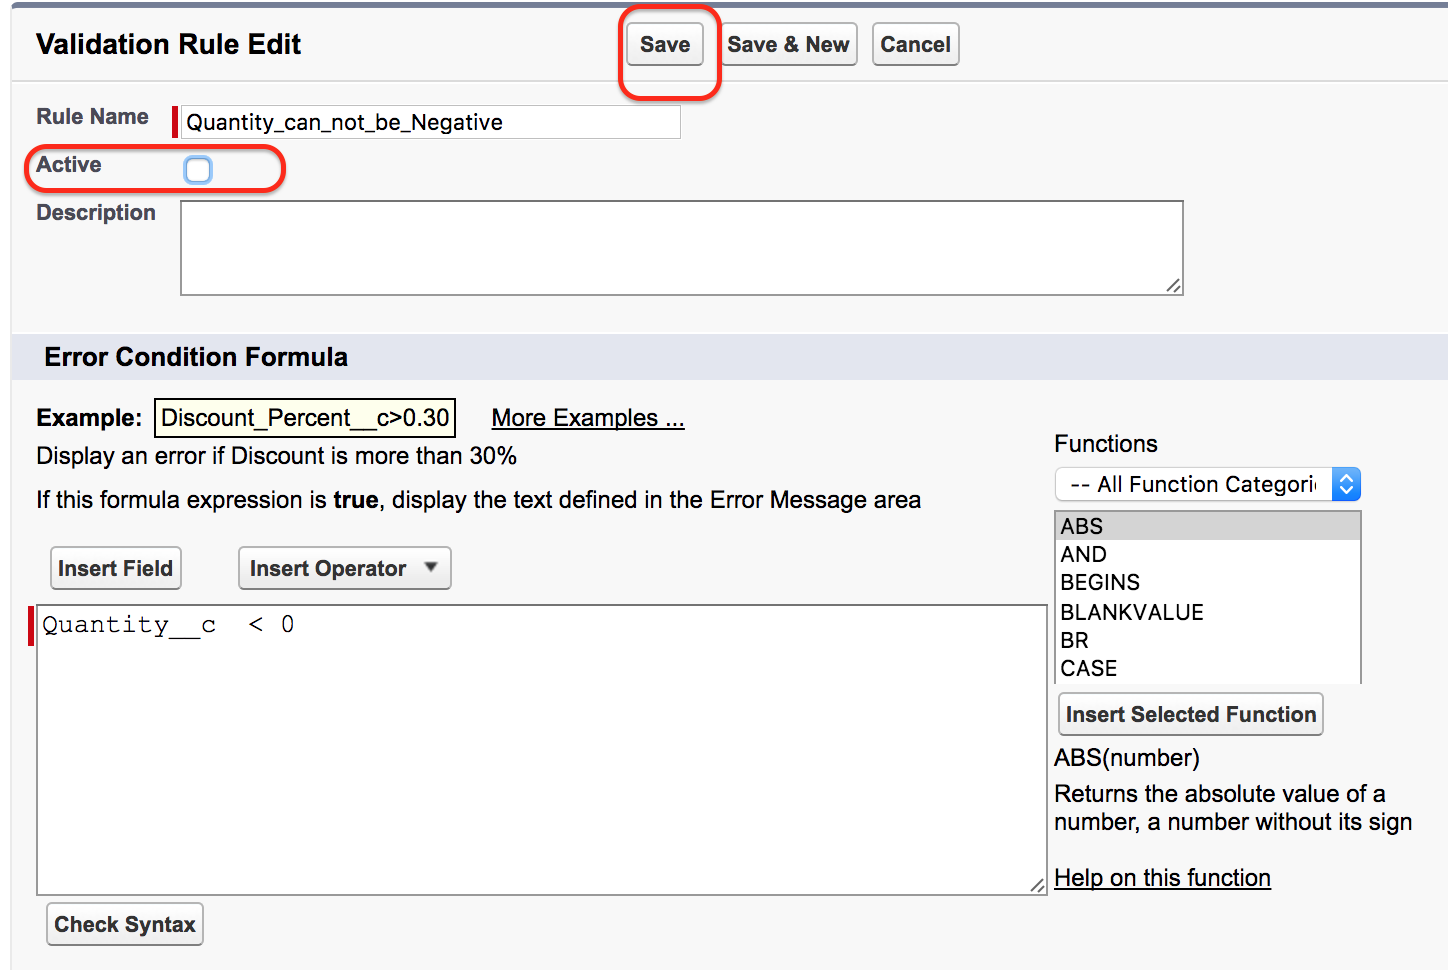
- Uncheck the active Button to deactivate Validation rule in Salesforce
- Finally click on Save button.
When to deactivate a Salesforce validation rule safely
Do not deactivate a validation rule without checking why it exists. A temporary deactivation may be needed for a controlled data load, migration, or correction job, but the rule should be reactivated after the work is complete if the business requirement still applies.
- Record the reason for deactivating the validation rule.
- Confirm which users, integrations, or data loads are affected.
- Run the update in a sandbox first when the data is important.
- Reactivate the rule after the exception is complete.
- Test one invalid record again after reactivation.
Validation rules, automation, and order of execution in Salesforce
Validation rules are part of the record save process. If a user, flow, integration, or Apex code tries to save a value that violates an active validation rule, the save can fail. This is why validation rules should be written with automation in mind, not only with page layout users in mind.
- If a flow updates a field, check whether the new value can violate a validation rule.
- If an integration loads records, confirm that the incoming data satisfies required validation rules.
- If an admin changes a picklist value, review validation rules that reference that picklist.
- If a validation rule is added to an existing object, test old records that may contain older data patterns.
For metadata-level reference, Salesforce provides documentation for ValidationRule metadata, which is useful when validation rules are deployed through metadata tools.
Common mistakes while creating validation rules in Salesforce
- Writing the formula for the valid case: The formula should return true for the invalid condition, not for the allowed condition.
- Forgetting blank values: Decide whether blank values should pass or fail, then include
ISBLANKorNOT(ISBLANK())where needed. - Using unclear error messages: Tell the user exactly what value must be corrected.
- Putting all checks in one large formula: Separate unrelated checks so users receive a precise message.
- Not testing automation: A rule that works for manual entry can still block flows, imports, or integrations.
QA checklist for Salesforce validation rules tutorial review
- Confirm that the tutorial explains that a validation rule blocks saving only when the formula returns true.
- Check that the Quantity example uses the correct custom field API name for the target org.
- Verify that the error message tells users how to correct the invalid Quantity value.
- Confirm that the steps include rule name, formula, syntax check, error message, error location, and activation status.
- Test both negative and non-negative Quantity values after the validation rule is active.
- Review any flow, import, or integration that may save records affected by the validation rule.
FAQs on validation rules in Salesforce
What happens when a Salesforce validation rule formula returns true?
When a validation rule formula returns true, Salesforce treats the record as invalid, blocks the save, and displays the configured error message.
Can a Salesforce validation rule make a field required only in one status?
Yes. A validation rule can require a field only when another field has a specific value, such as requiring a reason when the status is Closed.
Where should the Salesforce validation rule error message appear?
Use field-level placement when the error is related to one field, such as Quantity. Use page-level placement when the rule depends on multiple fields and no single field is responsible.
Can validation rules affect Salesforce data imports and integrations?
Yes. Active validation rules can block records saved through imports, integrations, flows, or Apex if the saved values violate the rule condition.
What is the simplest validation rule for a negative Quantity field?
The simplest formula is Quantity__c < 0, assuming Quantity__c is the API name of the Quantity field in your Salesforce org.
Conclusion on creating validation rules in Salesforce
Validation rules in Salesforce are a direct way to protect data quality at the object level. In this tutorial, we used a Quantity field example to stop users from saving negative values, added a clear error message, and reviewed how to activate or deactivate the rule. The same approach can be used for date checks, format checks, required fields by status, and other business rules that must be enforced before a record is saved.